Making a Game Part 5: Dangerous World
2014-07-11
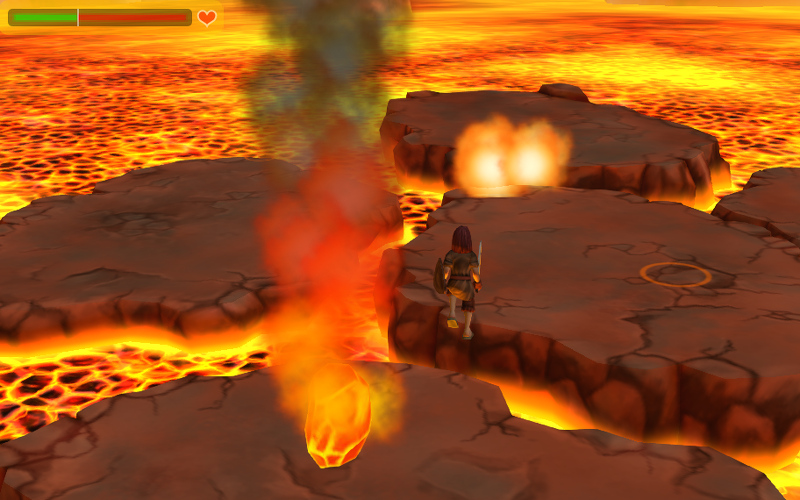
We continue the exciting process of creating a mini Blend4Web game. Now we'll introduce some gameplay elements: red-hot rocks which fall from the sky and damage the character.
New objects in the Blender scene
Lets prepare new game objects in the blend/lava_rock.blend file:
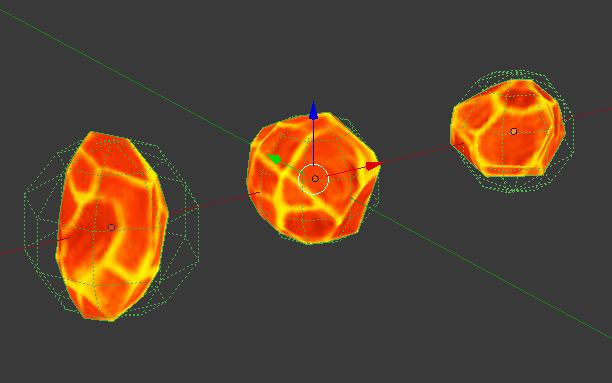
1) There are 3 sorts of falling rocks: rock_01, rock_02, rock_03.
2) Smoke tails for these rocks - 3 identical particle system emitters, parented to the rock objects: smoke_emitter_01, smoke_emitter_02, smoke_emitter_03.
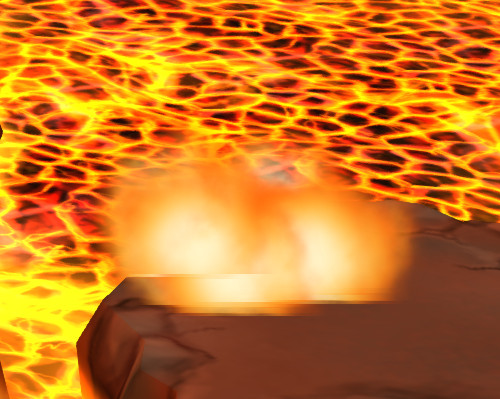
3) Particle systems for the rock explosions: burst_emitter_01, burst_emitter_02, burst_emitter_03.
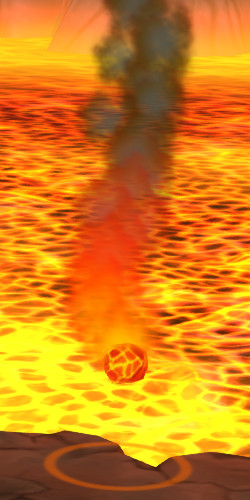
4) Markers that appear under the falling rocks: mark_01, mark_02, mark_03.
We'll describe the creation of these objects in one of the next articles.
For convenience, lets put all these objects into a single group lava_rock and link this group to the main file game_example.blend. Then we double the number of all the objects on the scene - by copying the empty object with the duplication group. As a result we obtain a pool of 6 falling rocks, which we'll access by the names of the two empty objects - lava_rock and lava_rock.001.
Health bar
Lets add four HTML elements to render the health bar.
<div id ="life_bar">
    <div id ="life_bar_main"></div>
    <div id ="life_bar_green"></div>
    <div id ="life_bar_red"></div>
    <div id ="life_bar_mid"></div>
</div>

These elements will move when our character receives damage. The corresponding style descriptions have been added to the game_example.css file.
Constants and variables
First of all lets initialize some new constants for gameplay tweaking and also a global variable for character hit points:
var ROCK_SPEED = 2;
var ROCK_DAMAGE = 20;
var ROCK_DAMAGE_RADIUS = 0.75;
var ROCK_RAY_LENGTH = 10;
var ROCK_FALL_DELAY = 0.5;

var LAVA_DAMAGE_INTERVAL = 0.01;

var MAX_CHAR_HP = 100;

var _character_hp;

var _vec3_tmp = new Float32Array(3);
The _vec3_tmp typed array is created for storing intermediate calculation results in order to reduce the JavaScript garbage collector load.
Lets set the _character_hp value to MAX_CHAR_HP in the load_cb() function - our character is in full health when the game starts.
_character_hp = MAX_CHAR_HP;
Falling rocks - initialization
The stack of function calls now looks like this:
var elapsed_sensor = m_ctl.create_elapsed_sensor();

setup_movement(up_arrow, down_arrow);
setup_rotation(right_arrow, left_arrow, elapsed_sensor);
setup_jumping(touch_jump);

setup_falling_rocks(elapsed_sensor);
setup_lava(elapsed_sensor);

setup_camera();
For performance reasons, elapsed_sensor is initialized only once and passed as argument to the functions.
Lets look at the new function for setting up the rock falling:
function setup_falling_rocks(elapsed_sensor) {

    var ROCK_EMPTIES = ["lava_rock","lava_rock.001"];
    var ROCK_NAMES = ["rock_01", "rock_02", "rock_03"];

    var BURST_EMITTERS_NAMES = ["burst_emitter_01", "burst_emitter_02",
                                "burst_emitter_03"];

    var MARK_NAMES = ["mark_01", "mark_02", "mark_03"];

    var falling_time = {};

    ...
}
The first thing we see is the population of arrays with names of falling rocks and related objects. The falling_time dictionary serves for tracking the time passed after every rock had started falling.
Falling rocks - sensors
Lets set up sensors to describe the behavior of each falling rock within the double loop:
for (var i = 0; i < ROCK_EMPTIES.length; i++) {

    var dupli_name = ROCK_EMPTIES[i];

    for (var j = 0; j < ROCK_NAMES.length; j++) {

        var rock_name  = ROCK_NAMES[j];
        var burst_name = BURST_EMITTER_NAMES[j];
        var mark_name  = MARK_NAMES[j];

        var rock  = m_scs.get_object_by_dupli_name(dupli_name, rock_name);
        var burst = m_scs.get_object_by_dupli_name(dupli_name, burst_name);
        var mark  = m_scs.get_object_by_dupli_name(dupli_name, mark_name);

        var coll_sens_lava = m_ctl.create_collision_sensor(rock, "LAVA", true);
        var coll_sens_island = m_ctl.create_collision_sensor(rock, "ISLAND", true);

        var ray_sens = m_ctl.create_ray_sensor(rock, [0, 0, 0],
                                    [0, -ROCK_RAY_LENGTH, 0], false, null);

        m_ctl.create_sensor_manifold(rock, "ROCK_FALL", m_ctl.CT_CONTINUOUS,
                                     [elapsed_sensor], null, rock_fall_cb);

        m_ctl.create_sensor_manifold(rock, "ROCK_CRASH", m_ctl.CT_SHOT,
                                     [coll_sens_island, coll_sens_lava],
                function(s){return s[0] || s[1]}, rock_crash_cb, burst);

        m_ctl.create_sensor_manifold(rock, "MARK_POS", m_ctl.CT_CONTINUOUS,
                                    [ray_sens], null, mark_pos_cb, mark);

        set_random_position(rock);
        var rock_name = m_scs.get_object_name(rock);
        falling_time[rock_name] = 0;
    }
}
The external loop iterates through dupli-groups (remember - there are just two of them). The inner loop processes the rock objects, explosion particle systems (burst) and markers. It's not required to process the smoke tail particle systems because they are parented to the falling rocks and follow them automatically.
The coll_sens_lava and coll_sens_island sensors detect collisions of the rocks with the lava surface and the ground. The third create_collision_sensor() function argument means that we want to receive the collision point coordinates inside the callback.
The ray_sens sensor detects the distance between the falling rock and the object under it, and is used to place the marker. The created ray starts at the [0,0,0] object coordinates and ends 10 meters beneath it. The last argument - null - means that collisions will be detected with any objects regardless of their collision_id.
Falling rocks - sensor manifolds
Then we use the sensor model that we learned in the prevoius articles. Three sensor manifolds are formed with the just created sensors: ROCK_FALL is responsible for rock falling, ROCK_CRASH processes impacts with the ground and the lava, and MARK_POS places the marker under the rock.
Also lets randomly position the rock at some height with the set_random_position() function:
function set_random_position(obj) {
    var pos = _vec3_tmp;
    pos[0] = 8 * Math.random() - 4;
    pos[1] = 4 * Math.random() + 2;
    pos[2] = 8 * Math.random() - 4;
    m_trans.set_translation_v(obj, pos);
}
The last but not least - the time for tracking the rock falling is initialized to zero in the falling_time dictionary:
falling_time[rock_name] = 0;
The rock names are used as keys in this object. These names are unique despite the fact that several identical objects are present in the scene. The thing is that in Blend4Web the resulting name of an object, which is linked using a duplication group, is composed from the group name and the original name of the object, e.g. lava_rock.001*rock_03.
Callback for the falling time
The rock_fall_cb() callback is as follows:
function rock_fall_cb(obj, id, pulse) {
    var elapsed = m_ctl.get_sensor_value(obj, id, 0);
    var obj_name = m_scs.get_object_name(obj);
    falling_time[obj_name] += elapsed;

    if (falling_time[obj_name] <= ROCK_FALL_DELAY)
        return;

    var rock_pos = _vec3_tmp;
    m_trans.get_translation(obj, rock_pos);
    rock_pos[1] -= ROCK_SPEED * elapsed;
    m_trans.set_translation_v(obj, rock_pos);
}
The falling time is incremented by elapsed value which has been retrieved from the current value of the elapsed time sensor. There is a small delay before the rock starts falling (ROCK_FALL_DELAY). This delay allows the physics engine - which runs asynchronously in an independent Web Worker - to correctly detect the height of the object when it starts falling. Later it will help us to place the marker nicely below the rock.
The current rock coordinates are saved into the rock_pos variable. Then its Y coordinate is changed by the ROCK_SPEED * elapsed value, and the object is set into a new position. To make things easier we used a linear motion model (without gravity acceleration).
Callback for impacts
The following callback is executed for rock impacts:
function rock_crash_cb(obj, id, pulse, burst_emitter) {
    var char_pos = _vec3_tmp;

    m_trans.get_translation(_character, char_pos);

    var sensor_id = m_ctl.get_sensor_value(obj, id, 0)? 0: 1;

    var collision_pt = m_ctl.get_sensor_payload(obj, id, sensor_id);
    var dist_to_rock = m_vec3.distance(char_pos, collision_pt);

    m_trans.set_translation_v(burst_emitter, collision_pt);
    m_anim.set_current_frame_float(burst_emitter, 0);
    m_anim.play(burst_emitter);

    set_random_position(obj);

    if (dist_to_rock < ROCK_DAMAGE_RADIUS)
        reduce_char_hp(ROCK_DAMAGE);

    var obj_name = m_scs.get_object_name(obj);
    falling_time[obj_name] = 0;
}
In this function the last parameter burst_emitter is a particle system object which we passed upon registration of the sensor manifolds.
Using the sensor_id value we detect the exact sensor which triggered the callback execution. The 0 value corresponds to collisions with the ground while the 1 value - with the lava surface. The collision point coordinates can be obtained with the following method:
var collision_pt = m_ctl.get_sensor_payload(obj, id, sensor_id);
The explosion particle system emitter (burst_emitter) is placed into the collision point and then its animation is started.
After that the stone is randomly positioned at some height to be ready for a new voyage.
With respect to the new character position (char_pos) we calculate the distance to the collision point - dist_to_rock. If the character is near enough to the collision point, its life points decrease:
if (dist_to_rock < ROCK_DAMAGE_RADIUS)
    reduce_char_hp(ROCK_DAMAGE);
We'll look at the function for decreasing life points a bit later. Now we end by zeroing the falling time for this rock, just to guarantee the next falling iteration:
falling_time[obj_name] = 0;
Callback for the marker under the rock
To help the player avoid the falling rocks we'll place special markers on the surface for them. Lets look at the callback code:
function mark_pos_cb(obj, id, pulse, mark) {
    var mark_pos = _vec3_tmp;
    var ray_dist = m_ctl.get_sensor_payload(obj, id, 0);
    var obj_name = m_scs.get_object_name(obj);

    if (falling_time[obj_name] <= ROCK_FALL_DELAY) {
        m_trans.get_translation(obj, mark_pos);
        mark_pos[1] -= ray_dist * ROCK_RAY_LENGTH - 0.01;
        m_trans.set_translation_v(mark, mark_pos);
    }

    m_trans.set_scale(mark, 1 - ray_dist);
}
We save the distance to the ground in the ray_dist variable. The marker is positioned before the rock had started its motion (ROCK_FALL_DELAY seconds). Please note how the marker moves relative to the rock:
mark_pos[1] -= ray_dist * ROCK_RAY_LENGTH - 0.01;
The ROCK_RAY_LENGTH multiplier is required here, because ray_dist is a relative length of the ray segment (from 0 to 1), while its real length is 10 meters. To order to lift the marker a bit above the ground surface, 0.01 is subtracted.
While the stone is falling the marker increases in size linearly. The last line of the callback is responsible for it:
m_trans.set_scale(mark, 1 - ray_dist);
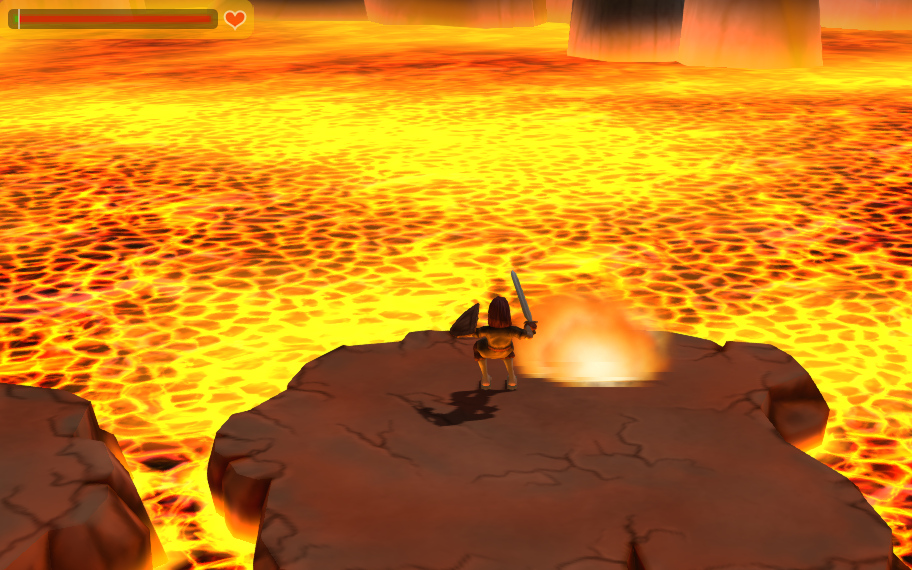
As a result we observe the falling of red-hot rocks:
Damage from lava
If the character touches the lava its life point will decrease with time. The setup_lava() function is compact enough for its code to be listed in whole:
function setup_lava(elapsed_sensor) {
    var time_in_lava = 0;

    function lava_cb(obj, id, pulse, param) {
        if (pulse == 1) {

            var elapsed = m_ctl.get_sensor_value(obj, id, 1);
            time_in_lava += elapsed;

            if (time_in_lava >= LAVA_DAMAGE_INTERVAL) {

                if (elapsed < LAVA_DAMAGE_INTERVAL)
                    var damage = 1;
                else
                    var damage = Math.floor(elapsed/LAVA_DAMAGE_INTERVAL);

                reduce_char_hp(damage);
                time_in_lava = 0;
            }
        } else {
            time_in_lava = 0;
        }
    }

    var lava_ray = m_ctl.create_ray_sensor(_character, [0, 0, 0], [0, -0.25, 0],
                                           false, "LAVA");

    m_ctl.create_sensor_manifold(_character, "LAVA_COLLISION",
        m_ctl.CT_CONTINUOUS, [lava_ray, elapsed_sensor],
        function(s) {return s[0]}, lava_cb);

}
The lava_ray sensor is a ray with a length of 0.25 (a bit bigger than half of the character's height), which is directed down from the character center. The LAVA_COLLISION sensor manifold is created based on it and elapsed_sensor. We calculate whether to decrease the character life points based on the time it has spent in the lava (time_in_lava). The rate of hit points decreasing can be tweaked with the LAVA_DAMAGE_INTERVAL constant. If the character remains in the lava for this period of time, it loses 1 HP. If, on the other hand, the delay between frames is larger than the specified interval, the damage is calculated as follows:
var damage = Math.floor(elapsed/LAVA_DAMAGE_INTERVAL);
The in-lava time is reset in two cases: if the character receives damage from the lava or if it gets out of it. Then it accumulates again until the LAVA_DAMAGE_INTERVAL value is reached.
Hit points
When we processed the rocks and the lava we used the reduce_char_hp() function. Now lets look at what it is:
function reduce_char_hp(amount) {

    if (_character_hp <= 0)
        return;

    _character_hp -= amount;

    var green_elem = document.getElementById("life_bar_green");
    var red_elem = document.getElementById("life_bar_red");
    var mid_elem = document.getElementById("life_bar_mid");

    var hp_px_ratio = 192 / MAX_CHAR_HP;
    var green_width = Math.max(_character_hp * hp_px_ratio, 0);
    var red_width = Math.min((MAX_CHAR_HP - _character_hp) * hp_px_ratio, 192);

    green_elem.style.width =  green_width + "px";
    red_elem.style.width =  red_width + "px";
    mid_elem.style.left = green_width + 19 + "px";

    if (_character_hp <= 0)
        kill_character();
}
First of all this function reduces the _character_hp global variable value. Second, the health bar HTML elements are changed: for the life_bar_green element its width is decreased, for the life_bar_red element - increased, and the life_bar_mid element is placed between them.
If the hit points reach zero the kill_character() function is called:
function kill_character() {
    m_anim.apply(_character_body, "character_death");
    m_anim.play(_character_body);
    m_anim.set_behavior(_character_body, m_anim.AB_FINISH_STOP);
    m_phy.set_character_move_dir(_character, 0, 0);
    m_ctl.remove_sensor_manifolds(_character);
}
The death of the character is accompanied by the "character_death" animation which is played back in the m_anim.AB_FINISH_STOP mode - i.e. the animation is not looped. Then we stop the character and remove all its existing sensor manifolds.
Conclusion
Now we have something which really resembles a game! You can always make the game more complicated by adding more rocks or increasing their speed and damage.
In one of the next articles we will take a closer look at the models and materials used for this tutorial.
Link to the standalone application
The source files of the application and the scene are included to the free Blend4Web SDK distribution.
Changelog
[2014-07-11] Initial release.
[2014-07-22] Path to the application changed.