Making a Game Part 9. A Tale with Meaning
2015-03-03
It seems a bit pointless to just jump from island to island trying to avoid falling rocks and collecting some bonuses, don't you think? Now it's time to add some tasks for our main character so that he has something to do in this harsh and ruthless world. But first and foremost, this article is specifically for describing the creation of real enemies, with which our player will have to engage in a fierce fight!

Golem born in lava.
Golem's Creation
The main enemy on this level is a fire golem. Before we started working on 3D, our concept artist had drawn this concept with several views of the modeled object.

Concept made by the artist.
With the help of these concepts and as a result of modeling we got the following geometry. Since the beginning it has been done in low-poly because it wasn't planned to bake normal-maps or some other textures.

Golem's geometry and concept comparison.

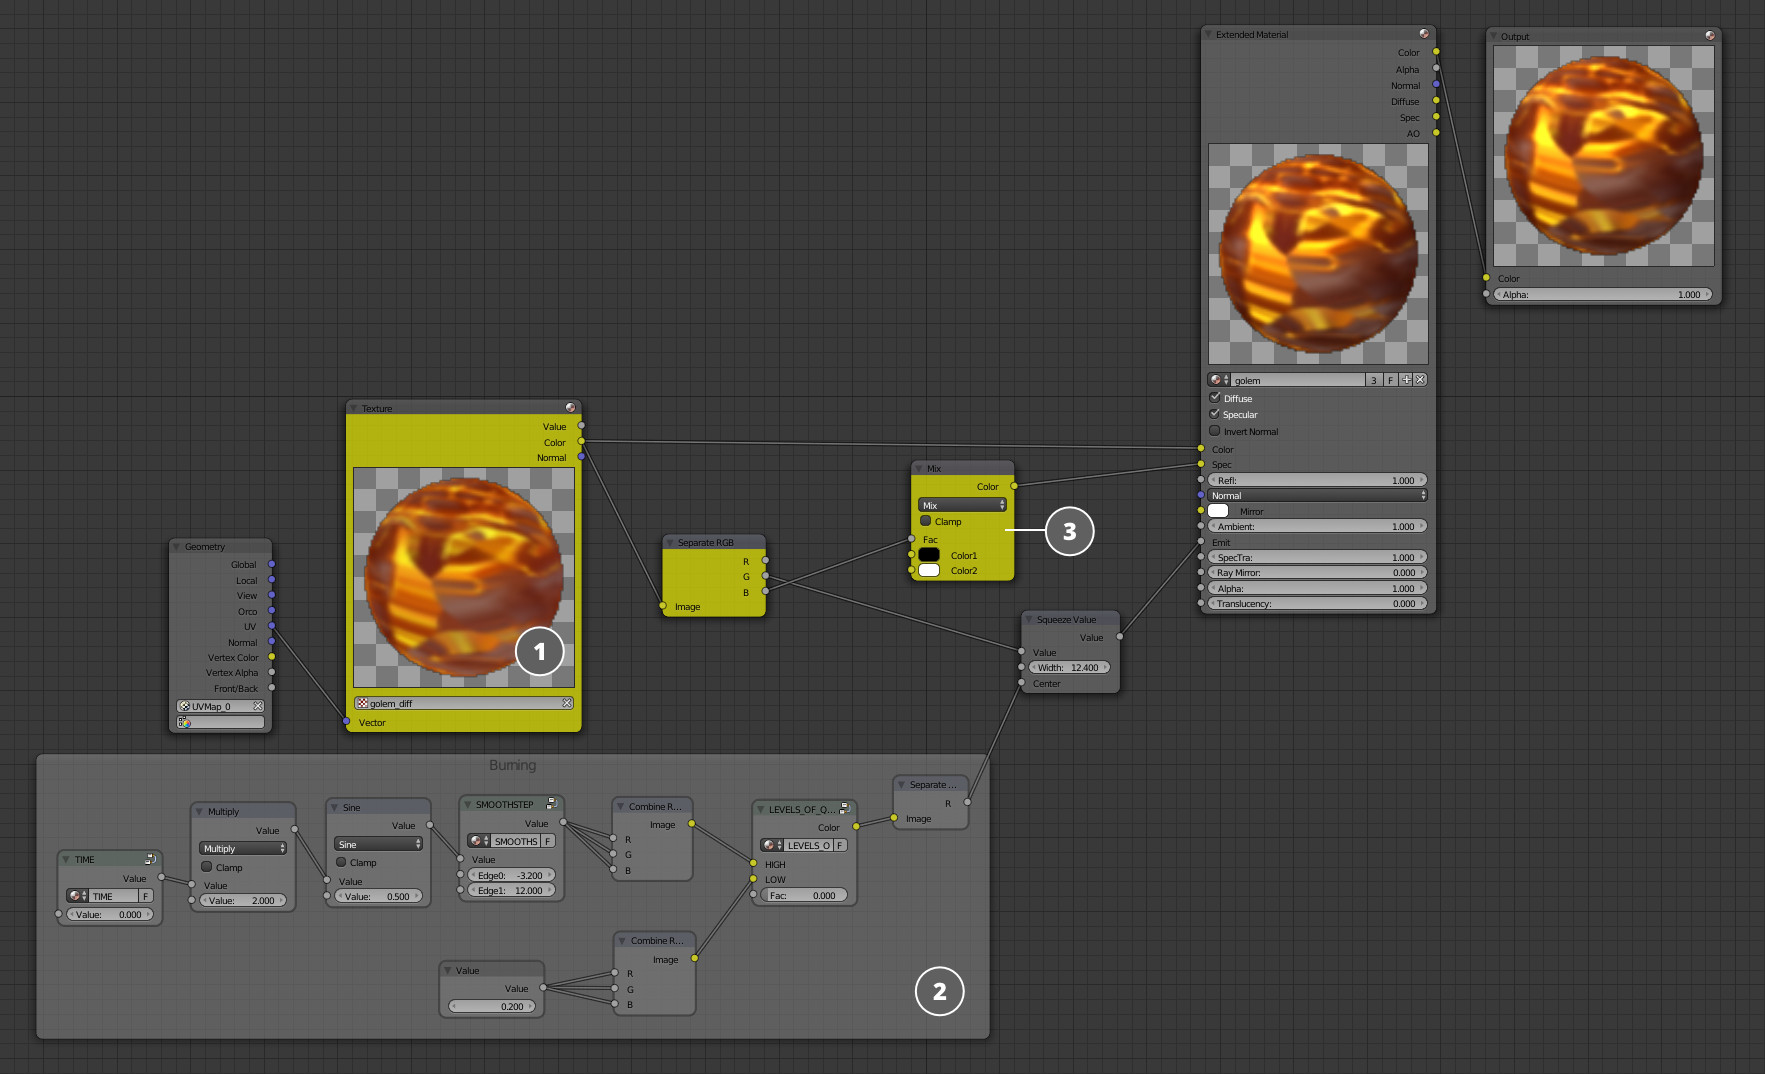
Setting up a material for golem's texture bake.
In order to save time on the draft texture creation, the concept (2) was projected to the geometry with four different angles (1). Then, it was combined inside a material with the help of special mask (3).

Progressive texturing using masks.
After several improvements near the seams, the texture was ready for use in the export material.
Material, Special Effects and Animation
Golem's export material.
Golem's material consists of the previously baked diffuse texture (1) and a slight burning effect (2), made with the help of a Time node to simulate the existence of his internal heat. The specular map is generated (3) from the diffuse texture on the fly.

Particle system geometry for golem's smoking effect (marked with light green).
The golem must emit smoke as it is burning from the inside. An additional geometry for the particle system is created in order to achieve this.

Setting up golem's smoke particle system.
A bone from the golem's rib cage is set as a Parent object in the particle system geometry settings. This will make the particle system take into account character skeletal animation.

Relations settings for the particle system geometry.
It is worth paying attention to the Rotation section in the particle system settings. There is randomization added to the rotation of the particles. In the Blend4Web settings World is choosen as the coordinate system. This will give a more realistic result in dynamics. The material is similar to the smoke material of rocks. You can look at it in one of the previous articles.

Golem's animation with the particle system in Blender.
As for animation, in order to diversify golem's behavior, apart from typical walk and idle animations there were three attack animations added, as well as a pretty complex animation of golem's getting out of the lava. As for death animation we had to complicate the whole process.

Golem is breaking apart into several pieces after his death.
Golem's Death
It required making a special geometry based on the golem's geometry cut into several parts in order to create an effect of the golem being broken into pieces. The material used was the same.

Golem's separate parts scattering to the sides.
Actually, in order to create the breakage animation there were two copies of such geometry made. The first is an object with armature - this geometry will be used in the game. The second one has the physics Rigid Body setup, where each of golem's parts is an independent object.

Setting up a physics simulation for the golem's parts.
To simulate golem's falling apart it is required to make physic's Rigid Body setup on each of its parts as show in the image. Also, it is needed to make a substrate for their falling (it may be a simple rectangular).

Golem's geometry created specially for the breaking into pieces animation.
The geometry, on which a physics simulation will be moved, has a skeletal system with the number of bones equal to the number of parts geometry being broken into. Each bone should influence only one of golem's parts with the help of vertex groups.
In order to move physics simulation to the skeletal animation it is required to put Copy Location and Copy Rotation constraints on every armature bone. A corresponding golem's part must be set as a Target object for each bone. Thus, a bone inherits all the physically simulated moves with the help of constraints.

Setting up the particle system constraints for baking.
Now we need to re-bake simulation into the skeletal animation with the help of the Blender's native animation baker.

Setting up Blender's animation baker.
The resulting animation will be overloaded with keys after baking. In order to simplify it we'll use Simplify F-Curves utility. By setting up the Error parameter we'll find the best value.

Curves after simplification.
Now the golem's death animation is ready. You will find a comparison of all four animation creation stages below.

01 - physics simulation; 02 - armature animation with the help of constraints; 03 - baked armature animation; 04 - optimized armature animation.
In order to make the destruction look more elaborate and to mask golem's remains disappearing let's add some smoke to the collapse.

Geometry for the smoke particle system under golem's breakage.
It is necessary to create a geometry approximately equal in area to the stones' fall space. It will serve as a particle system emitter.

Setting up the smoke particle system under golem's breakage.
The main thing we want to achieve with this particle system is that it covers the whole area under the falling rocks. The material being used is the same as that in the smoke coming from the golem itself.

Golem is ready to fight!
Golem is prepared for offense and is blazing with fury!
Magic Stones
Although the golems are the source of danger, they are also the defenders of very important game elements - the gemstones.

Magic stones which the fight will be for.
There are 6 types of gemstones in total in the game. Five of them have a color similar to the island and obelisk they are placed in (this will be discussed later). There is also one universal gem.
Their geometry is fairly simple and won't be described here. The same object animation used for the potions is used for the gems' rotation.
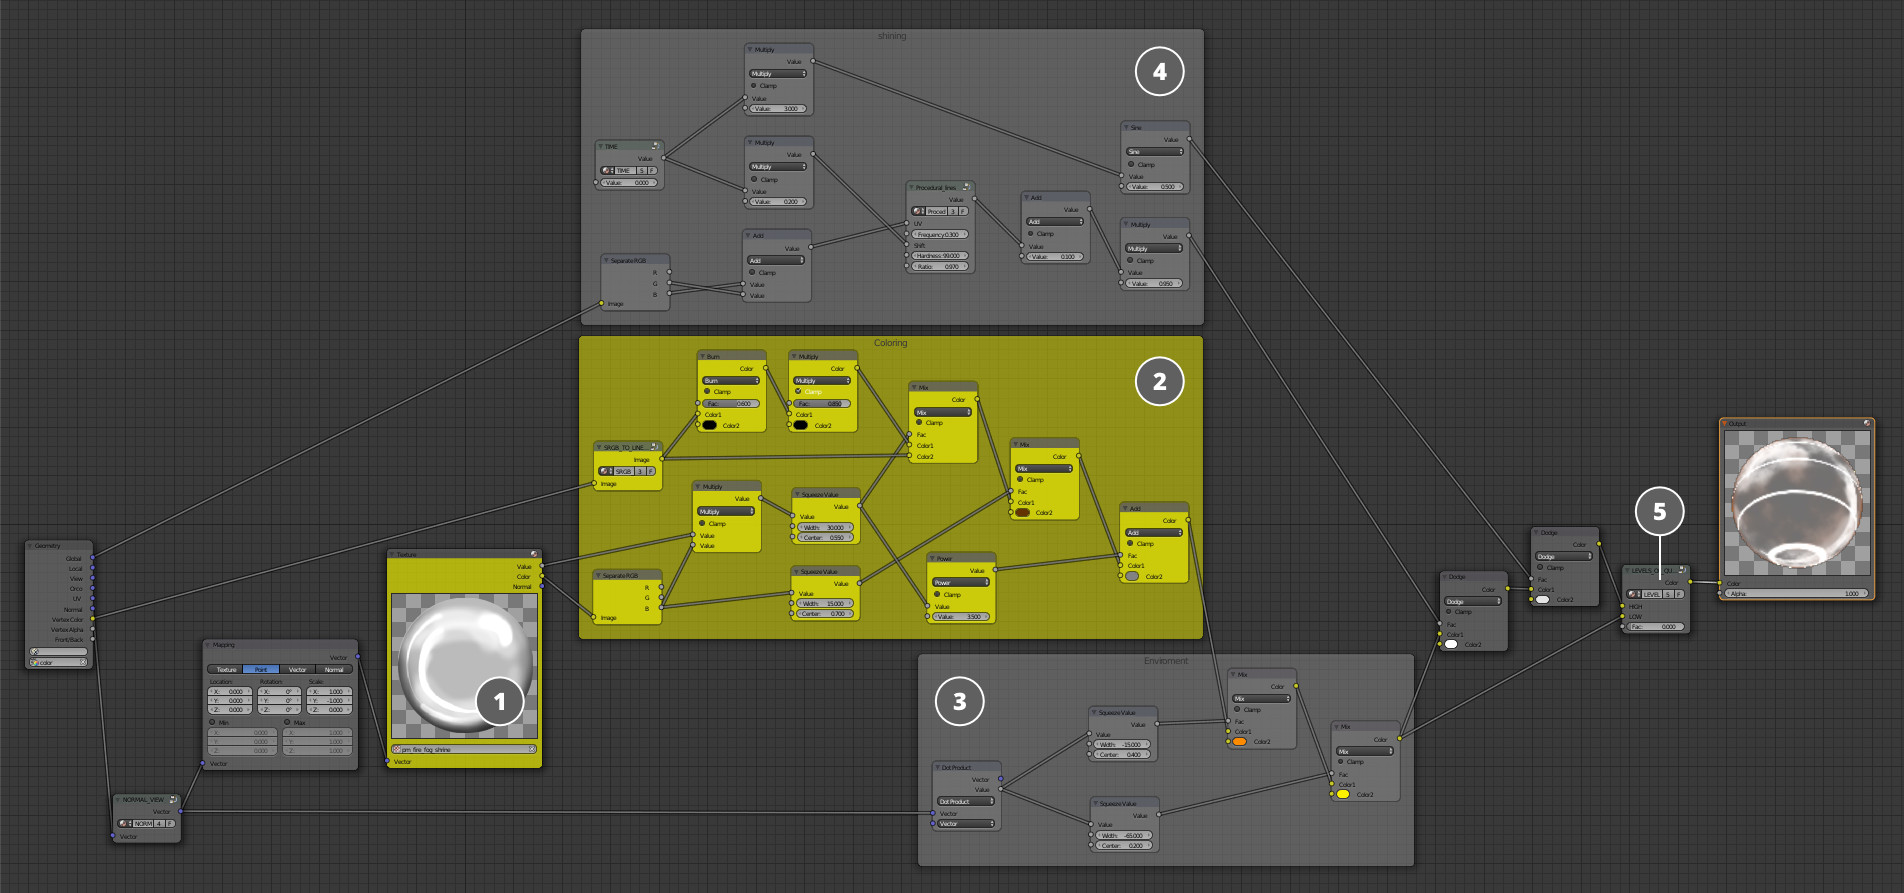
Magic stone material.
There is a matcap texture (1) in the base of the material which has already been used in the potions. It is painted with the help of different modifications of the gems' geometry vertex color. And with the help of Fresnel mask (3) an effect of orange and red reflections is created. Just like in the magic potion material there is an effect of the magic shine (4) which adds some vivid effects to the gems. It is optimized with the help of the Level Of Quality node in the low graphics profile.
Obelisks
An obelisk is the heart of every island. The character will bring all the gems honestly snatched away from the golems here.

One of the obelisks in the center of the island.
Apart from the new geometry with a new material, there are the geometry and the material of the magic stones in places they are expected to be put during the game process.

Obelisk stone material.
The texture for material (1) is drawn in a Texture Paint mode by hand. The base of the geometry is tinted (2) with a vertex color to give obelisks some color difference.
Islands' Magic
When all the crystals are in the obelisk, the island activates its magic and becomes protected from the golems.

The appearance of the magic shield around the island.
An additional geometry around every island has been added for the magic shield.

Geometry for the island's magic shield material.
Every geometry has its own individual material with one common to all node group.
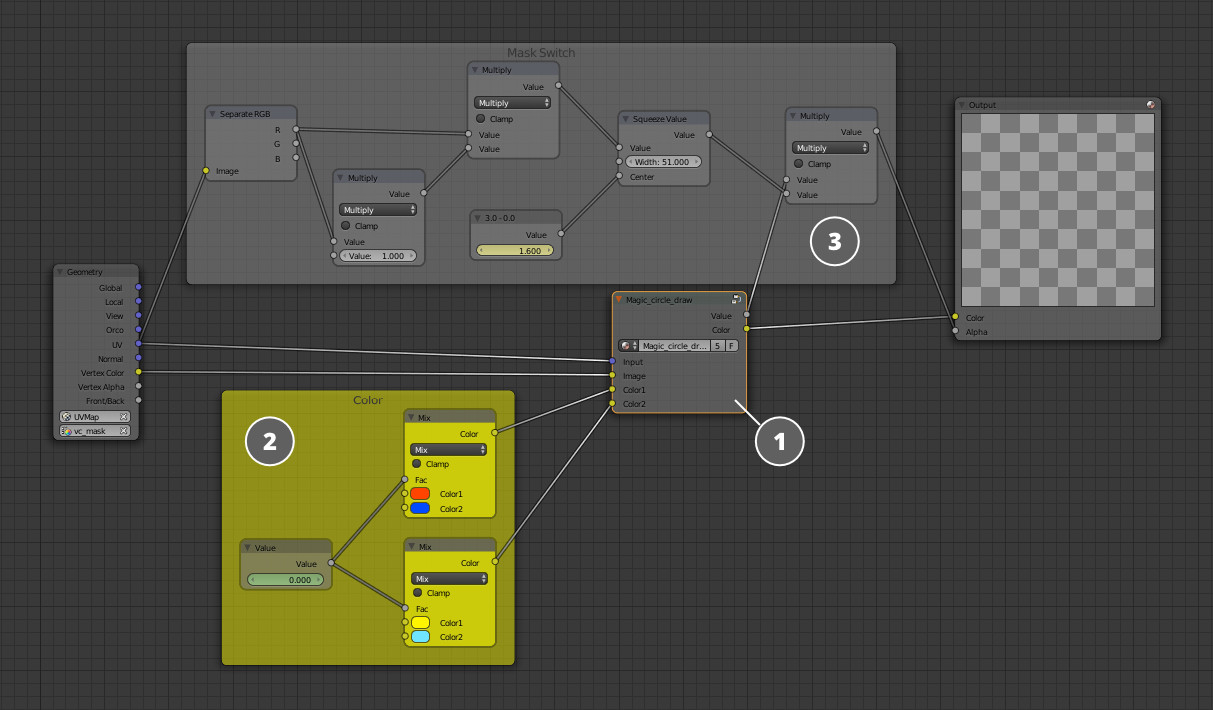
Magic shield material.
There is a node group (1) which is the main body of the material in the center. Also, there is a mask for the alpha-channel (3) with an animated Value node which will show the magic shield at the right moment. In addition, there is a block which will set the color of the magic shield (2). There are two color node groups here as the color can change from the moment the magic shield just starts appearing to the moment it has completely appeared. The animated Value node will perform smooth color transitions.
The node group of the magic shield material.
Let's look at this node group in more detail.
Here are the next inputs (1) in the node group: a UV for the texture with magic signs (3), vertex color which is just a transparency mask on the edges of the magic shield, and two Color values which the magic shield will be painted with.
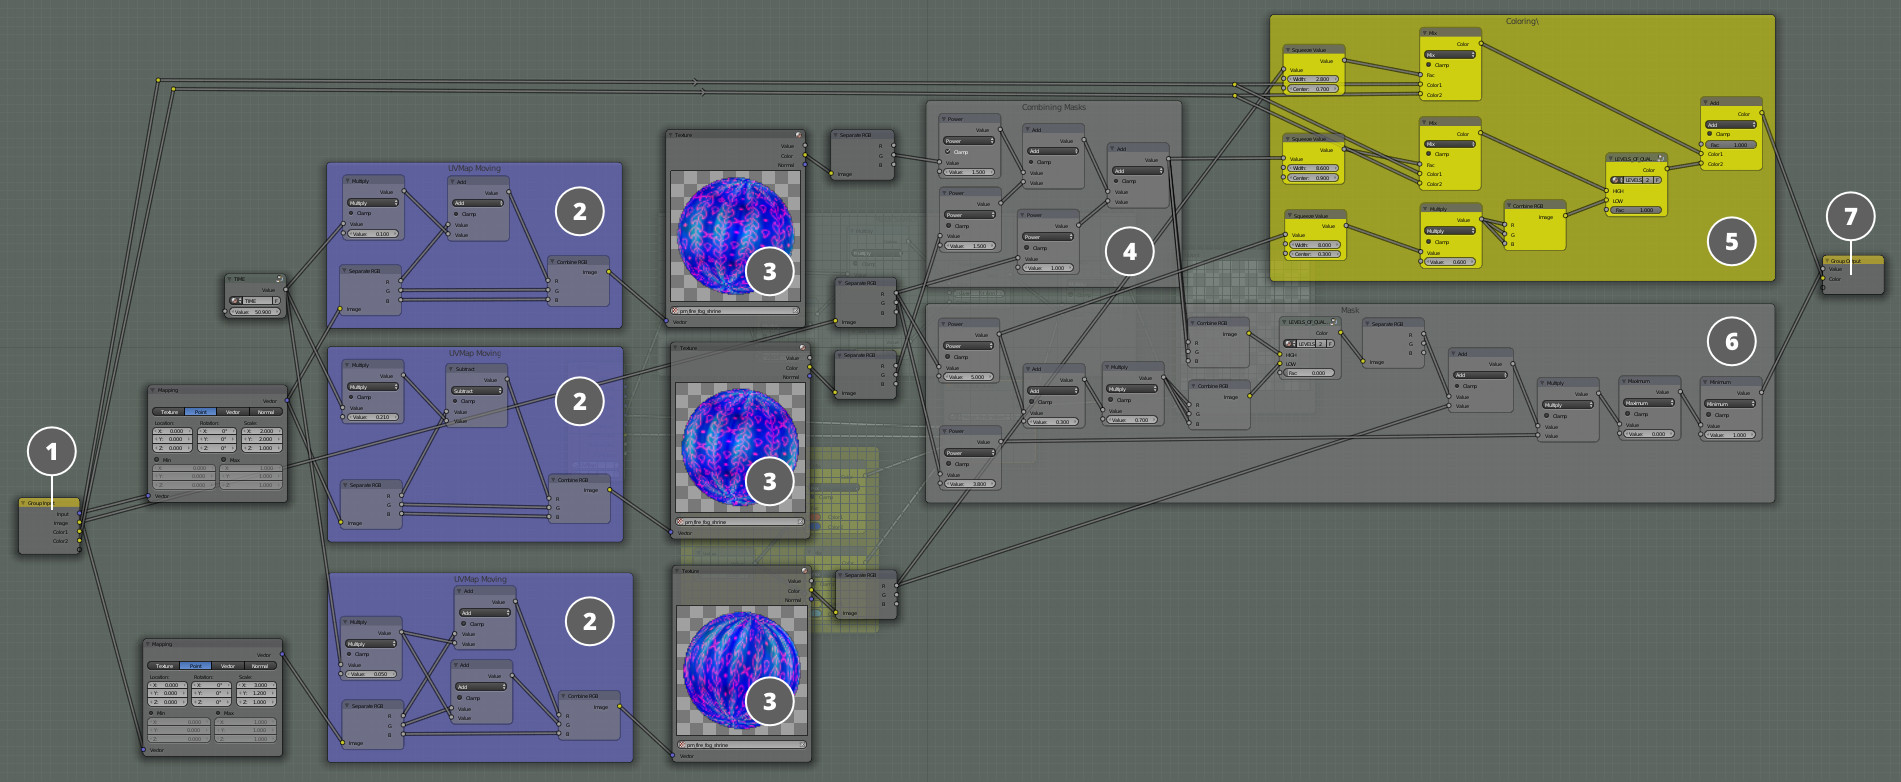
All the textures with magic signs (3) are moving across UV (2) with the help of Time node. Further they are just combined into a single mask (4) and tinted (5) with the help of the color obtained from the input node (1).
A slightly modified mask (6) is created for the alpha channel and moved into the output node (7).
Furthermore, there is a Level Of Quality node in two places. It helps to simplify visualization for a low-quality graphics setup.
Conclusion

The main character in the heat of battle!
That's all. This is the last article on graphics creation for the first game level. Now, the world is full of different magic effects, enemies, magic and it finally has some meaning and goals. We just need to add sound! That will be the topic of the next article...
The source files are part of the free Blend4Web SDK.
You can ask all the questions about the lesson in this topic and we'll try to answer them.
Changelog
[2015-03-03] Initial release.