由用户创建的信息 Pavel Kotov
23 October 2014 13:00

Oh, and you can use alpha in non-node material. Well, I recommend nodes, but anyway, B4W can deal with transparent stack material  In texture tab in influence turn color and alpha on and in material tab (in Blender Game mode) find Transparency parameter. Turn it on and reduce Alpha gauge to 0. That must work
 In texture tab in influence turn color and alpha on and in material tab (in Blender Game mode) find Transparency parameter. Turn it on and reduce Alpha gauge to 0. That must work
23 October 2014 12:13
You're welcome 
Oh, yeah, it happens And, btw, sometimes you need to clean browser cash to see the changes you've made
Oh, yeah, it happens
 And, btw, sometimes you need to clean browser cash to see the changes you've made
23 October 2014 11:15
Hello again! 
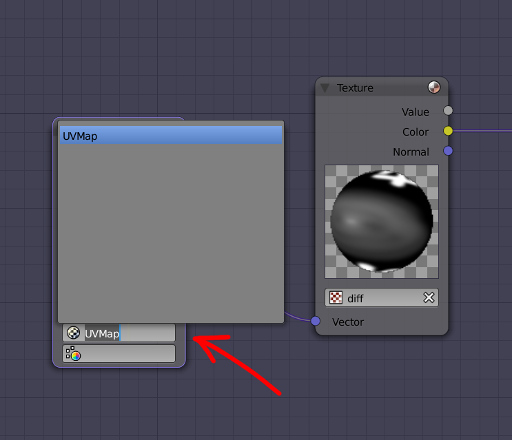
Blend4Web needs to know what UV to use. Just put the name of your UV map here in geometry node :)
![]()
Also, some errors are shown in console in HTML player. Press F12, maybe there'll be reddish "Missing UV Layer" or so
And all errors and info are shown in viewer application, it can be found in our SDK.
P.S.
In one of our future releases we're planning to avoid this thing: if no UV are chosen, the engine will just load first UV. As for now, it must be chosen manually
Blend4Web needs to know what UV to use. Just put the name of your UV map here in geometry node :)
Also, some errors are shown in console in HTML player. Press F12, maybe there'll be reddish "Missing UV Layer" or so
And all errors and info are shown in viewer application, it can be found in our SDK.
P.S.
In one of our future releases we're planning to avoid this thing: if no UV are chosen, the engine will just load first UV. As for now, it must be chosen manually
16 October 2014 23:21
Hello Zakaro!
And welcome to our forum!
Wow, looks great! And it reminds me kitchen stuff we've bought not long ago
Have you seen our Mi-34 demoscene? Here is an example of this possibility. And it was done without programming
Instead of it we used special functional based on NLA. Here I made a little example of using it. But there is one thing - soon will come out our new release, and this feature will be improved, so right now there's no actual point in thorough description of almost "old" functional And we will make a tutorial (maybe tutorials) including that improved feature :)
By the way, I can try to describe how it works according to material. I assume you need your texture to change by the click, right? So, there is one method, I think, the easiest one. Let's think we already know how to use our new NLA functional. So we speak about material itself. First - I hope your materials are made in Node Editor :) Because I don't know the way to do this trick with stack materials . So, we got node material. And in it we have two textures - the first will be replaced by second when we'll click. So they both go to colors in node color mix, and in factor goes input->value. This value is animated: it changes from 0 to 1 in, let's say, 5 frames. So now we have an animation - Tex1 changes to Tex2 due Mix factor. That's all! All we need now is to make this animation play by click. You can see an example I mentioned earlier - there is animated value, too. Well, it animates UV-shifting, not just mixing, so it's a little more complicated, but it shows overall how it works.
Hope it will help
And welcome to our forum!
Wow, looks great! And it reminds me kitchen stuff we've bought not long ago

Have you seen our Mi-34 demoscene? Here is an example of this possibility. And it was done without programming

Instead of it we used special functional based on NLA. Here I made a little example of using it. But there is one thing - soon will come out our new release, and this feature will be improved, so right now there's no actual point in thorough description of almost "old" functional
And we will make a tutorial (maybe tutorials) including that improved feature :) By the way, I can try to describe how it works according to material. I assume you need your texture to change by the click, right? So, there is one method, I think, the easiest one. Let's think we already know how to use our new NLA functional. So we speak about material itself. First - I hope your materials are made in Node Editor :) Because I don't know the way to do this trick with stack materials
 . So, we got node material. And in it we have two textures - the first will be replaced by second when we'll click. So they both go to colors in node color mix, and in factor goes input->value. This value is animated: it changes from 0 to 1 in, let's say, 5 frames. So now we have an animation - Tex1 changes to Tex2 due Mix factor. That's all! All we need now is to make this animation play by click. You can see an example I mentioned earlier - there is animated value, too. Well, it animates UV-shifting, not just mixing, so it's a little more complicated, but it shows overall how it works.
Hope it will help
16 October 2014 19:14
woow… techy ! ! !Thanks!
Well, I'm familiar with B4W, so maybe I intuitively clicked on the right things  But yeah, I thought this tool will be more complicated, so this was a nice surprise
 And about deeper explanation - in our next release this tool will be improved and some settings will be added, some will be changed, so we are planning to make an interesting demo that will use new functional and to make a tutorial based on this demo (maybe not one). So stay tuned!
15 October 2014 19:38
Hello visualizer!
Here you go:
circuit.html
circuit.blend
Notable things: "wires" are animated due UV-shift that was made by animating Value. I came up with this right now, so here may be lots of other ways to animate things like this
In Scene in our B4W tab I added some NLA script links. In other words everything in this tab means:
Click_1 -> animation_of_red_wire -> click_2 ->animation_of_green_wire -> cube_animation. Seems a little difficult, maybe. It's pretty easy, though, when you'll play with this feature some time. For me it took like 45 mins to make this file from zero (I didn't use this tool before)
By the way, in our next release this feature will be greatly improved
14 October 2014 11:38
My heroes!Oh, don't make us shy

And you're welcome
Thanks for the explanation of UV to Separate RGB as a means of splitting out axes/vectors.Yeah, node materials are full of tricks you can use :) Well, I learn almost every day something new and helpful to use, another tricky things to perform. Nodes are awesome to play with

14 October 2014 11:18
Hello visualizer!
As I can say, the best way to do such things lies in the sphere of web development. I mean, scripts overall are better than GUI-based interactive elements. You can see here and here examples of scripting for interactive apps
But, for example, I am an artist, and, sadly, right now for me scripts are difficult and I can't use them. To add extra interactivity I can use our new NLA functional. And examples you mentioned can be simply done by parenting some planes to the camera, so they will be those interactive triggers :) And it will be pretty fast, too.
13 October 2014 15:59
is there, or will there be, a way to render objects in browser such that they look to have soft edges?
Hello! If I understood correctly, you can achieve this effect by using Halo - this is the easiest way. Sadly, right now you can't animate Halo somehow :( But you can do it using billboards and particle system instead of Halo, the effect will be the same, and you can animate it by using node TIME, for example
There's one more option: you can make two strips of polygons and cross them in X-shape, then paint them using Vertex Colour and this VC will be used as alpha: black zones will be transparent. And you can animate them, too. Here's an example: left one is Halo, in the middle are billboards and right one is X-shaped mesh.

pseudoglow.blend
fakeglow.html
If it's not exactly what you want, there will be a better way, we are working on it now.
It will be possible to add some "glow" to an object in needed places, so there will be soft edges :)
Ответ на сообщение пользователя Rollo-s_Son
Using the same sample file, is there a way to set the nodes to use an image, tied in with TIME, to do an animated texture? I think these would be easier to sync up on multiple objects than procedurals.
Yes,and you can see our example here: shining areas under floating things are made using TIME+texture :) Basically, you add TIME values to image coordinates and TIME shifts your UV. That is the easiest example:

Here we are shifting red channel, so it means we are shifting UV in positive X direction. If you want negative direction, change MULTIPLY value to negative. So, red channel means X and green channel means Y