Lighting, Shadows and Background
Table of Contents
Shading Types
Lighting (shading) depends on the direction of normal vectors. The standard Blender’s shading types are supported: Shading: Flat (face normals are used), Shading: Smooth (interpolated vertex normals are used) and their combinations.

If the required effect is impossible to achieve with the standard tools, you can use the normals editor.
The result of applying different shading types and using the normals editor:
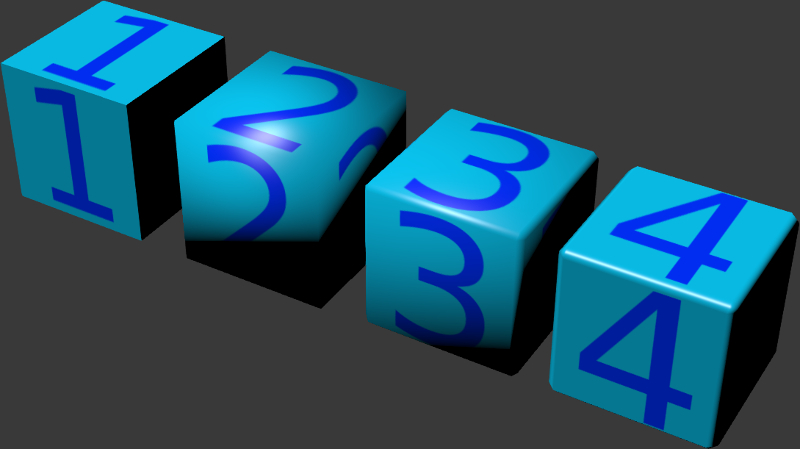
- Flat Shading
- Smooth Shading
- Smooth Shading + bevel
- Smooth Shading + bevel + editing normals
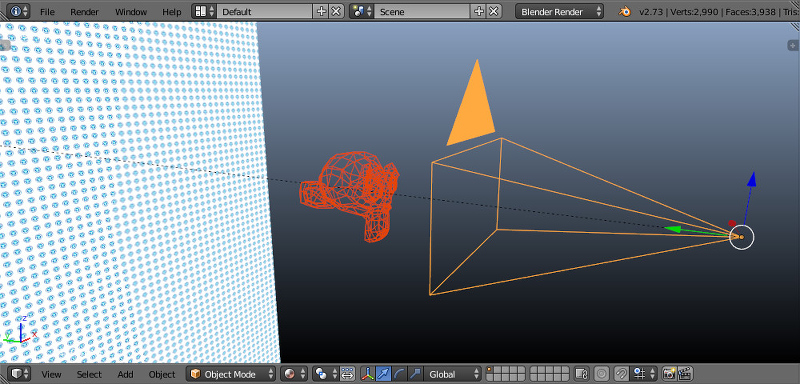
Lighting with Light Sources
A scene can have multiple (but not less than one) light sources of different types.
Light source types
The following light source types are supported:
- Point
- Light propagates from one point uniformly to all directions with gradual attenuation.
- Sun
- Light propagates from an infinite plane in one direction without attenuation.
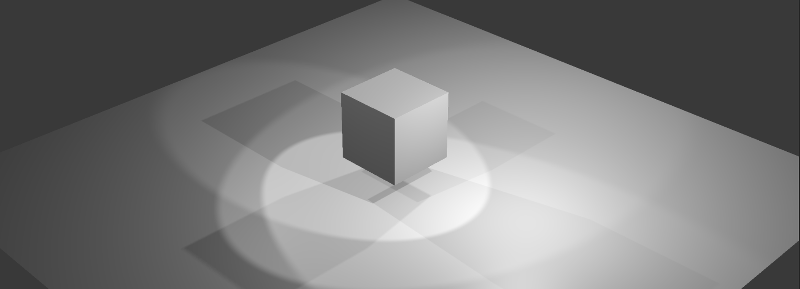
- Spot
- Light propagates from one point within the angular limit, with gradual attenuation.
- Hemi
- Hemispherical. Light propagates from an infinite hemisphere without attenuation.
Light source setup
Performed in the Object Data tab when a lamp object is selected.
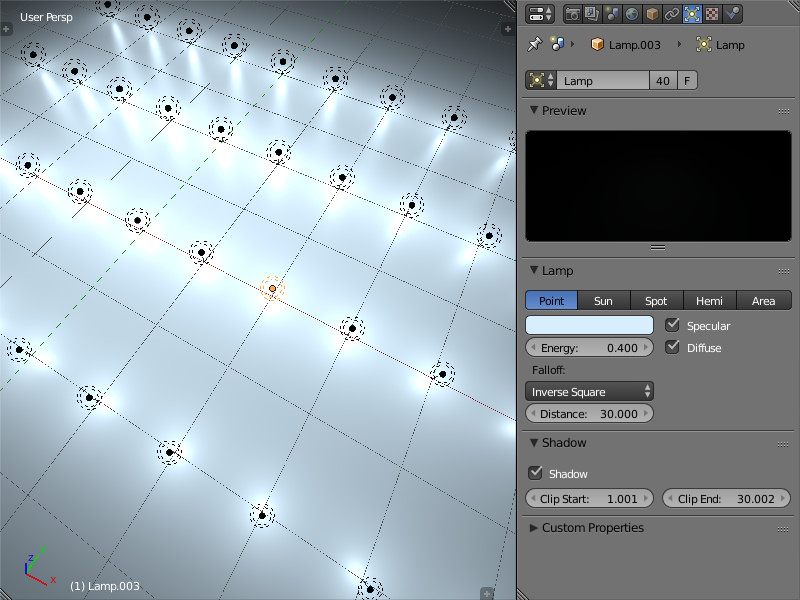
- Color
- Light color. The default value is (1.0, 1.0, 1.0) (i.e. white).
- Energy
- Radiation intensity. The default value is 1.0.
- Falloff
- Attenuation type. The value is exported but the engine always uses
Inverse Square. It is applicable to thePointandSpotlight source types. The default value isInverse Square. - Distance
- Attenuation parameter. It is applicable to the
PointandSpotlight source types. The default value is 30.0. - Specular
- Create specular highlights. Enabled by default.
- Diffuse
- Do diffuse shading. Enabled by default.
- Spot Shape > Size
- Cone angle in degrees. It is applicable to the
Spotlight source type. The default value is 45º. - Spot Shape > Blend
- Parameter for blurring light spot edges. It is applicable to the
Spotlight source type. The default value is 0.15. - Dynamic Intensity
- Use this light source for calculating the time of day. Applicable only to the
Sunlight source type. Disabled by default. - Shadow > Shadow
- Use this light source for shadow calculation. Should be used when multiple light sources are present. Disabled by default.
- Shadow > Clip Start
- This parameter specifies a distance from the light source, below which objects do not generate shadows. Default value is 1.001.
- Shadow > Clip End
- This parameter specifies a distance from the light source, beyond which objects do not generate shadows. Default value is 30.002.
Environment Lighting (Ambient)
The engine supports 3 methods of the environment lighting simulation.
- Flat white lighting.
- Hemispherical lighting model in which horizon and zenith colors should be specified. As a result objects are filled with a gradient between these two colors depending on the direction of normals.
- Lighting using an environment map - so called image-based lighting.
Please note that environment lighting uses a simplified model which doesn’t take into account mutual shadowing of objects.
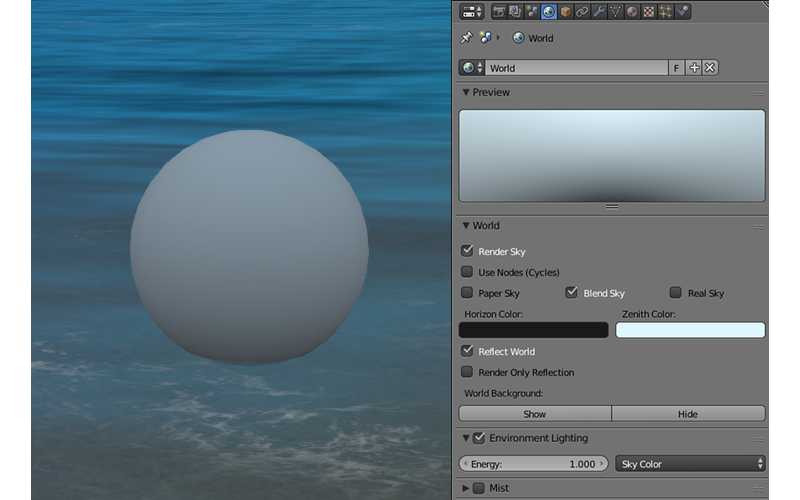
Setup
- World > Environment Lighting > Energy
- Environment lighting intensity. The default value is 1.0.
- World > Environment Lighting > Environment Color
- Selection of the environment lighting simulation method:
White- flat white lighting,Sky Color- hemispherical model,Sky Texture- lighting using an environment map. The default value isWhite. - World > Horizon Color and World > Zenith Color
- If the hemispherical model (
Sky Color) is selected the horizon and zenith colors can be specified by means of theWorld > Horizon ColorandWorld > Zenith Colorcolor pickers. It is recommended to activate theWorld > Blend Skyoption for better color selection. - World > Use Nodes (Cycles)
- If this option is enabled,
Cyclesnodes can be used to set up the environment. Disabled by default. - World > Reflect World
- If this parameter is enabled, environment will also be rendered for reflections (i.e., it will be reflected by mirror surfaces). Disabled by default.
- World > Render Only Reflection
- If this parameter is enabled, environment will be rendered for reflections, but not for the scene itself. Disabled by default.
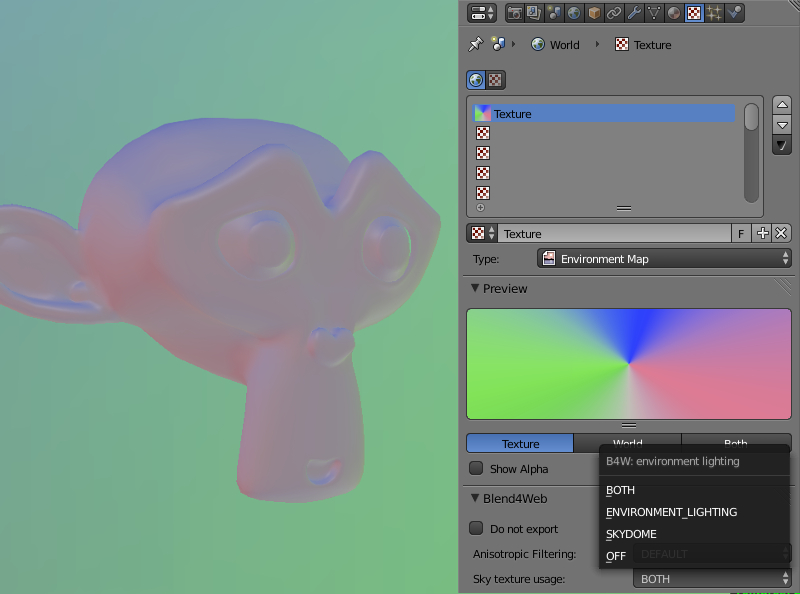
Environment map method
To use an environment map for environment lighting:
- Enable the
Environment Lightingcheckbox on theWorldtab. - Select
Environment Lighting > Sky Texture. - Go from the
Worldtab to theTexturetab. - Create an environment map, load the corresponding image to it.
- For the environment map select
ENVIRONMENT_LIGHTINGorBOTHas theSky Texture Usagevalue on theExport Optionspanel (theBOTHoption also enables using this texture as a skydome texture).
Shadows
Shadows are exceptionally important for rendering the final picture. They provide the viewer not only with information about the objects’ outline but also about their height and relative position, light source position and so on.
Blend4Web implements the following shadow rendering techniques: cascaded shadow maps (CSM) and softened shadows (PCF).
Up to 4 (or 3 if SSAO is enabled) light sources can generate shadows simultaneously. If Shadow parameter is enabled for more than 4 light sources, shadows will still be generated only from 4 of them.
Activation
- Enable the
Shadows: Castcheckbox under theObjecttab for the objects which cast shadows. - Enable the
Shadows: Receivecheckbox under theObjecttab for the objects which receive shadows. - Make sure that the
Shadowsoption in theRendertab has the valueAUTOorON.
Setup
- Direction
- If there are multiple light sources, it is recommended to specify the exact light source which is used for shadow calculations, by enabling the
Shadow > Shadowcheckbox under theObject Datatab for the selected lamp object. - Color
- The shadow color is determined by the environment lighting settings.
The following additional settings are located on the Shadows panel of the Render tab:

- Render Shadows
- Enables and disables shadow rendering. Can be set to
ON,OFFandAUTO. Set toAUTOby default. - Soft Shadows
- This option enables smoothing of the shadow maps. Enabled by default.
- Resolution
- Shadow map resolution. The default value is 2048 x 2048px.
- Blur Samples
- The number of the samples used for smoothing shadow maps. Available values are 4x, 8x and 16x, with the latter being the default value.
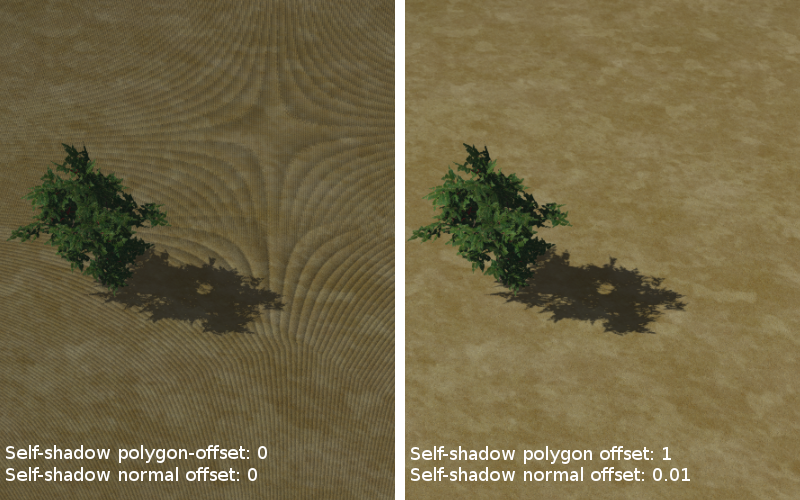
- Self-Shadow Polygon Offset
- Coefficient for shifting polygons relative to light source orientation. The default value is 1.
- Self-Shadow Normal Offset
- Coefficient for shifting polygons along their normals. The default value is 0.010.
The last two parameters can be used to reduce self-shadowing artifacts. These artifacts appear for the objects that cast and receive shadows at the same time. The Self-Shadow Polygon Offset parameter is more effective for fighting against artifacts in inner areas of polygons while Self-Shadow Normal Offset is better for the boundary areas. Both these parameters lead to shadow distortions so we recommend to set them as low as possible.
Note
Shadows from Point light sources are generated the same way as from Spot light sources and are projected only in one direction specified by the source’s Rotation parameter.
- Enable CSM
- Activates the using of cascaded shadows model; reveals additional options. Disabled by default. Won’t work if the
Shadowsetting is enabled for more than one light source.PointandSpottype light sources support only one shadow cascade.
This option allows to choose between the following shadow generation models:
- Generic model which uses a single optimized shadow map for the whole scene (
Enable CSMis turned off). - Shadow cascades (
Enable CSMis turned on).
- Blur Radius
- Blur ratio for setting up softened shadows. The default value is 3. Zero value produces hard shadows.
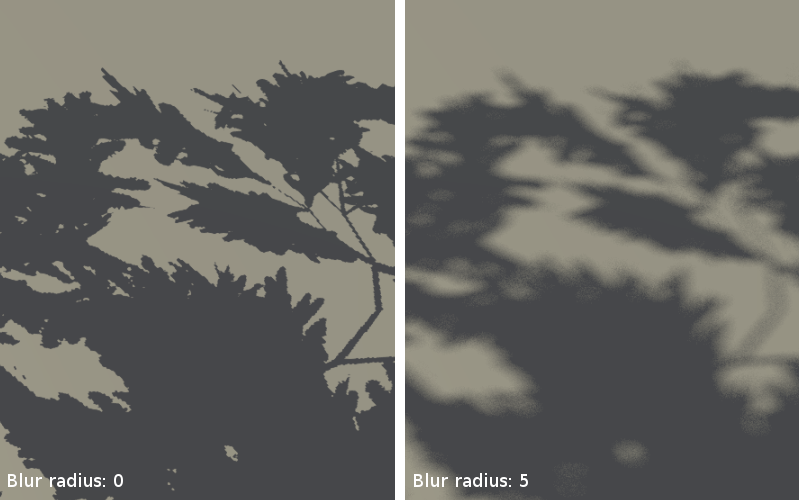
Softened shadows can improve visual quality and realism. They hide the jugged edges inevitable when using image-based techniques, that is especially noticeable for low-resolution shadow maps. The using of softened shadows often allows to decrease resolution without substantial quality loss.
Generic shadows
This option suits well smaller scenes with a limited number of objects. Thanks to optimizations applied for such scenes, one can achieve better shadow quality as compared with cascaded shadows. Also, this option is simpler and faster for setting up, while using a single shadow map greatly improves the performance.
Shadow cascades
Note
These settings are supported only for Sun light sources. Cascades are turned off for other types of light sources.
In order to provide acceptable shadow quality and to cover considerable space at the same time it is required to use multiple stages for shadow generation (cascades). Thus, the best quality cascades are situated near the observer while the worst quality cascades are in the distance. This option suits well middle-to-large scenes, e.g. game levels.
When enabled the following extended settings are revealed:
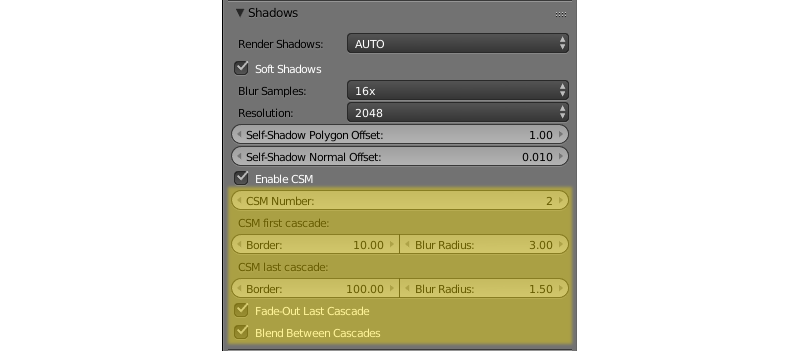
- CSM Number
- Number of shadow cascades. From 1 to 4 cascades are supported. The default value is 1.
- CSM First Cascade Border
- First cascade size. The default value is 10.0.
- CSM Last Cascade Border
- Last cascade size. The default value is 100.0.
The sizes of the intermediate cascades are interpolated between the two above-mentioned parameters.
Note
When setting up the shadows keep in mind that the bigger the cascade size is, the worse and less detailed are the shadows inside it. On the other hand, reducing the CSM First Cascade Border parameter makes the subsequent less detailed cascades closer to the camera and thus more noticeable. Reducing the CSM Last Cascade Border parameter forces shadows to disappear at more close distance from the camera. However, when softened shadows are used the overall quality will improve thanks to blurring at the edges.

- CSM First Cascade Blur Radius
- Blur ratio for the first cascade. The default value is 3. Zero value produces hard shadows.
- CSM Last Cascade Blur Radius
- Blur ratio for the last cascade. The default value is 1.5. Zero value produces hard shadows.
The blur radii of the intermediate cascades are interpolated between the two above-mentioned parameters.
Note
We recommend to start setting up the softened shadows with the first cascade (using CSM First Cascade Blur Radius) and then proceed to other cascades (using CSM Last Cascade Blur Radius). Often the last cascade may need less blurring than the first one. This may be needed to prevent the shadows on the last cascade being too faded due to low resolution. This also reduces undesirable self-shadowing artifacts.
- Fade-out Last Cascade
- Smooth dying-out of the last cascade. Enabled by default.
- Blend Between Cascades
- Smoothing the boundaries between the cascades. Enabled by default.

Background
You can change the background in the following ways:
- Enable
World > Render Sky, then set theHorizon Colorand theZenith Colorunder Blender’sWorldtab. - Place the whole scene inside a model (e.g. a cube or a sphere) with its normals directed inside, with a material and an optional texture.
- Place a surface with a material and an optional texture in front of the camera. Parent it to the camera. If required, tweak the distance to this surface, starting and ending clipping planes for the camera.
Use a skydome.
Set up the procedurally generated atmosphere.
Set the engine’s
background_colorparameter with theconfig.set()method. Please note, thatWorld > Render Skyunder Blender’sWorldtab must be disabled. This value is used as argument for the WebGLclearColor()method. For correct results, it’s recommended to turn the WebGL context transparency off (thealphaparameter). Such the configuration is used by default in the engine’s standard web player.var m_cfg = b4w.require("config"); var m_main = b4w.require("main"); // gray m_cfg.set("background_color", new Float32Array([0.224, 0.224, 0.224, 1.0])); m_cfg.set("alpha", false); m_main.init(...);
You can use any HTML content behind the canvas element, to which the rendering is performed, as a background. To do this, activate the WebGL context transparency (the
alphaparameter). Please note, thatWorld > Render Skyunder Blender’sWorldtab must be disabled. For correct results, it’s recommended to set absolutely transparent black background color. Such the configuration is used by default in the scene viewer of Blend4Web SDK.var m_cfg = b4w.require("config"); var m_main = b4w.require("main"); m_cfg.set("background_color", new Float32Array([0.0, 0.0, 0.0, 0.0])); m_cfg.set("alpha", true); m_main.init(...);
See also