Workflow
Table of Contents
Developing any product is a creative process with many participants who have different skills and experience. However, no matter how complex it is and what is the target it’s always possible to separate the production stage in which the bulk of assets and source code is authored.
Any work with the Blend4Web engine should start with running Blender.
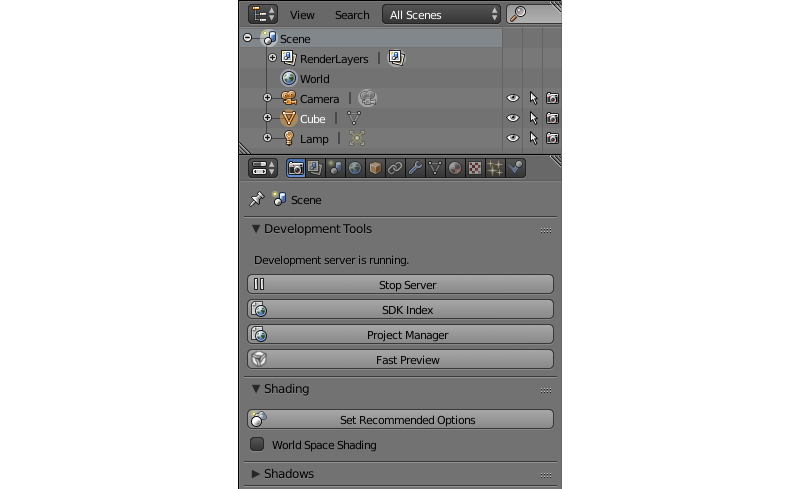
Select Blend4Web from the render engine list at the top panel in the main Blender window, and you will see how the program interface have changed. Some parameters will disappear, and new ones will take their place. The most important of these new parameters are located in the Properties window (usually placed at the right side of the main window), on the Render panel.
Note
If the Development Tools tab shows the Development server is off message, this means that the development server is not working. It can be enabled with the Start Server button on the same panel. The server can also be configured to run on startup with the Run On Startup option found in the add-on settings (User Preferences → Add-Ons → Blend4Web).
If any problems occur as you try to run development server, please consult the Problems and Solutions chapter.
The SDK Index button opens the index page that can be found by this address: http://localhost:6687.
The Fast Preview button opens the Scene Viewer and loads the scene that is open in Blender at the moment. This is a useful feature for planning and debugging your scenes.
The Project Manager button opens the Project Manager — a powerful and easy to use tool for working with Blend4Web projects. Using Project Manager is the most simple way to start working with Blend4Web.
When using Blend4Web the workflow is the following:
- Creating a New Project.
- Creating Scenes
- Preparing a Scene to Use in Blend4Web
- Exporting scenes.
- Application Development.
- Project Building.
- Project Deploying.
Creating a New Project
The work on a project, of course, should always start with creating it.
The easiest way to create a new project is to use the Project Manager. To do it, run the Project Manager (either from Blender or from index page) and press the Create New Project button at the top of the Project Manager’s main window.
The other way is to use the project.py command line script, which is more versatile. Working with this script is described here.
Creating Scenes
Scenes are contained in blend files. Project Manager can automatically create a blend file with a basic scene upon creating a new project. Additional blend files can be created and attached to a project.
Scenes for Blend4Web are created in the same manner as the scenes for Blender itself, with only minor differences. The process of working on a scene could be separated into several stages:
- Modeling the scene objects
- Setting up materials
- Animating objects
- Creating scene logic (this part is exclusive for Blend4Web engine and does not apply to regular Blender scenes)
It should be noted that not every project may require all of these stages. More simple scene might not feature any animations or even any materials aside from the default ones.
The order of the stages is also not strict and can be interchanged to a certain degree (for example, you won’t probably animate an object before creating it, but you can create a material for it beforehand).
Besides the usual stages such as modeling, texturing, animation etc a scene should be prepared for working in the engine.
General recommendations:
- We strongly recommend to save your blend files in the
projects/project_name/blenderdirectory. Auxiliary files which are not intended for loading in your app (for example, references), should be located there as well. - Images and media files should be external and located in the
projects/project_name/assetsdirectory. - Files from which you export should contain resources which are actually required in your application (objects, materials, textures, animation etc).
- Scene components should have distinct names. They should not be named “Cube.001”, “Material” or “Armature”.
- We recommend you to link components from other files (libraries).
Preparing a Scene to Use in Blend4Web
Besides the usual stages such as modeling, texturing, animation etc a scene should be prepared for working in the engine.
Displaying Scenes in the Viewer
When using the local development server
it’s possible to preview current scene using Fast Preview button located at the bottom of Blender’s 3D View window,
and also on the Render -> Development Server panel in Blender. In this case
the scene will be exported inside some temporary storage and loaded in the
Viewer app.
The other method is using Run in Viewer export option. In this case the scene will be displayed in the Viewer app immediately after the export.
Exporting Scenes
The export procedure converts the scene from the Blender format to one of the formats used by Blend4Web.
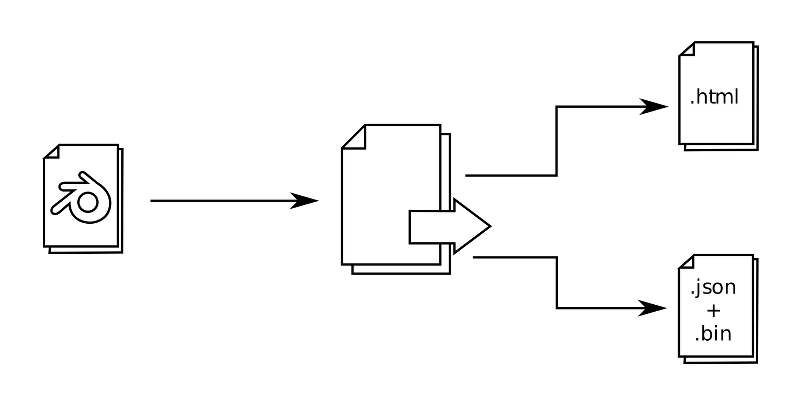
There are two formats: JSON and HTML.
The HTML format is used for simple stand-alone applications, where all the resources are packed into one HTML file that can then be easily deployed to a web page.
The JSON format can be used for creating such projects as well, but it also offers numerous extra features making it possible to create complex projects that require programming. Format differences and export options are described in the Export Formats chapter.
To export the scene, select Blend4Web (.json) or Blend4Web (.html)
option from the File > Export menu, or type b4w export in the
operator search menu (available by pressing Spacebar).
Note
If the scene uses Blender features not yet supported by the Blend4Web engine, errors may occur during export. Export errors are listed in this table.
Export options are described in detail in the corresponding section.
Application Development
This section only applies to the project types other than Web Player HTML and Web Player JSON.
At this stage an application is created. Logic for scene loading and user interaction is written using JavaScript. The application developer notes are given in the corresponding section.
Project Building
After development of a project is completed, it should be built so it can then be used outside of the SDK.
Project building can be performed by clicking the build project link in the Project Manager.
Before building a project, you might want to convert media resources used in the project, which can help to minimize its size.
Project Deploying
After project development is completed, the project can be deployed so it can be used outside of the Blend4Web SDK. Project deployment is performed by clicking the deploy project link that can be found in the Operations command list on the right side of the project entry in the main window of the Project Manager.
Clicking this link will cause Project Manager to perform all necessary operations and to deploy the project.
The deployed project has a form of an archive that contains all project files. This archive can be saved to any place on your disc with the use of a standard Save File dialogue in the web browser you are using.
A complete project can be placed on a web server.
To do it, extract the project files from the archive downloaded from the Project Manager and upload them to your web server (while retaining inner file structure) by means of FTP, SSH or any other file transfer protocol supported by the server. After doing this, you only need to place the project on a web page using, for example, an iframe container.
Deploying project to web server is described in a dedicated section of the Project Manager chapter.