Textures
Table of Contents
Textures are hand-made or procedurally generated images that can be applied to the model surfaces to add more detail. As a rule, the image pixels are assigned to the 3D surface points using texture mapping. For this reason they are sometimes referred to as maps.
Usually the textures are placed into material texture slots. They can be also used for particle systems parametrization and for creating the skydome.
Texture Types
The Type drop-down menu (for selecting texture type) is located under the Textures tab. The engine supports the following texture types:
Image or MovieIn this case, the texture is defined by an image or a video file. Following file formats are supported:
.PNG.JPG
It can be used for the following purposes:
- diffuse map
- specular map, this can also be packed into the alpha channel of a diffuse texture
- normal map
- height map; this must be packed into the alpha channel of a normal map; it is used for visualization of relief surfaces (parallax mapping).
- stencil map
- video texture
Environment Map- mirror map
- skydome texture
- used for implementation of an environment lighting method
None- applied to the Blender’s default scene cube. It is also used for rendering a scene to texture and for rendering canvas textures.
Blend, gradient- is used in particle systems
Generic Settings
- Dimensions
- Bitmap dimensions for image textures (image width and height in pixels) should be a 2N number, i.e. 4, 8, 16, 32, 64, 128, 256, 512, 1024, 2048, 4096 px. Using textures with other dimensions (so-called NPOT) is supported but is not recommended. Dimensions should be at least 4 pixels for the correct texture compression. Normally square images are used (e.g. 512 x 512 px), however rectangular ones can be used too (e.g. 4 x 128 px). Using images bigger than 2048 px is not recommended.
- Image Mapping > Extension
- Texture coordinates interpretation mode (Wrap Mode in WebGL). This is available for
Image or Movietexture type. In case ofRepeatvalue the engine sets theREPEATmode for the texture. In this case the integer part of the texture coordinates is ignored and the fractional part is used. In all other cases (for exampleExtend) the engine sets theCLAMP_TO_EDGEmode. In this case the texture coordinates are limited by the [0, 1] segment. The default value isRepeat.
- Mapping > Coordinates
- Texture coordinates type. Supported types are
UV(use UV map),Normal(use direction at the camera; available only for diffuse maps; used for the creation of material capture, matcap) andGenerated. The default value isGenerated. - Mapping > Size
- Scaling the UV map along respective axes. The default values are 1.0.
- Export Options > Do Not Export
- Do not export the texture.
- Export Options > Disable Compression
- Disable texture compression (using
DDStexture format) for this texture. Used in cases when texture compression deteriorates the image quality. For example it’s recommended to disable compression for mask textures used to mix different parts of materials. - Export Options > Shore Distance Map
- Used in outdoor rendering.
- Export Options > Anisotropic Filtering
- Anisotropic filtering factor for the individual texture. It has priority over the similar parameter for the scene. The default value is
DEFAULT(i.e. use the scene settings). - Water Foam
- The foam texture. Used by the water rendering material.
Note
Texture compression is disabled for textures used as normal maps.
Diffuse Map
A diffuse map is used for specifying scattered light distribution (the Lambert model).
Activation
Enable the Diffuse > Color checkbox on the Textures > Influence panel.
Additional Settings
- Influence > Diffuse > Color
- Influence of the texture on the diffuse color. The default value is 1.0.
- Influence > Blend
- The type of the interaction with the material color (
Material > Diffuse > Color), or with the vertex color if theVertex Color Paintcheckbox is enabled. The following types are supported:Mix(mixes with the color),Multiply(multiplies by the color). The default value isMix.
Specular Map
The specular map is used for specifying the reflected light color distribution (the Phong model).
Activation
Enable the Specular > Color checkbox on the Textures > Influence panel.
Additional Settings
- Influence > Specular > Color
- The influence of the texture on the reflected light color. The default value is 1.0.
- Influence > Blend
- The type of interaction with the reflected light color of the material (
Material > Specular > Color).Mix(mixes with the color) is the only supported type. The default value isMix.
The specular map can be packed to the alpha channel of a diffuse texture for optimization purposes. In such case it is required for the texture to enable the Diffuse > Color and Specular > Color checkboxes simultaneously. The color range is limited by gray tints.
Normal Map
A normal map is used for specifying the distribution of surface normals (perpendiculars) with the purpose of the relief detalization. The information about the normals should be stored in the texture space of coordinates. Normal maps baked in the object space of coordinates are not supported.
Activation
Set the Image > Color Space parameter to Non-Color.
Enable the Geometry > Normal checkbox on the Textures > Influence panel.
Additional Settings
- Influence > Geometry > Normal
- Normal map influence on the resulting normals calculation. The default value is 1.0.
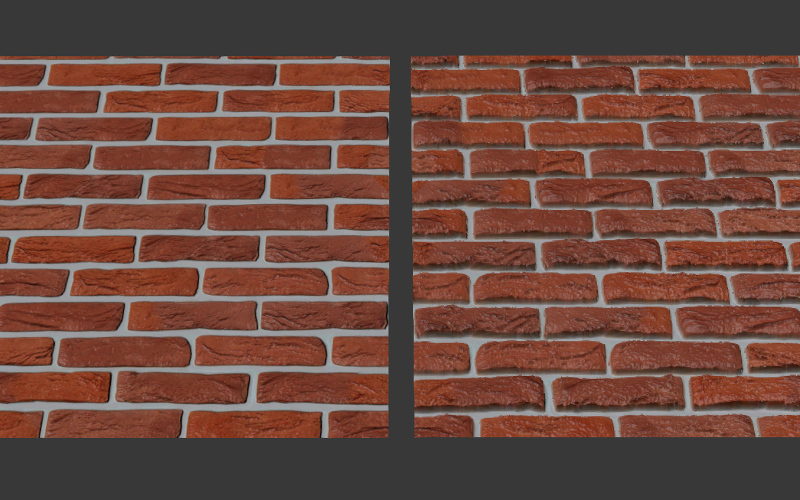
Height Map. Parallax Mapping
A height map contains information about the distribution of relative relief heights. The higher the surface level is, the brighter is its color. A height map combined with a normal map is required for the implementation of relief surface effect (parallax mapping). A height map should be present in the alpha channel of a normal map.

Activation
For the normal map enable the Parallax panel in addition to the Geometry > Normal checkbox.
Additional Settings
- Parallax > Parallax Scale
- Influence factor for the relief surface effect. The default value is 0.03.
- Parallax > Parallax Steps
- The number of iterations for the relief surface calculations. Bigger value leads to better quality but is more computationally expensive.
- Parallax > Parallax LOD distance
- Distance at which the parallax effect is observed.
Stencil Map
The special purpose texture (colorful or grayscale) contains information about the distribution of other texture surfaces.
Activation
- In case of node materials a stencil map should be used in the corresponding node structure.
- In case of generic materials a stencil map should be located in a texture slot between two mixed diffuse textures. A stencil map requires to set both the
RGB to Intensityand theStencilcheckboxes on theTextures > Influencepanel.
Additional Settings
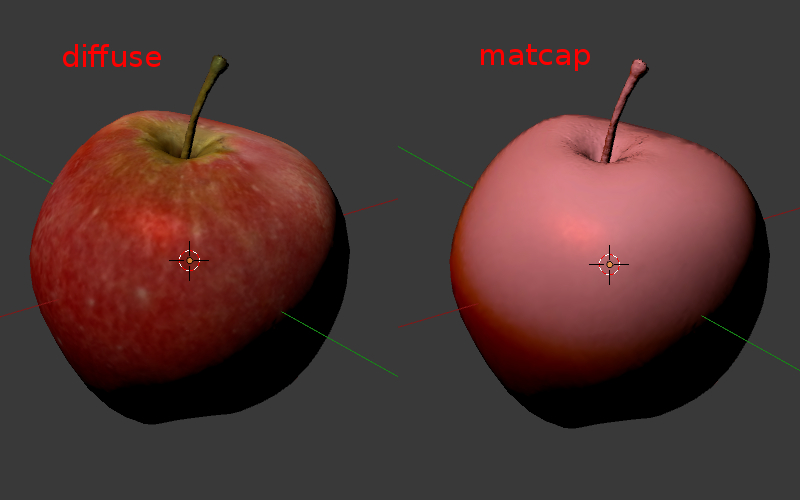
In the case of generic materials one of the mixed diffuse textures can have the Normal (“matcap”) texture coordinates type.
Limitations
In case of generic materials the engine only interprets the red channel of a stencil map. Specular maps or normal maps (if any) are not being mixed. The Mapping > Size setting is extracted from the first texture and is applied to all remaining textures.
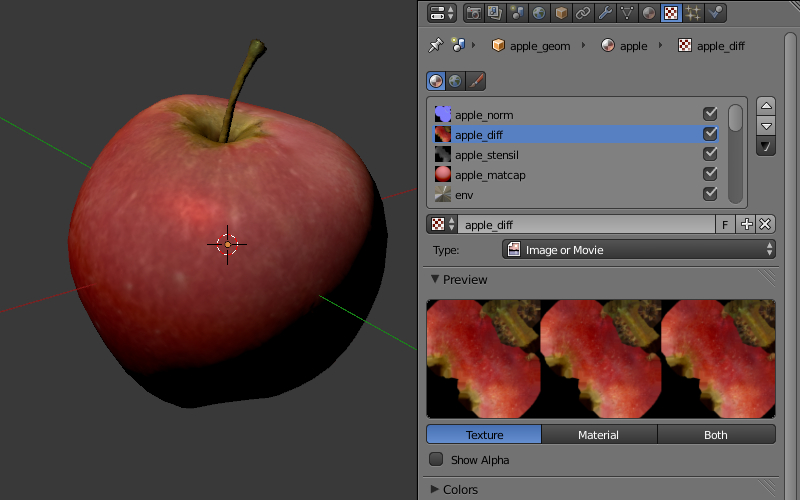
Example
The apple model material has the following textures: a normal map, a diffuse texture with a specular map in its alpha channel, a stencil map, a diffuse “matcap” map, an environment map.
Video Textures
A video file can be used as a texture if Image or Movie texture type is selected.
Note
Video textures support playing back just video tracks. Audio tracks should be played back by using a SPEAKER object.
Supported formats (containers):
- webm, VP8 codec (Chrome, Firefox)
- m4v, H.264 codec (Chrome, Safari, IE)
- ogv, Theora codec (Chrome, Firefox)
We recommend to use WebM as a basic format. It is an open standard supported by the majority of browsers and offers good picture quality.
Note
Files saved in mp4 and ogg formats have different extensions for audio and video data: .mp4 and .ogg extensions are used for sounds, .m4v and .ogv - for video.
Converting resources between different formats is described in the corresponding section.
Setting up the Texture
The following settings are available for video textures on the Texture > Image panel:
- Image > Frames
- Length of the played fragment in frames.
- Image > Offset
- The number of the frame from which the video playback starts.
- Image > Cyclic
- Start video playback afresh each time it finishes.
- Image > Allow NLA
- Play back the texture as part of an NLA track. Additionally, enable NLA in the global scene settings through activating
Scene > NLA. Enabled by default.
For NLA-controlled textures the following option is also applicable:
- Image > Start
- Video playback delay (in frames) when using non-linear animation.
For non-NLA-controlled textures the following option is also applicable:
- Image > Auto Refresh
- Play back the video immediately after the scene is loaded.

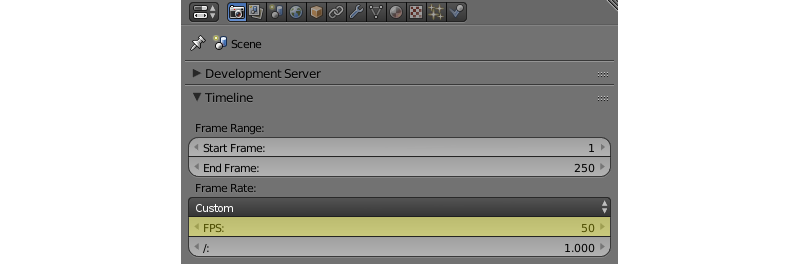
The video playback rate can be increased. To do this set Scene > Dimensions > Frame rate to a value which is different from the FPS value for the videos. Video playback rate is increased proportionally to the ratio of the scene’s FPS and the video’s FPS.
Note
When video textures are used together with NLA, the video playback can be not corresponding with Blender settings. Namely, there can be observed some lagging withing 5-6 frames due to starting/pausing delay of the <video> HTML element.
Specifics of Mobile Devices
The peculiarities for mobile devices are as follows:
- Normal operation of video textures on iPhone is not possible because these devices play back videos via the standard iOS video player. For these devices you need to convert your videos to special
.seqformat by using our converter. - some devices only support playing back only one video file.
- stable operation is not guaranteed if the
Offsetvalue is not zero. - not all devices support changing the video playback rate.
- iPad and iPhone do not provide the possibility to control the audio volume for video, and so the audio track should be removed from the video before the file is added to Blender.
Environment Map
An environment map can be used as a mirror map, as a static sky texture (skydome) and also for implementation of an environment lighting method.
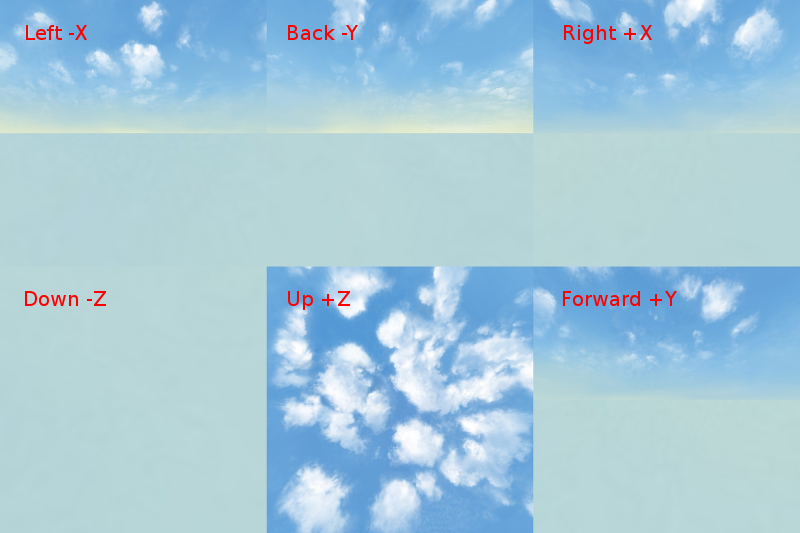
The engine considers it as a cube texture. Environment map bitmaps should contain 6 projected environment images, packed in 2 rows 3 pieces in each (a Blender format). Bitmap dimensions for each image should follow the 2N rule (512, 1024 etc).
It is recommended to use the lossless format (PNG) in order to avoid seams.
Making Environment Maps
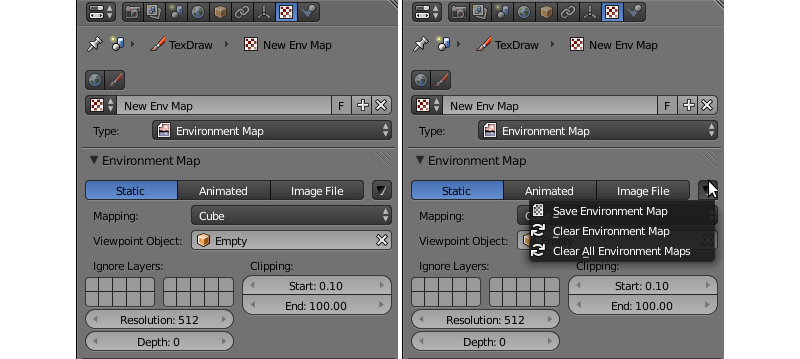
Blender has an option for baking a scene into an environment map. To do this:
- Create a scene for baking.
- Add an empty object in the supposed point of view (
Add > Empty). - Go to the
Worldtab then to theTexturestab and create a new texture with theEnvironment Maptype. - On the
Environment Mappanel select theStaticsource, then select the empty object in theViewport Objectfield, then set the 2N dimension (512, 1024 etc). - Render the scene by pressing
F12(a camera is required). - Save the environment map into a file.

Mirror Map
A mirror map is used to visualize the surface reflection. This is an environment map.
Activation
Select the Environment Map texture type (Type). Enable the Shading > Mirror checkbox on the Textures > Influence panel.
Additional Settings
- Influence > Shading > Mirror
- The degree to which the mirror map affects the reflection. The default value is 1.0.
See also
Skydome
A skydome is used to visualize an infinitely far environment (for example the sky). This is an environment map.
Can be also used to implement one of the environment lighting methods.
Activation
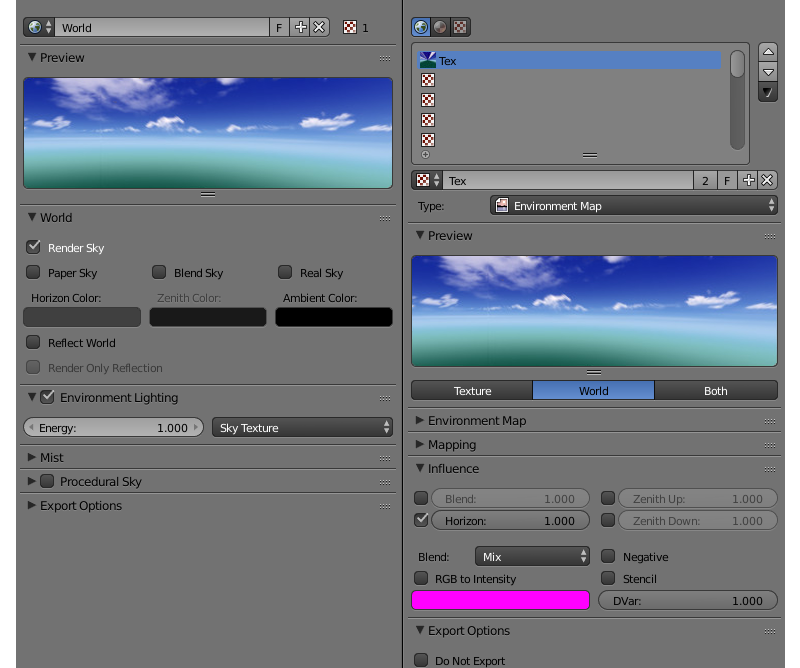
Create a world texture of Environment Map type. Select the Export Options > Sky Texture Usage > SKYDOME option. Enable World > Render Sky under the World tab.
Note
The behavior of the texture is intentionally made as close as possible to the Blender internal render. That’s why the texture may not be displayed upon its default settings. In order to make the texture visible, enable the Influence > Horizon checkbox on its panel and set the Horizon value to 1.0.
Note
To imitate environment lighting you can select the Export Options > Sky Texture Usage > ENVIRONMENT_LIGHTING option. Also, you should select the corresponding option in the world settings: Environment Lighting > Sky Texture.
To use the world texture both for skydome and for environment lighting, select Export Options > Sky Texture Usage > BOTH.
Additional Settings
The engine also supports parameters from the world texture’s Influence panel which are used for sky rendering. Mixing of the world texture with color depends on the World > Horizon Color and World > Zenith Color parameters, as well as on the Paper Sky, Blend Sky and Real Sky options. All mixing options are supported (Mix, Add, Multiply etc).
Note
The Influence panel parameters only affect the sky rendering. They do not affect environment lighting by any means.
Special Texture Types
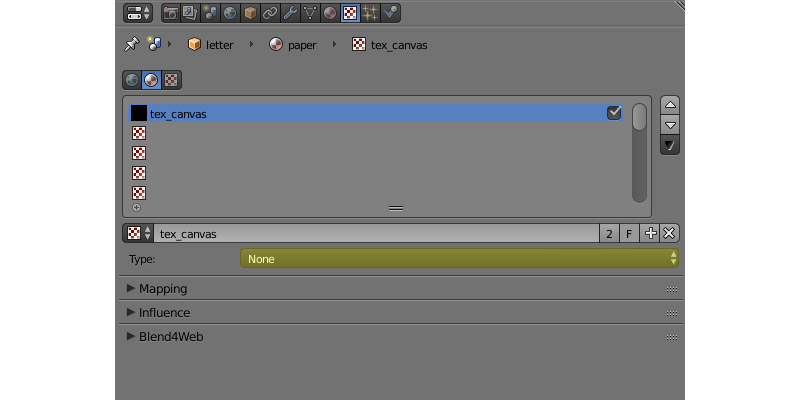
In order to use such textures, select None type under the Textures tab.
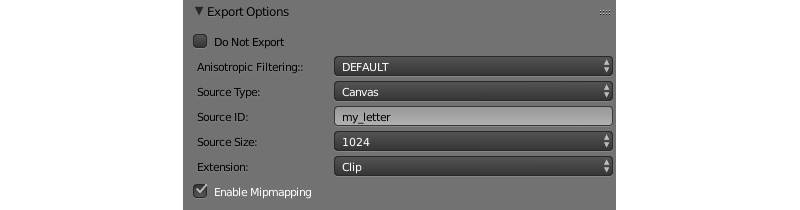
On the Textures > Export Options panel, you can set up properties for these textures:
- Export Options > Source Type
- Select texture type:
Scene- for rendering a 3D scene into the texture,Canvas- for using <canvas> HTML element andNone- for indicating of its absence. - Export Options > Source ID
- The name of the scene which will be rendered into the texture (for
Scene), or ID of the <canvas> HTML element (forCanvas). - Export Options > Source Size
- Texture resolution.
- Export Options > Extension
- Texture coordinates interpretation mode. Default is
Repeat. - Export Options > Enable Mipmapping
- Enable mipmapping for the Canvas texture. Enabled by default.
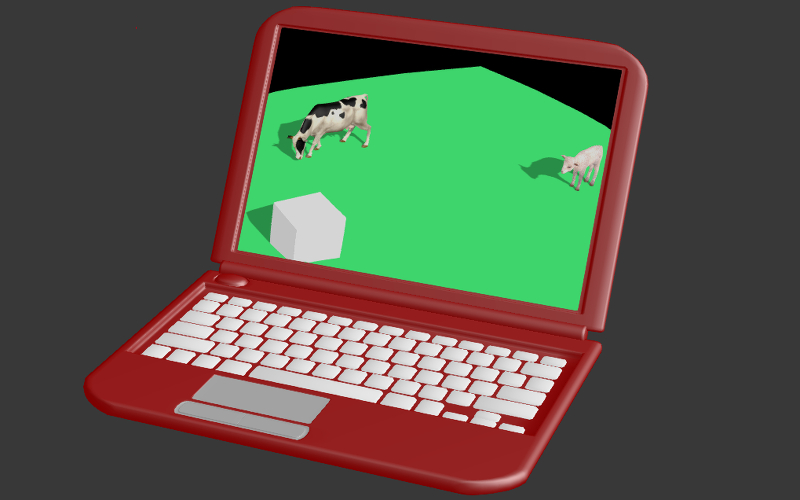
Render-To-Texture
An image of a 3D scene rendered in real time also can be used as a texture for an object in another scene (“main” scene). This technique is known as render-to-texture (RTT) and can be activated by following these steps:
- Create an additional scene that will be rendered to the texture.
- For convenience, give this scene a unique name.
- Create a
Worldsetting for this scene. - Add the objects you need to the scene.
- Add a camera to the scene and set it up.
- Then, switch to the main scene.
- Select the target object and create a UV map for it.
- Create a texture that will act as the rendering target.
- Set the
Nonetype for this texture. - Set the
UVvalue for theCoordinatesparameter under theMappingtab. - Select the
Scenetype in theExport Options > Source Typemenu. - Specify the name of the source scene in the
Export Options > Source IDfield. - Set the texture size in the
Export Options > Source Sizefield (in pixels).
The engine also supports the cyclic rendering of scenes to each other.
Note
A project should contain at least one scene which is not rendered by any other scenes.
Canvas textures
A <canvas> HTML element can be used as a texture. It can be modified via API.
Set the None type for the texture of the target object on the main scene, and select the Canvas type in the Export Options > Source Type menu. Set the texture size in the Export Options > Source Size field (in pixels).
Use the textures module to handle such textures. See the example below.
var m_tex = require("textures");
...
var obj = m_scenes.get_object_by_name("NAME");
var ctx = m_tex.get_canvas_ctx(obj, "TEXTURE_NAME");
...
// operations with canvas context
...
m_tex.update_canvas_ctx(obj, "TEXTURE_NAME");
Use get_canvas_texture_context() to obtain a context - this method requires the “canvas_id” identifier which should be defined in Blender. After operations with the context, the update_canvas_ctx() function has to be called which will render modifications of the “canvas_id” element.
Note
If one Canvas type texture is assigned in Blender to several different objects, then after engine loading it still will be one texture and not several different ones. Any changes applied to it will be applied to all objects using this texture, which can be useful for optimization purposes. In case this effect is not needed, you should assign different textures in Blender or use deep copy after engine startup.