Scene Viewer
Table of Contents
The Side Panel
The side panel consists of three areas: the information board, basic control buttons and the list of drop-down panels with additional control elements differentiated by functionality.
Control elements list in top-to-bottom order
Information Panel
- Build
- The engine build date and time. In the developer version this shows the page load time.
- Scene
- The name of the loaded scene. Path to the file pops-up on mouse hover.
- Loaded
- Loading progress and time.
Basic Control Buttons
- Home
- Reloads the last scene exported from Blender using the
Fast Previewbutton or, if Scene Viewer hasn’t been run from Blender, the default scene is loaded. - Reset
- This button deletes the saved name of the last viewed scene and reloads the page back to display the default scene.
- LOW Q - HIGH Q - ULTRA Q
Drop-down menu for choosing the performance profile of the engine.
See also
- Pause
- Pause rendering.
- Resume
- Resume rendering.
- Rotate
- Enables and disables camera orbiting the loaded scene. Disabled by default.
Additional Panels
Tools & Debug
This panel contains a range of debugging tools, including:
- Overview Outlining Mode
- Turning this option on makes all objects in the scene selectable and enables outline animation to be played upon selecting them. This feature is enabled by default.
- Auto View Mode
- Pressing this button will cause Scene Viewer to load every scene from the
Sceneslist within one second of each other. This feature can be used to check all available content for console errors. - Canvas Resolution Factor
This parameter can be used to increase the resolution of a canvas. The value can vary from 1 to 10. Default value is 1.0 (canvas resolution is equal to the physical resolution of the Scene Viewer window).
Note
The highest available resolution of a canvas may be limited by a web browser.
- Make Screenshot
- This button can be used to make screenshots of the Scene Viewer’s window. Screenshots are stored in the same folder that web browsers use for storing downloaded files.
- Debug View Modes
The list of different rendering modes that can be used for debug purposes. Available modes are:
NONE- normal rendering mode. This is the default mode.OPAQUE WIREFRAME- the scene is rendered in flat white color with darker wireframe. The color used for rendering the wireframe can be adjusted by using theWireframe Edge Colorparameter.TRANSPARENT WIREFRAME- the scene is rendered as in normal mode, but wireframes are added on top of it. Like in the previous mode, the color used for rendering the wireframe can be adjusted by using theWireframe Edge Colorparameter.FRONT BACK VIEW- renders front and back sides of the polygons with different colors.BOUNDINGS- this mode adds wireframe spheres that envelope objects and meshes. The spheres can be blue (for static objects/meshes) or red (for dynamic objects).CLUSTER VIEW- in this view mode, every object in a specific cluster (used for batching) is rendered with a specific color.BATCH VIEW- in this view mode, every batch is rendered using a specific (flat) color. The colors used in rendering can be changed to randomly generated colors by clicking theChange Colorsbutton.RENDER TIME- the scene is rendered in different colors to represent the complexity of various parts of the scene. The lightest parts are rendered using shades of green, heavier - shades of orange, and the most resource-demanding parts of the scene are colored red.- Change Colors
- This button randomly changes the colors that are used in the
CLUSTER VIEWandBATCH VIEWrendering modes. This feature is useful in cases when colors that are picked randomly by the engine are too similar and make it difficult to distinguish parts of the image. - Render Time Threshold (ms)
- This parameter sets a “threshold” time for the
RENDER TIMEview mode. If the engine spends more time on rendering a certain object than the time set by this value, this object will be colored red. The default value is 1.5 ms. - Wireframe Edge Color
- This parameter allows you to change the color of the wireframe edges used in the
OPAQUE WIREFRAMEandTRANSPARENT WIREFRAMEview modes. - HUD Info
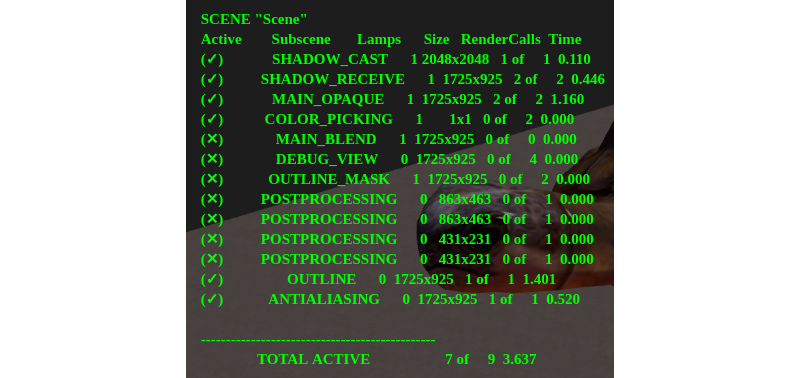
This button shows a list of rendered subscenes and its parameters, including:
- SCENE
- The name of the current scene.
- Active
- Shows whether the subscene is active or not.
- Subscene
- The name of the subscene.
- Lamps
- The number of light sources in the subscene.
- Size
- The size of the render of the subscene.
- RenderCalls
- The number of draw calls in the subscene.
- Time
- The amount of time the engine spends on rendering the subscene.
- TOTAL ACTIVE
- The number of draw calls in all present subscenes and the time that the engine spends on rendering them.
Enabling this parameter may decrease performance of a scene. This option is disabled by default.
- GL Debug
- This parameter, when activated, causes the engine to process low-level errors. This can significantly decrease performance. It is disabled when you start Scene Viewer for the first time, and afterwards, the application will save the state of this option for the next time.
- Min Capabilities Mode
- This parameter makes Scene Viewer run a loaded scene as if it was running on a low-end system (on a mobile device, for example). This allows an artist to find out which materials in the scene may not work as intended with low-end configuration. Disabled by default.
Animation
Animation controls. When viewing animated models, you can select an object and switch its animation with a drop-down menu, switch cyclic animation mode, stop and resume animation, set the required frame (the animation should be stopped to do this).
Available parameters:
- Play All
- Pressing this button will play all available animations.
- Stop All
- Pressing this button will stop playback of all animations that are currently being played.
- Object
- A list of scene objects that have animations.
- Animation Slot
- The list of all animation slots that can be used to apply some animation to an object.
- Animation
- A list of all animations available for a selected object.
- Cyclic
- If this parameter is enabled, the animation will be played repeatedly. If it isn’t, the animation will stop after being played once. Enabled by default.
- Range
- This value shows the length of the selected animation.
- Status
- This value shows the status of the animation, i.e. if it is being played or stopped.
- Playing Animation > Play
- Plays the selected animation.
- Playing Animation > Stop
- Stops the selected animation.
- Set Frame
- Shows the current frame of the animation and can be used to set the current frame.
- Skeletal Mix Factor
- The factor of mixing different skeletal animations together. Default value is 1.0.
NLA
A tool to control Non-Linear Animation (if it is present in the scene). For this panel to work, NLA option should be enabled in the scene’s settings.
Available parameters:
- Range
- Shows the start and the end frame of the NLA strip.
- Status
- Shows the status of NLA animation, i.e. if it is being played or stopped.
- Playing NLA > Play
- This button can be used to play NLA animation.
- Playing NLA > Stop
- This button can be used to stop NLA animation that is currently being played.
- Set Frame
- If an animation is stopped at the moment, this parameter can be used for setting a specific frame of NLA animation.
Shape Keys
Shape Keys control. When viewing models that has shape keys, you can select an object, one of its shape keys and the influence that the key has on the object.
Available parameters:
- Object
- This list contains all scene objects that have Shape Keys.
- Shape Key
- This list contains all Shape Keys attached to a selected object.
- Set Value
- This parameter sets the level of influence of a selected Shape Key on an object. The value can vary from zero to 1.
Materials
Material properties setup. A material can be selected using the drop-down menu. For now, this feature only supports a limited number of properties and only stack (non-node) materials applied to dynamic objects (node materials and static objects are not supported).
Available parameters:
- Material
- A list of all stack materials present in a scene.
- Color
- This parameter defines the base color of a selected material.
- Reflectivity
- This parameter sets the reflectivity factor of a selected material. Its value is equal to zero by default.
- Fresnel
- The power of the Fresnel effect for the reflection. Set to zero by default.
- Fresnel Factor
- A factor of the Fresnel effect. Set to zero by default.
- Parallax Scale
- The scale parameter of the parallax effect. This value can vary from zero to 0.1. Default value is 0.
- Parallax Steps
- The number of steps used for building a parallax surface. The value can vary from 1 to 30. Default value is 5.
Lighting
Setup for direct lighting parameters. A light source can be selected using the drop-down menu. Changing color and intensity is supported. Daytime and sun lighting parameters can also be tweaked on this panel.
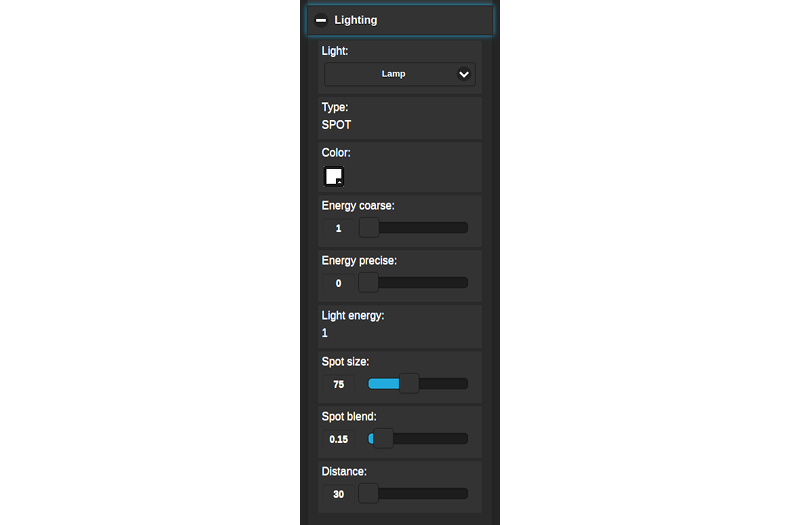
Available parameters:
- Light
- This list contains all light sources present in the scene.
- Type
- The type of the selected light source. This parameter cannot be changed in the Scene Viewer.
- Color
- The base color of the selected light source. By default, white (1; 1; 1) is used.
- Energy Coarse
- This parameter sets the integral part of the energy value for the light source. The value of this parameter can vary from zero to 100. Default value is 1.
- Energy Precise
- This parameter sets the fractional part of the energy value for the light source. The value of this parameter can vary from zero to 1. Set to zero by default.
- Light Energy
- This value is calculated as the sum of the Energy Coarse and Energy Precise parameters. In case both of them have default values, it will be equal to 1.
- Spot Size
- Angle of the light beam emitted by the light source. Default value is 75. This parameter is only available for
Spottype light sources. - Spot Blend
- This defines the softness of the spotlight edge. Default value is 0.15. This parameter is also available for
Spottype light sources only. - Distance
- This parameter sets the distance (in meters) from the light source at which the light emitted by the light source will be half as bright as defined by the
Light Energyvalue. Set to 30 by default.
The following parameters are only available for Sun type light sources:
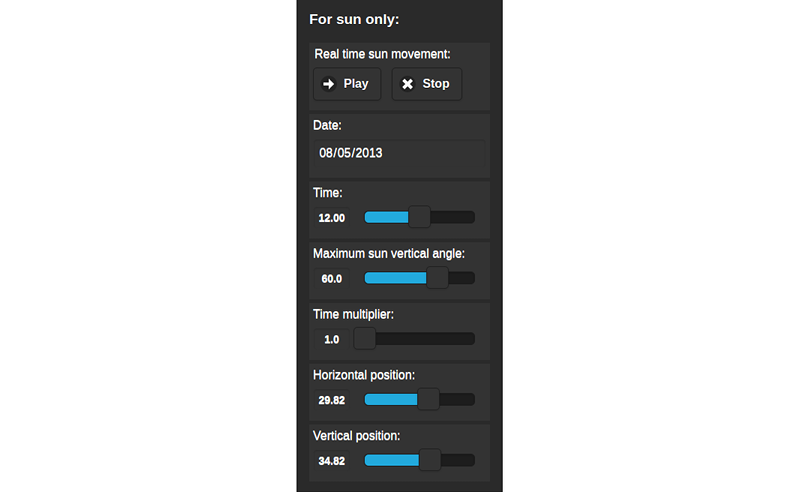
- Real Time Sun Movement > Play
- Pressing this button activates real-time sun movement.
- Real Time Sun Movement > Stop
- Pressing this button stops real-time sun movement.
- Date
- This parameter sets the current date.
- Time
- This parameter set the current time of day. Default value is 12.0.
- Maximum Sun Vertical Angle
- This parameter sets maximum possible vertical angle for a
Suntype light source. Default value is 60. - Time Multiplier
- The value of this parameter defines the speed of the flow of time. Default value is 1.0 (time flows at the same speed it does in real life).
- Horizontal Position
- Horizontal position of the sun on the skydome. Default value is 29.82.
- Vertical Position
- Vertical position of the sun on the skydome. Default value is 34.82.
Ambient
Setup for ambient lighting parameters. Changing the colors and intensity of a hemispheric ambient model is supported.
The settings available for ambient lighting setup are the same as the ones in Blender. They are described in the dedicated section.
Shadows
Setup for shadow parameters, including shadow cascades and shadow edges softening parameters.
The options for setting up shadows are described in the corresponding section of this manual.
Sky
Setup for dynamic sky parameters such as color, sun light scattering parameters etc.
Scene Viewer has access to all Blender parameters used for setting up procedural sky. These parameters are described in the corresponding section.
Sea
Setup for water rendering parameters, including color transitions by depth and by distance from the shore, foam and subsurface scattering parameters, wave dynamics etc.
The settings for water rendering are described in the Outdoor Rendering chapter. Scene Viewer uses the same settings as the Blend4Web engine itself.
Mist
Setup for fog parameters.
Scene Viewer uses standard fog rendering settings that are described in the dedicated chapter.
Wind
Setup for wind parameters, including direction and strength.
The same parameters as the ones used by Scene Viewer are available in Blender. These parameters are described in the corresponding chapter.
Wind Bending
Setup for wind bending effect parameters.
The same set of wind bending parameters is available in Blender. It is described in the Outdoor Rendering chapter.
Screen Space Amb Occlus
Setup for ambient occlusion parameters.
All available settings are described in the Postprocessing Effects chapter.
God Rays
Setup for crepuscular ray effect parameters.
All parameters for this effect are described in the corresponding section.
Bloom
Setup for bloom effect parameters.
This effect uses the same set of parameters as it does in Blender. It is described in greater detail in the corresponding section.
Motion Blur
Motion blur effect settings.
The parameters for adjusting Motion Blur effect are the same ones that are used in Blender. They are described in the Postprocessing Effects chapter.
Glow Materials
Glow Material effect settings.
The settings used for this effect are described in the corresponding section.
Depth of Field
Setup for depth-of-field effect parameters.
The parameters are described in the corresponding chapter.
Color correction
Setup for color correction parameters, including brightness, contrast, exposure and saturation.
The same set of parameters is used for color correction in Blender itself. The description of these parameters is available in the Color Management chapter.
Audio
There is a mixing mode switch on the panel. After it is enabled the mixer interface becomes visible (only for scenes with sound sources).
- Mixer
Enables equalizer that shows various parameters (including volume, frequency, distance, attenuation and others) of the speakers present in the scene, and allows user to adjust these parameters by using a numerical keypad. The available parameters and possibilities are described in greater detail in the dedicated section of the Audio chapter.

This feature is disabled by default.
Stereo View
There is a stereoscopic mode switch on the panel.
Available parameters:
- Stereo Types
A list of all available stereo rendering modes. As of today, three types are supported:
NONE- stereo rendering is not used.ANAGLYPH- anaglyph rendering is used.HMD- rendering for Head-Mounted Displays is used. This option is only available if the system has access to an HMD device.Default setting is
NONE.- HMD Settings
- Shows the HMD setup window.
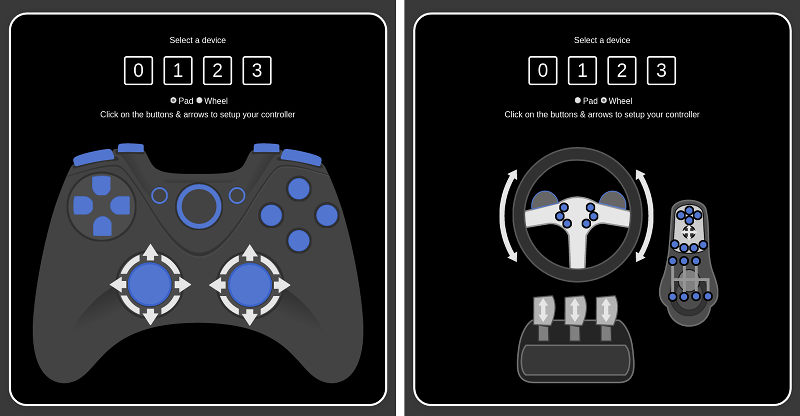
Input Devices
This panel contains tools for setting up the input devices.
- Gyroscope use
- Enables the use of the gyroscope in the application. Disabled by default.
- Gamepad Settings
Clicking this button shows the gamepad settings window.
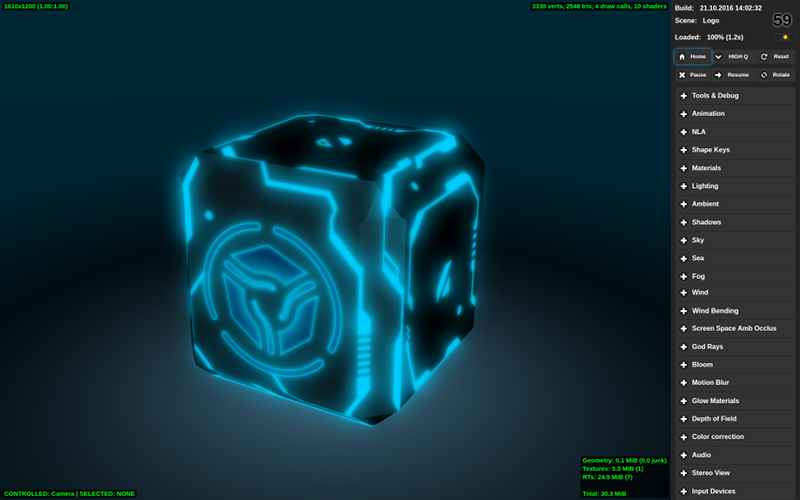
Indicators
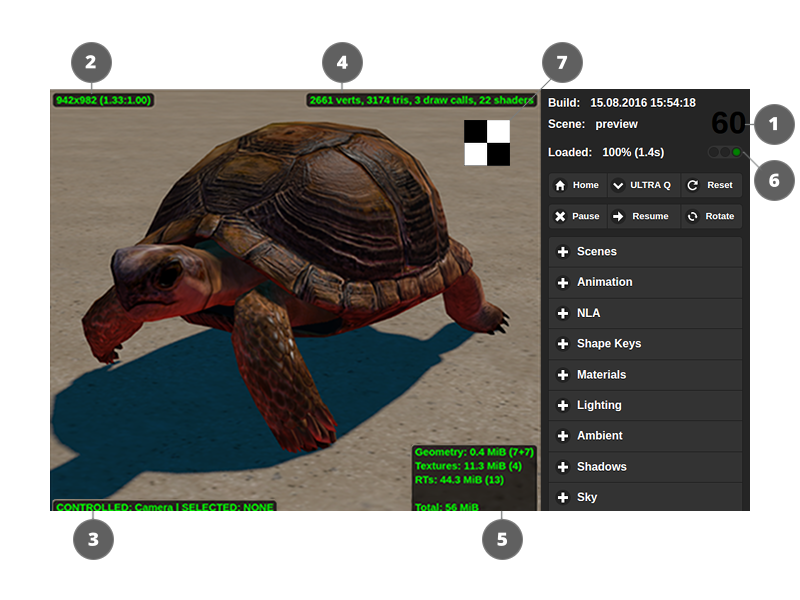
- Frames per second counter
This is located in the top right corner. It displays the averaged and rounded value for the last 1.5 seconds.
- Viewport dimensions
This is located in the top left corner. It displays the viewport dimensions in pixels.
- Selected object and controlled object
This is located in the bottom left corner. It displays the names of selected and controlled objects. Selecting an object is done with the mouse. To control the object directly (normally for physics debugging) press the
Qkey and click on the object. The object movement is performed with theW,A,S,Dkeys. To exit the control mode press theQkey and click on an empty space. The indicator also displays the distance to the selected object in Blender units (meters equivalent).
- Scene complexity indicator
Is located in the top right corner of the rendering area. It displays the number of vertices, triangles, WebGL draw calls and shaders used in the main rendering scene (i.e. shadow rendering calls are not included, for example).
- Video memory indicator
Is located in the bottom right corner of the rendering area. It displays the amount of video memory used by geometry, textures, render targets, and also the total memory usage.
- Scene load error indicator
Is located under the FPS counter. It shows errors and warnings which occur during scene load. Red light means errors, yellow - warnings and green means that the scene was loaded successfully.
Loading errors and warnings can be viewed in the web browser console.
- Background Transparency Indicator
Is located in the top right corner of the screen, right below the Scene Complexity Indicator. This is a debug tool that can be used to find if the background of a scene is transparent or not. It appears as a small square with a black and white checkerboard pattern.
This indicator is visible only when the background of the application is transparent. It is shown on the picture above only to give the reader the general idea of how it will look under real circumstances.