I'm using <iframe allowfullscreen src="path/to/apple.html" width="800" height="500"></iframe> or method #1, how can I adjust the 3D content inside ? and how can I remove or hide the Control Panel button??
Webmasters! 3 Ways to 3D Web
2014-08-01
This article explains how to place Blend4Web content on websites.
Method #1 (Simplest): Self-Contained HTML File
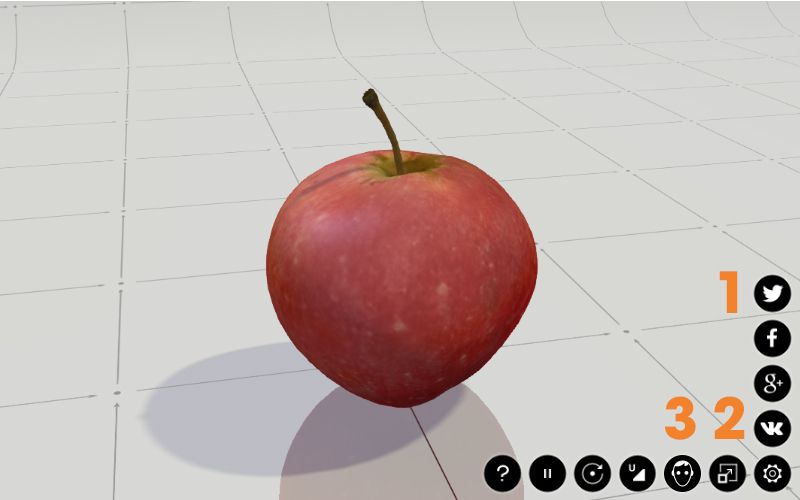
The possibility to export scenes from Blender to a single HTML file is one the most exciting features of Blend4Web. Such a file is an all-sufficient web page that can be opened with any standard browser and shared through any means (via email, USB drive/memory card, cloud storage, etc). You can, of course, share it online too. Particularly, you can upload and embed it in a website using iframe for which you can set the dimensions and specify other properties such as allowfullscreen:
<iframe allowfullscreen src="path/to/apple.html" width="800" height="500"></iframe>
The main advantage of this method is its simplicity. Blend4Web newbies can follow these steps:
- 1. Download and install Blend4Web;
- 2. Export a pre-created scene via Blender menu File > Export > Blend4Web (.html);
- 3. Upload the HTML file to your website and embed it with iframe.
Of course, you can use HTML files as standalone web pages without any embedding too.
Method #2 (More Optimized): Web Player + JSON
The second method is an alternative to the first and the result seemingly looks the same: 3D content with control elements is embedded in a web page.
Nevertheless, this method of embedding is different: instead of a single HTML file, a combination of the Web Player and a separate JSON file is used.
<iframe allowfullscreen src="path/to/webplayer.html?load=path/to/apple.json" width="800" height="500"></iframe>
Where do you get the Web Player? You can copy the whole directory blend4web/deploy/apps/webplayer/ with the Web Player files from your Blend4Web SDK and deploy it on your website.
JSON files can be exported in the same way as the HTML files File > Export > Blend4Web (.json). Upload your exported .json file (with the accompanying .bin file and possible textures) to your website and specify the path to it with the load attribute. Both absolute and relative URLs are supported.
Learn more about features of the Web Player in the corresponding section of the User Manual.
Note
If you try to launch this app locally (not from a remote web server), it won't run due to the same-origin policy. For loading and viewing exported .json files we recommend using the Project Manager. With the Project Manager you can also create production-ready apps based on the Web Player without the need to copy files manually.
While this method looks a bit more complicated, it offers several benefits. Exported scenes are:
- 1. smaller and can be loaded faster;
- 2. capable to be used by programmed apps other than the standard Web Player;
- 3. designed to allow you to use Blend4Web's physics engine;
- 4. decoupled from the Web Player's code and are not subject to the licensing as it is with HTML files.
Method #3 (Customizable): Interactive 3D Web App
Finally, we can convert the web page itself into an interactive 3D application! Let's demonstrate this with a simple example: we'll place a button on this page to trigger interesting animation.
Check it out: the page content can be viewed through translucent animated balloons with volumetric highlights. Plus, there is a magical sound!
The stripped version can be seen live here. The source files can be found in this SDK folder: apps_dev/tutorials/web_page_integration/.
How this animation effect was created is described in this article. Now, let's look at how it was integrated with this page. This isn't any more difficult than making something similar with jQuery or the fading Flash.
Note
Once again, it is very convenient to use the Project Manager to create a full set of application files (HTML, CSS, JS) and modify them instead of creating everything from scratch.
First of all, you should link the Blend4Web JavaScript library b4w.min.js that you can copy from your SDK. The logic is coded in separate script file called example.js:
<script type="text/javascript" src="b4w.min.js"></script>
<script type="text/javascript" src="example.js"></script>
Then we add div elements for the rendering area and the button:
<div id="canvas_cont"></div>
<div id="run_button"></div>
The script for this small app is very short. It starts with a module declaration and then it imports required Blend4Web modules. The app initializes a WebGL context first. Pay attention to the init parameters: div element id is supplied to canvas_container_id yet transparency is enabled with alpha:
exports.init = function() {
    m_app.init({
        canvas_container_id: "canvas_cont",
        callback: init_cb,
        alpha: true
    });
}
Then the .json file is loaded:
m_data.load("path/to/flying_letters.json", load_cb);
After the loading is complete, the load_cb() callback is fired. Inside this function, we can start manipulating our 3D scene. First, we stop the armature animation because it was set to auto-play in Blender settings (our 3D artist used skeletal animation for balloons and it was convenient for him to tweak the animation outside the app).
var letters_arm = m_scs.get_object_by_name("beads_armature");
m_anim.stop(letters_arm);
Then we attach a mousedown event listener to our button:
run_button.addEventListener("mousedown", demo_link_click, false);
Every time the button is clicked the demo_link_click() function is called. Inside it we play sound...
var spk = m_scs.get_object_by_name("Speaker");
m_sfx.play_def(spk);
...and run the animation of flying balloons. So simple!
var letters_arm = m_scs.get_object_by_name("beads_armature");
m_anim.apply(letters_arm, "flying_letters");
m_anim.play(letters_arm, letters_obj_cb);
After all the balloons fly out from the bottom and are positioned in a row, we switch their animation to idle:
m_anim.apply(obj, "flying_letters_idle");
m_anim.set_behavior(obj, m_anim.AB_CYCLIC);
m_anim.play(obj);
That's it!
In Closing
WebGL gives the unique opportunity to seamlessly integrate interactive 3D content with other web technologies. With Blend4Web, you can easily create such content with Blender, deploy it on web pages and combine it with any HTML elements.
Changelog
[2014-08-01] Initial release.
[2014-10-22] Updated file paths.
[2014-10-30] Updated links to the web player. Added allowfullscreen attribute. Removed deprecated bg parameter.
[2014-12-03] Added sound.
[2015-04-23] Updated file path to webplayer sources. Updated variable and animation names. Removed deferred_rendering and context_antialias parameters from m_app.init() function.
[2015-05-15] Added CSS style description. Rendering area resize logic replaces from script to CSS table. Added link to standalone application. Added resize() function description.
[2015-12-10] Removed app.js module.
[2016-02-11] Fixed css.
[2016-04-08] Standalone B4W add-on is no longer mentioned to discourage its use. Fixed links. Removed show_fps URL attribute to simplify things. Added info about the Project Manager. Removed all CSS code and simplified code explanation.
[2016-06-16] Added the possibility to use physics to the benefits list of the second method. Clarified other items in that list.
[2016-09-21] Added an advice to use the Project Manager for creating apps.
[2017-01-12] Minor changes in the text.
[2017-03-22] Updated the link to the licensing options. Fixed the links to the #3 app sources.