User posts mo-systeme
30 January 2018 20:08

Hi everybody 
I am facing almost the same request.
To be concrete: i ve made this little app where (till now) the only possibility to "save" the configuration is to make an image screenshot of it.
I found the idea of "save" and "load" from the app in the first post above quite good, but in my case I would like that the 3d model I've set up can be call thru a URL Link ? To keep the communication easier when fowarding the online visualisation.
I am still begining with js programming and I guess that files have to be save on the app server if I want to make a configuration callable thru a simple URL link. I wondering also if there is any possibility to save also the uploaded textures (which I call "branding", in my app) in the same file with the configuration parameters on the server, and not separate.
What I am also wondering about the "save" and "load" solution (first post above) is if it is safe? Regarding code injection?
I guess the app is running in the webbrowser localy, so that shouldn't be a problem, but I am not sure.
Thank you in advance for your advices !

www.mo-systeme.com
02 May 2017 16:56
Hi Ivan,
thank you very much !
That's very cool !
As I'm not professional programmer (I'm a kind of so-called "copy paste" programmer) I'm not sure to understand very well your explanations (I'll check what is a "callback"). But anyway, I am so glad that it works at the end.
After all, here we are the corrected script (it has to be saved as HTML file) for those who want to build a "change texture image" button:
Enjoy
Thanks again !
thank you very much !
That's very cool !
As I'm not professional programmer (I'm a kind of so-called "copy paste" programmer) I'm not sure to understand very well your explanations (I'll check what is a "callback"). But anyway, I am so glad that it works at the end.
After all, here we are the corrected script (it has to be saved as HTML file) for those who want to build a "change texture image" button:
 <!DOCTYPE html>

<html>
    <head>
        <style type="text/css">
            #canvas_cont {
                position: absolute;
                width: 100%;
                height: 100%;
                top: 200;
                left: 0;
            }
        </style>

<script src="b4w.min.js"></script>

<script>
//Display texture on the 3d model from loading imgae file
"use strict";

b4w.register("TextureUpload", function(exports, require) {

var m_tex     = require("textures");
var m_data    = require("data");
var m_app     = require("app");
var m_main    = require("main");
var m_sfx     = require("sfx");
var m_scenes  = require("scenes");
var m_cfg     = require("config");
var m_version = require("version");

var DEBUG = (m_version.type() === "DEBUG");


exports.init = function() {
    m_app.init({
        canvas_container_id: "canvas_cont",
        callback: init_cb,
        show_fps: true,
        physics_enabled: false,
        background_color: [1, 1, 1, 1],
        alpha: true,
        autoresize: true,
        assets_dds_available: !DEBUG,
        assets_min50_available: !DEBUG,
        console_verbose: true
    });
}

function init_cb(canvas_elem, success) {

    if (!success) {
        console.log("b4w init failure");
        return;
    }
    load();
}

function load() {
    m_data.load("TextureUpload.json", load_cb);
}

function load_cb(data_id) {
    m_app.enable_camera_controls();
    load_data();
}


function load_data() {
    var cube = m_scenes.get_object_by_name("Cube");
    var ctx_image = m_tex.get_canvas_ctx(cube, "Canvas_TextureNEW");
	var changeImageBtn = document.getElementById('changeImageBtn');
	var fileInput = document.getElementById('fileInput');


//Display the default texture image on the 3D model
    var img = new Image();
    img.src = "data:image/png;base64,iVBORw0KGgoAAAANSUhEUgAAAA8AAAAPCAYAAAA71pVKAAACIklEQVQokS2SWW/aYBBFr2NjSEJRoqo/pFUSwuYNm0CUNP3/Uit1SdWgsAgMNjb+Th/M82iO7pw7iho5gSASzM73RPach2aJJwhdCAXTizdiwcQtiQSBsyZyDQoFgSCxS/o64KtgIIhduBXMXOjpSCToCQIL+trS1xuKzyBxd3jWLyYtCO2CkZURujmRA3FzTmjtSJqG0DYMtOL5ogYo1IFpAzzBUAWBA+POH4Y6ElrgC8ZuPU/OMwJnw0ArAos6duIYfDuD1EAG7GB6tWAk8NuvsARyA5saENqGnkBTwcyBewFlhdkAmWGgOYngRjnkwHYOuakTNA2RQLFgbB3w2j8hP0IJbGDW2dAXBNcLWFEDlvUJobWjpwpN9M6DXZvst3d8bqzxO1u6yni5NNyeADfK8duv+KolzlxQYGf4Snm5qrhT3Wty6n0ieNCRJ8Gj4NGq405tQ9yYo6QBsQNftOfbpxLPeSe+XDNuFdxriddI8ZtLvMaGob0maWfcqeBWFeqfio8/rDB/gS2wS2vrORjAVJBtALaUa/Cvc7ouyLcK/MaKgap6sQQooIKsXJBXsCtXVBVAikmh23rHOwcFqhhozvNHOPwrwKQUxQ+yfA385li+1cAMqL7DFkZWxkhHFJ2tmDjQFSSdBV2lDJswdKHnQnAGQ+2ZtOBG8NSGUAe+uqDgZPfRgYlTEFkVkQVD1S8ZyRAqJdKeQCXTFnja4CvlPzEgSFZRaHh+AAAAAElFTkSuQmCC";
    img.onload = function() {
    ctx_image.drawImage(img, 0, 0, ctx_image.canvas.width, ctx_image.canvas.height);
    m_tex.update_canvas_ctx(cube, "Canvas_TextureNEW");
    }


//Display an other texture image on the 3D model by clicking "Change image" Button
	changeImageBtn.addEventListener('click', function() {
	var img = new Image();
	img.src = "data:image/png;base64,iVBORw0KGgoAAAANSUhEUgAAAA8AAAAPCAYAAAA71pVKAAACHElEQVQokT2TTW8TZxRGz/s19limMQHULPIXygqhINGiqmojiLpIQV1Ezaqof7oLJBIaEurYODLOuDNzuhhgdaUrPdLRee6lD7hJxaZgH3e0YE+0D9hTezPCFjSMhllGSqUpyCYV24AmbJhoxG1GMzZMbQOumWqFm4hWOGeqjKUpQ9Axnudol6PbiOboRbqvo+ib8Z59wVUawm/H+Cncky58Y8PE8xx9jD7LvSdsnKeZfcF/wR+DPkUPo7ZMvpJiQSN2Ofost55w5ilXrtgfiELtcbn2OTe+4tqeXR2hBemJbjNuI56w8ZQrf+dvz+KuVvgR/ItLj2j9Lc59X30WWCF9GOSYo/M0c8W+Z3HXJux4m6eaKz/EPZdhz3dhpjG6Tmgo0lPbMPUi3bf/Iq9iCBZc5AfDvmCXsI/f2kaULA1FQ601fhjf8zpOXVSDB0doSt6ChqARN4SBtJpKk3GddnzPrn+Gtx6hB1FfoN8l/Rn9BX2R1j4a6R9s/Ic7XlVIG7BNtZcJn+fOp+iTsZ4y96Do92HuQdBDNj7MepyXw4UVxDzUcc5dX/POI/SH+MljFj5BD2n9KeuvaenjpC/T0ot8xxVIz8we7AKuUuV1Tn6shupkYsvMVRnq2YLLkL2ts8aZrCMuEjbsa4Xm7DbhZV1rnGgaHuU/dmwLGpJdwJ4kN59vtvtiMQ8U6xBsycpdu4AdaBgquim4KNn/AUiWzb7MLipNAAAAAElFTkSuQmCC";
 	img.onload = function() {
   	ctx_image.drawImage(img, 0, 0, ctx_image.canvas.width, ctx_image.canvas.height);
   	m_tex.update_canvas_ctx(cube, "Canvas_TextureNEW");
  	}
	});


//Display the uploaded texture image on the 3D model by selecting it thru "File upload" Button
	fileInput.addEventListener('change', function() {
	var file = fileInput.files[0];

	var img = new Image();
	img.onload = function() {
    ctx_image.drawImage(img, 0, 0, ctx_image.canvas.width, ctx_image.canvas.height);
    m_tex.update_canvas_ctx(cube, "Canvas_TextureNEW");
	}
	img.src = URL.createObjectURL(file);
	});


}

});


b4w.require("TextureUpload").init();
</script>

    </head>

    <body>

      <button id="changeImageBtn">Change image</button>
      <br>
      or
      <br>
      <input type='file' id="fileInput" />

      <div id="canvas_cont"></div>


    </body>

</html>
Enjoy
Thanks again !
www.mo-systeme.com
28 April 2017 20:09
Hi everybody,
I am also trying to make the texture of my 3D model changing thru an uploaded image file. But in somehow it doesn't work .
.
![]()
Here in my script (I have include HTML and Javascript scripts all together in one file) the image is well displayed when loading the HTML file, and button "Change Image" works too. But the Upload File not.
I have marked the concerned part of the script (close to the script end) with the following comment:
//Display the uploaded texture image on the 3D model by selecting it thru "File upload" Button
I attach also the json file, bin file and blender file, that you can test the script if you want. Following common blend4web files are also needed to run the HTML file (my script above is saved as HTML file):
-b4w.min.js
-uranium.js
-uranium.js.mem
At the end I would like to be able to upload an image texture on my 3d model without to have to save it on the server. I would like to "paste" it on my 3d model as a data URL image. As it already works in the 2 first cases.
Thank you very much for any advices, clues

I am also trying to make the texture of my 3D model changing thru an uploaded image file. But in somehow it doesn't work
 .
.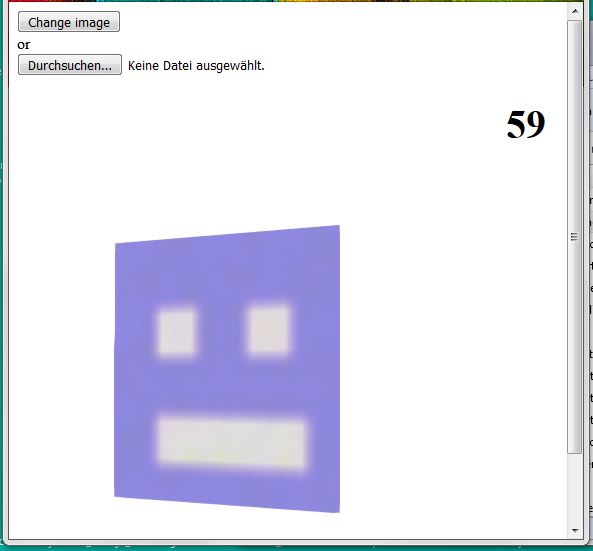
Here in my script (I have include HTML and Javascript scripts all together in one file) the image is well displayed when loading the HTML file, and button "Change Image" works too. But the Upload File not.
I have marked the concerned part of the script (close to the script end) with the following comment:
//Display the uploaded texture image on the 3D model by selecting it thru "File upload" Button
 <!DOCTYPE html>

<html>
    <head>
        <style type="text/css">
            #canvas_cont {
                position: absolute;
                width: 100%;
                height: 100%;
                top: 200;
                left: 0;
            }
        </style>

<script src="b4w.min.js"></script>

<script>
//Display texture on the 3d model from loading imgae file
"use strict";

b4w.register("TextureUpload", function(exports, require) {

var m_tex     = require("textures");
var m_data    = require("data");
var m_app     = require("app");
var m_main    = require("main");
var m_sfx     = require("sfx");
var m_scenes  = require("scenes");
var m_cfg     = require("config");
var m_version = require("version");

var DEBUG = (m_version.type() === "DEBUG");


exports.init = function() {
    m_app.init({
        canvas_container_id: "canvas_cont",
        callback: init_cb,
        show_fps: true,
        physics_enabled: false,
        background_color: [1, 1, 1, 1],
        alpha: true,
        autoresize: true,
        assets_dds_available: !DEBUG,
        assets_min50_available: !DEBUG,
        console_verbose: true
    });
}

function init_cb(canvas_elem, success) {

    if (!success) {
        console.log("b4w init failure");
        return;
    }
    load();
}

function load() {
    m_data.load("TextureUpload.json", load_cb);
}

function load_cb(data_id) {
    m_app.enable_camera_controls();
    load_data();
}


function load_data() {
    var cube = m_scenes.get_object_by_name("Cube");
    var ctx_image = m_tex.get_canvas_ctx(cube, "Canvas_TextureNEW");
	var changeImageBtn = document.getElementById('changeImageBtn');
	var fileInput = document.getElementById('fileInput');


//Display the default texture image on the 3D model
    var img = new Image();
    img.src = "data:image/png;base64,iVBORw0KGgoAAAANSUhEUgAAAA8AAAAPCAYAAAA71pVKAAACIklEQVQokS2SWW/aYBBFr2NjSEJRoqo/pFUSwuYNm0CUNP3/Uit1SdWgsAgMNjb+Th/M82iO7pw7iho5gSASzM73RPach2aJJwhdCAXTizdiwcQtiQSBsyZyDQoFgSCxS/o64KtgIIhduBXMXOjpSCToCQIL+trS1xuKzyBxd3jWLyYtCO2CkZURujmRA3FzTmjtSJqG0DYMtOL5ogYo1IFpAzzBUAWBA+POH4Y6ElrgC8ZuPU/OMwJnw0ArAos6duIYfDuD1EAG7GB6tWAk8NuvsARyA5saENqGnkBTwcyBewFlhdkAmWGgOYngRjnkwHYOuakTNA2RQLFgbB3w2j8hP0IJbGDW2dAXBNcLWFEDlvUJobWjpwpN9M6DXZvst3d8bqzxO1u6yni5NNyeADfK8duv+KolzlxQYGf4Snm5qrhT3Wty6n0ieNCRJ8Gj4NGq405tQ9yYo6QBsQNftOfbpxLPeSe+XDNuFdxriddI8ZtLvMaGob0maWfcqeBWFeqfio8/rDB/gS2wS2vrORjAVJBtALaUa/Cvc7ouyLcK/MaKgap6sQQooIKsXJBXsCtXVBVAikmh23rHOwcFqhhozvNHOPwrwKQUxQ+yfA385li+1cAMqL7DFkZWxkhHFJ2tmDjQFSSdBV2lDJswdKHnQnAGQ+2ZtOBG8NSGUAe+uqDgZPfRgYlTEFkVkQVD1S8ZyRAqJdKeQCXTFnja4CvlPzEgSFZRaHh+AAAAAElFTkSuQmCC";
    img.onload = function() {
    ctx_image.drawImage(img, 0, 0, ctx_image.canvas.width, ctx_image.canvas.height);
    m_tex.update_canvas_ctx(cube, "Canvas_TextureNEW");
    }


//Display an other texture image on the 3D model by clicking "Change image" Button
	changeImageBtn.addEventListener('click', function() {
	var img = new Image();
	img.src = "data:image/png;base64,iVBORw0KGgoAAAANSUhEUgAAAA8AAAAPCAYAAAA71pVKAAACHElEQVQokT2TTW8TZxRGz/s19limMQHULPIXygqhINGiqmojiLpIQV1Ezaqof7oLJBIaEurYODLOuDNzuhhgdaUrPdLRee6lD7hJxaZgH3e0YE+0D9hTezPCFjSMhllGSqUpyCYV24AmbJhoxG1GMzZMbQOumWqFm4hWOGeqjKUpQ9Axnudol6PbiOboRbqvo+ib8Z59wVUawm/H+Cncky58Y8PE8xx9jD7LvSdsnKeZfcF/wR+DPkUPo7ZMvpJiQSN2Ofost55w5ilXrtgfiELtcbn2OTe+4tqeXR2hBemJbjNuI56w8ZQrf+dvz+KuVvgR/ItLj2j9Lc59X30WWCF9GOSYo/M0c8W+Z3HXJux4m6eaKz/EPZdhz3dhpjG6Tmgo0lPbMPUi3bf/Iq9iCBZc5AfDvmCXsI/f2kaULA1FQ601fhjf8zpOXVSDB0doSt6ChqARN4SBtJpKk3GddnzPrn+Gtx6hB1FfoN8l/Rn9BX2R1j4a6R9s/Ic7XlVIG7BNtZcJn+fOp+iTsZ4y96Do92HuQdBDNj7MepyXw4UVxDzUcc5dX/POI/SH+MljFj5BD2n9KeuvaenjpC/T0ot8xxVIz8we7AKuUuV1Tn6shupkYsvMVRnq2YLLkL2ts8aZrCMuEjbsa4Xm7DbhZV1rnGgaHuU/dmwLGpJdwJ4kN59vtvtiMQ8U6xBsycpdu4AdaBgquim4KNn/AUiWzb7MLipNAAAAAElFTkSuQmCC";
 	img.onload = function() {
   	ctx_image.drawImage(img, 0, 0, ctx_image.canvas.width, ctx_image.canvas.height);
   	m_tex.update_canvas_ctx(cube, "Canvas_TextureNEW");
  	}
	});


//Display the uploaded texture image on the 3D model by selecting it thru "File upload" Button
	fileInput.addEventListener('change', function() {
	var file = fileInput.files[0];
	var reader = new FileReader();
	reader.readAsDataURL(file);
	var img = new Image();
	img.src = reader.result;

	reader.onload = function() {
   	ctx_image.drawImage(img, 0, 0, ctx_image.canvas.width, ctx_image.canvas.height);
  	m_tex.update_canvas_ctx(cube, "Canvas_TextureNEW");
  	}

	});


}

});


b4w.require("TextureUpload").init();
</script>

    </head>

    <body>

      <button id="changeImageBtn">Change image</button>
      <br>
      or
      <br>
      <input type='file' id="fileInput" />

      <div id="canvas_cont"></div>


    </body>

</html>
I attach also the json file, bin file and blender file, that you can test the script if you want. Following common blend4web files are also needed to run the HTML file (my script above is saved as HTML file):
-b4w.min.js
-uranium.js
-uranium.js.mem
At the end I would like to be able to upload an image texture on my 3d model without to have to save it on the server. I would like to "paste" it on my 3d model as a data URL image. As it already works in the 2 first cases.
Thank you very much for any advices, clues
www.mo-systeme.com
31 March 2017 17:38
If you need a transparent object you always need to change this parameter to something else than Opaque.All right, thank you for this advice
www.mo-systeme.com
31 March 2017 17:37
Hi,
me again. I try an other way to change the textured material by clicking many times on the textured object itself, incrementing variable. Also quite easy thanks Blend4web logic nodes .
.
You can test my blend file:
texture-change2.blend
me again. I try an other way to change the textured material by clicking many times on the textured object itself, incrementing variable. Also quite easy thanks Blend4web logic nodes
 .
.You can test my blend file:
texture-change2.blend
www.mo-systeme.com
31 March 2017 16:50
Hi Mikhail,
thank you for your fast answer!
I didn't notice the node "inherit material" at the first look . But finaly I do, and I managed to do what I wanted to. Great, it is actually pretty easy. If it can help somebody with the same question as mine, please have a look in my attached blend file.
texture-change.blend
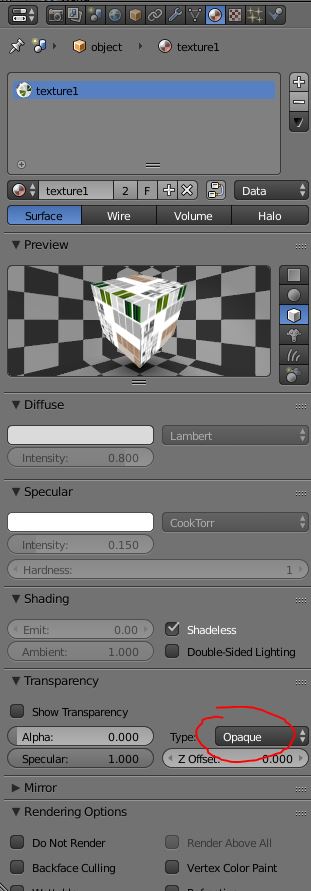
One last thing to pay attention to, the transparency of the material has to be turned on "opaque" like this. If not, the textured material (and your object) won't be displayed (at least for me).
![]()
thank you for your fast answer!
I didn't notice the node "inherit material" at the first look
 . But finaly I do, and I managed to do what I wanted to. Great, it is actually pretty easy. If it can help somebody with the same question as mine, please have a look in my attached blend file.
texture-change.blend
One last thing to pay attention to, the transparency of the material has to be turned on "opaque" like this. If not, the textured material (and your object) won't be displayed (at least for me).
www.mo-systeme.com
30 March 2017 14:12
Hi,
is that also possible to do it thru logic nodes, without scripting?

Thank you
is that also possible to do it thru logic nodes, without scripting?

Thank you
www.mo-systeme.com
25 January 2017 16:54
Hi Ivan,
thank you very much !! It works now .
.
Very good
thank you very much !! It works now
 .
.Very good
www.mo-systeme.com
24 January 2017 17:01
Hi,
I am trying to make a button triggering the outline anim from an other object on the cursor is passing over the button. You would like to have this effect to show the user more clearly on which object the user will act if he clicks on the button.
I build a simple 3D scene to test it allready and try to script something but it doesn't work (I am not programmer, I am learning by doing):
My script (contained in the js file of the app) :
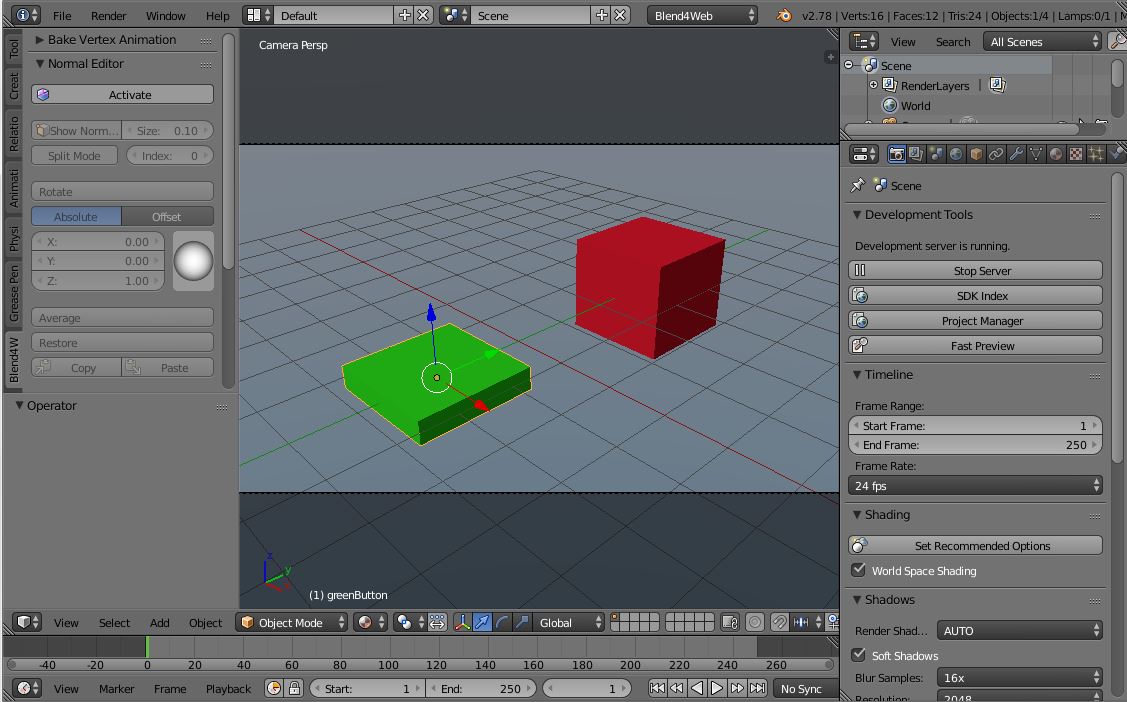
I would like when my mouse cursor is passing over the green button that the red cube plays its outline animation:
![]()
I attach also my Blend file: hover.blend
Has anybody a clue to make it works ?
Thank you very much
I am trying to make a button triggering the outline anim from an other object on the cursor is passing over the button. You would like to have this effect to show the user more clearly on which object the user will act if he clicks on the button.
I build a simple 3D scene to test it allready and try to script something but it doesn't work (I am not programmer, I am learning by doing):
My script (contained in the js file of the app) :
"use strict"

// register the application module
b4w.register("hover_app", function(exports, require) {

// import modules used by the app
var m_app       = require("app");
var m_cfg       = require("config");
var m_data      = require("data");
var m_preloader = require("preloader");
var m_ver       = require("version");
var m_mouse     = require("mouse");
var m_scenes    = require("scenes");


// detect application mode
var DEBUG = (m_ver.type() == "DEBUG");

// automatically detect assets path
var APP_ASSETS_PATH = m_cfg.get_std_assets_path() + "hover/";

/**
 * export the method to initialize the app (called at the bottom of this file)
 */
exports.init = function() {
    m_app.init({
        canvas_container_id: "main_canvas_container",
        callback: init_cb,
        show_fps: DEBUG,
        console_verbose: DEBUG,
        autoresize: true
    });
}

/**
 * callback executed when the app is initialized
 */
function init_cb(canvas_elem, success) {

    if (!success) {
        console.log("b4w init failure");
        return;
    }

    m_preloader.create_preloader();

    // ignore right-click on the canvas element
    canvas_elem.oncontextmenu = function(e) {
        e.preventDefault();
        e.stopPropagation();
        return false;
    };

    load();
}

/**
 * load the scene data
 */
function load() {
    m_data.load(APP_ASSETS_PATH + "hover.json", load_cb, preloader_cb);
}

/**
 * update the app's preloader
 */
function preloader_cb(percentage) {
    m_preloader.update_preloader(percentage);
}

/**
 * callback executed when the scene data is loaded
 */
function load_cb(data_id, success) {

    if (!success) {
        console.log("b4w load failure");
        return;
    }

    m_app.enable_camera_controls();

    // place your code here

	m_mouse.enable_mouse_hover_outline();

    var redCube = m_scenes.get_object_by_name("redCube");
    var greenButton = m_scenes.get_object_by_name("greenButton");

	document.getElementById(greenButton).addEventListener("mouseover", hoverObject, false);
	document.getElementById(greenButton).addEventListener("mouseout", outOfObject, false);

	function hoverObject(){
    m_scenes.apply_outline_anim(redCube,0.5,0.5,0);
	}

	function outOfObject(){
	m_scenes.clear_outline_anim(redCube);
	}


}


});

// import the app module and start the app by calling the init method
b4w.require("hover_app").init();
I would like when my mouse cursor is passing over the green button that the red cube plays its outline animation:
I attach also my Blend file: hover.blend
Has anybody a clue to make it works ?
Thank you very much

www.mo-systeme.com