
The New Normal Editor
2015-06-23
Introduction
The editing of normals is quite a simple and effective way to change the shading of a model without changing its geometry.
The most known usage of editing normals is creating spherical shading on the foliage of plants. As you can see, the tree with edited normals (on the right) is shaded more smoothly, compared to the tree on the left whose shading reveals the low-poly nature of the geometry.
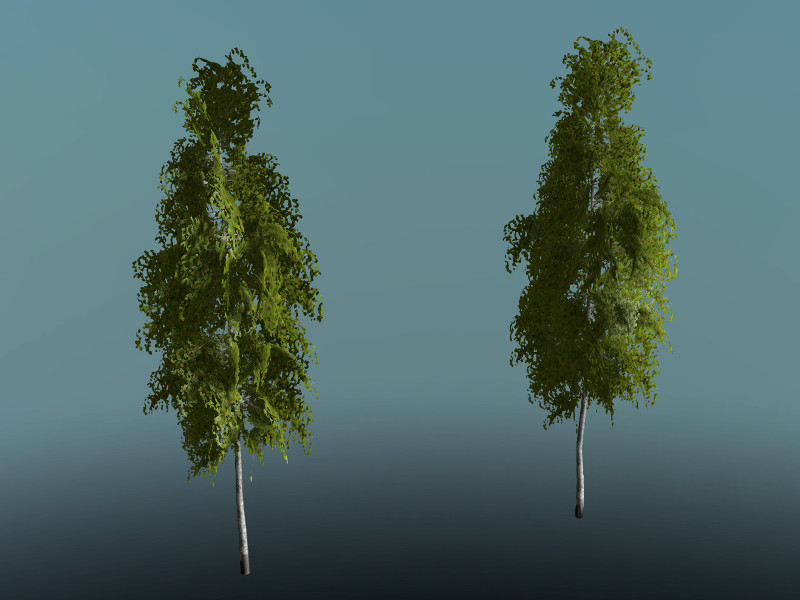
On the left - a tree with default shading, on the right - the same tree with edited normals.
This technology is also used to make realistic shading of planes with grass texture. When you look at the grass against the direction of light, you can see that it becomes unnaturally dark. If you change the direction of the normals up, then the shading will create an affect of above lighting from any view.

On the left - default shading of grass, on the right - the same grass with edited normals.
This method is also used to create flat shading of low-poly models with bevels, as at these gates. The shading of the model without edited normals looks blurred, while the model with edited normals looks sharper on the corners.

On the left - a gate model with default shading, in the center - the same model with edited normals, at the right - its wireframe.
Photorealistic model of the glasses is a more complex example of using the normal editor. Correct shading was achieved by thorough and careful editing of each vertex normal of the model.

On the left - glasses with default shading, on the right - the same model with edited normals.
Overview of the New Normal Editor
Anyone who is already familiar with the capabilities of Blend4Web's normal editor will be interested to hear about the changes that will occur in the upcoming version of the engine:
- Blender's native datablock (available since version 2.74) is used as the storage for normals;
- normals are edited and the resulting shading is displayed in Edit Mode;
- the Save and Auto Save buttons have been removed, all changes apply immediately and automatically;
- rotation of selected vertex normals can be done directly in the Viewport via the Shift+Ctrl+R hotkeys, just like any other rotation in Blender;
- Split Mode has been added which allows you to edit vertex normals separately for each face which form the vertex;
- the option Export Vertex Normals has been removed; now the edited normals are exported automatically.
New Interface and Functionality
The editor's interface has been changed significantly. Some buttons were removed and some were added, and finally they were rearranged on the panel to improve usability.
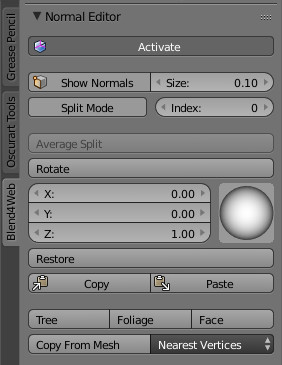
Interface of the new normal editor.
Activate
Description
The new Activate button turns on the edit mode of vertex normals and also replaces the old Export Vertex Normals option, which is now removed from the object settings.
Usage
To start editing normals you need to press the Activate button in the Edit Mode. While activated, the shading of the object and its export will use the edited normals. In other words, to see the shading based on the edited normals in the viewport and in Blend4Web, this button must be active.
Show Normals
Description
This button actually duplicates the original Blender's button. It turns on displaying the normals in the viewport, while the Size field allows you to set their length.
Usage
You just need to push the Show Normals button either on the normal editor panel or on the Blender's right panel in the Mesh Display section. You can also set the convenient length of normals by tweaking the Size.

Turning on displaying normals and setting their size.
Rotation
Description
Using these instruments you can change direction of the normals.
The Rotate function is also available through the Shift+Ctrl+R hotkeys, which allows rotation of vertex normals similarly to Blender.
Usage
Select one or more vertices that you want to edit and then rotate their normals using the visual sphere or specify the direction as numerical values.
The Rotate button provides a more convenient way to manipulate normals. The rotation is performed in the screen space. Nevertheless, as with any other rotations in Blender, you can isolate the desired axis during rotation (by typing X, Y or Z).

Demonstration of the rotation capability.
Split Normals
Description
The Split Normals mode allows to edit vertex normals separately for each face that form the vertex. Index allows you to navigate between the split normals.
Usage
Turn on the Split Normals mode, select the vertex and change the direction of its normals. Firstly, the normal which has the zero index in the queue will be modified. Then, by switching between indexes you can go to the next normal of this vertex and edit it, then to the next and so on.

Editing normals in the Split Normals mode.
Average Split
Description
The Average Split button averages the direction of the vertex normals which was modified in the Split Normals mode.
Usage
To combine several split vertex normals into one, in order to obtain the average direction of these normals, you just need to select the desired vertex and press the Average Split button.

Obtaining the average direction of the split vertex normals using the Average Split button.
Restore
Description
The Restore button restores the original direction of normals for the selected vertices.
Usage
In order to restore the normal's direction to its original (which is calculated on the basis of face normals), you need to select the desired vertices and click the Restore button.

Restoring the original direction of the modified vertex normals.
Tree, Foliage and Face
Description
The Tree button directs the normals of the selected vertices away from the 3D cursor. The Foliage button directs the normals of the vertices strictly up. The Face button directs the normals of the selected face parallel to the normal of this face.
Usage
In order to use the Tree function, select the desired vertices and place the 3D cursor in the desired position. Then click the Tree button so all the selected vertices will turn their direction away from the cursor, as if they were shot from one point.
The Foliage function is very easy to use: just select the vertices and press the button, so the function will direct their normals straight up.
In order to direct the normals parallel to the face normal, just select the desired face and click the Face button. The normals of the vertices which form the face will be directed parallel to the face normal. This function works only with one selected face at a time.

Using the Tree, Foliage and Face functions.
Copy/Paste
Description
Copies the normal direction from one vertex to another.
Usage
Select the vertex you want to copy from and click the Copy button. Then, select the vertex you want to copy to and click the Paste button. You may copy information from one selected vertex to many different vertices. The buttons are not active in the Split Mode and do not copy data of split vertices.

An example of copying normals from one vertex to many others.
Copy From Mesh
Description
This function allows you to copy the normals from one object to another. There are two modes: Matched Vertices and Nearest Vertices.
The Matched Vertices mode copies the normals from the vertices of one object to another object's vertices only if they have the same coordinates; the other vertices are ignored. The Nearest Vertices mode copies the normals of the nearest vertices of the source object.
Usage
This function works in Blender's object mode. At first, you need to select the object you need to copy from, then the object you need to copy to. It is also necessary to select the target object's vertices to which normals are copied.

Copying normals from one object to another.
Conclusion
The new normal editor will be included in the upcoming 15.06 release of Blend4Web, which will be come out later this month. Still, you can try it in action right now - login to the site and get the developer preview version from the downloads page.
As always, you can post comments and questions on our forum in the specific topic.


 .
.