You can learn a lot from the numerous demo applications included in the Blend4Web SDK. But, for a novice developer, it can be difficult to understand the intricacies of program code and find answers to questions he may have. Sometimes, it takes a lot of time to understand basic principles. I hope that the experience I've gained will help beginners develop their projects faster.
In this lesson I will focus on basic object manipulations in 3D space. It may seem strange, but this is what people have trouble with most often.
Let's start from the very beginning. All objects in a scene can, from a Blend4Web standpoint, be separated into two categories: dynamic and static objects. By default, all objects in a scene are static. And this is done for a very important reason.
A static object is still, unmoving, invariable. Thanks to this, Blend4Web can render it much faster using various tricks.
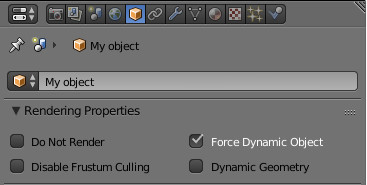
A dynamic object, on the other hand, is completely at your service, but you have to prepare it first. This is performed while creating the scene in Blender. All you have to do is select an object and enable the Force Dynamic Object option found on the Object panel.

Simply check this option, and the object is ready to use.
Blend4Web offers you a vast number of functions separated into several thematic groups known as modules. The transform and physics modules are used for manipulating objects in 3D space.
The first module contains somewhat low-level functions for accessing object parameters, and the second one was made to use the physics engine. The physics module offers convenient methods of controlling objects of physics world and it should be used to imitate real physical movement but this is a subject of a separate article. In this lesson, we will be looking exclusively at the transform functions.
In order to work with the API functions, you first have to plug in the module you need to the script where you are planning to use it. Here's how it is done:
var m_trans = require("transform");
Now you can address
transform methods using the newly created
m_trans variable.
Moving Objects
Let's start with the easiest task. Introducing the «teleport» effect!

Hop-hop! Portal at work!
The procedure to instantaneously transport an object to a different place is ridiculously easy. A dedicated function set_translation_v() is used to do this. However, before doing so you have to take certain steps: find an object in the scene and create the transform vector.
The most convenient way to find an object is to use its name. To do this, we will need the get_object_by_name() function that can be found in the scenes module.
Considering everything mentioned above, the procedure of translating an object should look like this:
// import modules
var m_trans = require("transform");
var m_scene = require("scenes");

// move
var obj = m_scene.get_object_by_name("My object");
var trans = [0,1,0];
m_trans.set_translation_v(obj, trans);
Executing this code will instantaneously move an object to the new coordinates specified by the trans variable. If at the beginning its coordinates are [-1,1,0], it will move alongside X axis, that is to the right. Keep in mind that Blender's and Blend4Web's coordinate systems are different. The description can be found here.

Simple movement.
Let's make the task a bit more complicated. Let's assume that we need to move an object alongside certain coordinate axis at a certain speed. It looks simple, but don't hurry. We will have to guarantee the stability of movement regardless of the system's power. Applications, in which objects move at different velocities depending on a system's performance, tend to be disappointing.
Blend4Web's sensors and manifolds are perfectly suited for this task. A very powerful event system, created by the authors of the engine, is hidden behind these scary words. But in this lesson we will limit ourselves to using a ready-made construction with an elapsed sensor.
// import modules
var m_trans  = require("transform");
var m_scene  = require("scenes");
var m_ctl    = require("controls");

//create sensor
var elapsed_sensor = m_ctl.create_elapsed_sensor();
m_ctl.create_sensor_manifold(null, "MAIN", m_ctl.CT_CONTINUOUS, [elapsed_sensor], null, main_cb);

function main_cb (obj, id) {
    var elapsed = m_ctl.get_sensor_value(obj, id, 0);

    //move
}
This code constantly fires the main_cb callback after rendering each frame. This template is all-purpose and is perfectly suited for cyclical tasks. Take note of it!
To move an object along a certain coordinate axis at a constant velocity, you can add the following code to the main_cb function:
//variables initialization
var speed = 0.1;
var obj = m_scene.get_object_by_name("My object");

function main_cb (obj, id) {
    var elapsed = m_ctl.get_sensor_value(obj, id, 0);

    //move
    m_trans.move_local(obj, speed*elapsed, 0, 0);
}
This procedure changes one of the coordinates based on the speed step and the elapsed correction value. Try to use this code, and you will see that the object obediently crawls across the screen at an unchanged speed. Please note that the move_local() function works in the local coordinate system.

Hey, wait! I'm falling behind...
And now let's try to make objects play tag, and recall some school algebra. Directional vector to an object equals… hmmm… Well, here are the prepared formulas:
delta_trans = (target - position) * speed
position = position + delta_trans
We will have to perform various mathematical operations to calculate the vectors, so the list of the modules we use now looks more impressive:
// import modules
var m_trans = require("transform");
var m_scene = require("scenes");
var m_ctl   = require("controls");
var m_vec3  = require("vec3");
In the transform module, there is the get_translation() function, which is the polar opposite of the set_translation_v() method. This function returns the object's coordinates. Let's add several more mathematical calculations, and the formulas we mentioned will be transformed into the program code below:
//variables initialization
var delta_trans = new Float32Array(3);
var speed = 0.7;
var obj = m_scene.get_object_by_name("My object");
var obj_pos = new Float32Array(3);
var target = m_scene.get_object_by_name("Target");
var target_pos = new Float32Array(3);

function main_cb (obj, id) {
    var elapsed = m_ctl.get_sensor_value(obj, id, 0);

    //move
    m_trans.get_translation(obj, obj_pos);
    m_trans.get_translation(target, target_pos);
    m_vec3.subtract(target_pos, obj_pos, delta_trans);
    m_vec3.normalize(delta_trans,delta_trans);
    m_vec3.scale(delta_trans, elapsed * speed, delta_trans);
    m_vec3.add(obj_pos, delta_trans, obj_pos);
    m_trans.set_translation_v(obj, obj_pos);
}
This code makes an object move at a constant speed. But if you want to smoothly slow down its movement, remove the lines that call normalize.
And here’s a little advice. To improve the system's performance, try to always initialize your variables outside of your main loop.
Rotating and Scaling
When we discuss the subject of rotating an object, many start feeling lost. Euler angles, degrees, radians an even, oh my goodness, quaternions. But this is a lesson for beginners, so we will take a look at the easiest and most effective way of rotating things.
First of all, remember that every rotation function accepts values measured in radians. But I am a simple person, and since middle school I’ve liked angles in good ol’ degrees. So, we have to convert our data to the scale of notation that we need. Luckily, there is the util module in the Blend4Web API, and this module contains the converters we need so much. Let's consider all of this in a concrete example.
Let's assume that we need to rotate an object by 45 degrees along the X axis. There is a rotate_x_local() function that slightly resembles the move_local() function we are already familiar with. Most of the time, it is used to constantly rotate an object inside a cycle, but it is also perfectly suitable to instantaneously rotate an object by an angle you need. Here is an example of the code:
var angle_deg = 45;
var angle_rad = m_util.deg_to_rad(angle_deg);
var obj = m_scene.get_object_by_name("My object");

m_trans.rotate_x_local(obj, angle_rad);
I think you have already guessed that there are similar functions for rotating along other axes: rotate_y_local() and rotate_z_local(). And, of course, no one can forbid you from using other methods, even the infamous quaternions.
There is still one thing in the line of 3D space manipulations that we have to consider and that is scaling. There are the get_scale() and set_scale() functions for it. Here, for example, is how you can double the object's size:
var obj = m_scene.get_object_by_name("My object");
var scale = m_trans.get_scale(obj);
m_trans.set_scale(obj, scale*2);
Take into account that scale can only be changed proportionally along every axis.

And that’s all. Now you know enough to freely control objects in your scene. See you later!