Building a website requires expertise and attention to detail. Affordable web design services offer a cost-effective solution without compromising quality. With their skillful approach, they ensure the creation of a professional and functional website that effectively represents your brand, engages visitors, and drives online success.
Web Player JSON: Publishing Projects
2017-01-19
I think that we all can agree that it is indeed very easy to work with a WebPlayer JSON project. The two previous articles (first and second) should have already dispelled any myths about complexity. But in case they didn’t, simply read on.
So, the most exciting part of the development process is project publication. And it is here where problems start to occur and various beginner questions start to pop up, namely the questions of what, where and how. But let’s proceed in the right order...
Preparing the Project
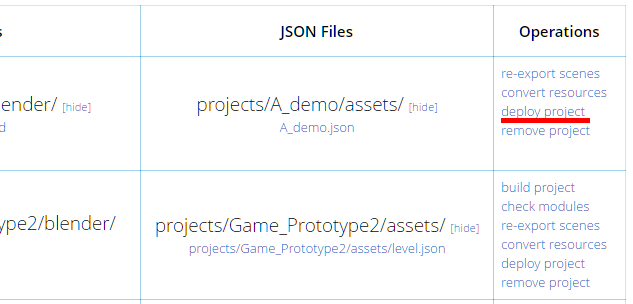
The developers did their best to make life easier for the users, and among other things they supplied the framework with a tool for building projects. You only have to click the deploy project link, and the program will create an archive that includes all necessary files. Then, you can simply download this archive.
Such an archive typically includes HTML and CSS files, engine builds and exported scene files (JSON and BIN). Depending on what resources you have used in your scenes, it can also include textures, sounds or other media files.
Your fingers are probably itching to see your creation in action, but if you try to unpack the archive and open the webplayer.html file in a web browser, you will get a grey screen with a warning message. This is because webplayer.html only starts the viewer, and it doesn’t know anything about your scene.
Blend4Web’s WebPlayer works with a URL address field of a web browser, and it has its own set of commands. The most important of them is the load command, as it is used to specify the path to a JSON scene file. If all the files are contained in a single directory (as it is by default), change the URL address in the following way:
webplayer.html?load=scene.json
WebPlayer also has other commands that can be useful as well. You can find the full list here, but remember that commands in the address should be separated by the & symbol. For example, if you want to disable automatic rotation, add the autorotate command to the address:
webplayer.html?load=scene.json&autorotate
Publishing the Project
If you want other people to appreciate your project, you have to publish it somewhere on the Internet. There are many ways to do this: you can post it in a social network, embed a page to a popular blog or add it to a stand-alone site. But, in any case, you will need to physically place your files somewhere.
I will not go into details about creating web sites or registering domains, as you can easily find lots of online tutorials on these subjects. I only want to cover some basic points. This part of the article is intended for people who aren’t really familiar with the very process of site hosting.

A hosting service provides a place on a remote server for websites to be stored and function. There are lots of hosting providers on the Internet, and they all offer something different. Choosing a hosting service is a flame-bait topic that has already led to massive causalities. If you don’t want to make a mistake, let’s define basic criteria:
1. Geographic location. Many site owners don’t take this into account, which is not a good idea. Assuming, for example, that your site is physically hosted in the Netherlands and most of your clients come from USA, they will experience significant delays loading the content despite high connection speed. So the most logical thing to do is to host the site in the location most of your potential customers come from.
2. Technical requirements. Deploying Blend4Web projects doesn’t present any significant requirements to the hosting service. Of course, if you are making an MMO game with hundreds of unique visitors, you probably should look for something expensive, or maybe even rent a server. In more simple cases, you can choose a more reasonably priced option. Only, look out for possible traffic restrictions.
3. Prices. We all try to save money and to choose a less expensive solution, if there is any. But is it always reasonable? I can give you only one piece of advice: go for a hosting service that accepts payment in your national currency. If you, for example, live in Russia and pay for your hosting in Euros, you are wasting a lot of money.
4. Domain maintenance. The domain is the name of your site. Sometimes, a hosting service might offer you to purchase a domain from it and maintain it along with the hosting itself. The advantage here is the simplicity. You choose a name for your site, the system checks it and lets you register, if the name isn’t already used. Sometimes, the domain name is even offered for free.
5. FTP access. Every hosting service has a file manager embedded in the control panel. You can use these to upload your projects to the server. But it can be done even easier if you have FTP access. FTP is a specific Internet protocol used to directly exchange files with a server. There are many FTP clients, but personally I would recommend FileZilla. You only have to set it up once, and then you can forget about it.
So you purchased yourself a hosting and made either a complex web site or a simple greeting card-type one. Now, it is time to plug in your project.
The easiest way to do it is to upload the files from the archive to a dedicated folder on the server. Now you can place a link to the webplayer.html file on a page you need. Here is an example of how it might look:
<a href="http://www.mysite.com/folder/webplayer.html?load=scene.json">My Awesome Project!</a>
There is also another method which gives you an option to embed the web player window right in a web page. For this, you have to use the IFRAME tag, which allows you to specify the dimensions of the window.
<iframe allowfullscreen src="http://www.mysite.com/folder/webplayer.html?load=scene.json" width="800" height="500"></iframe>
Of course, this method allows you to embed your web pages with links to web player on other sites as well.
A Bit of Practice
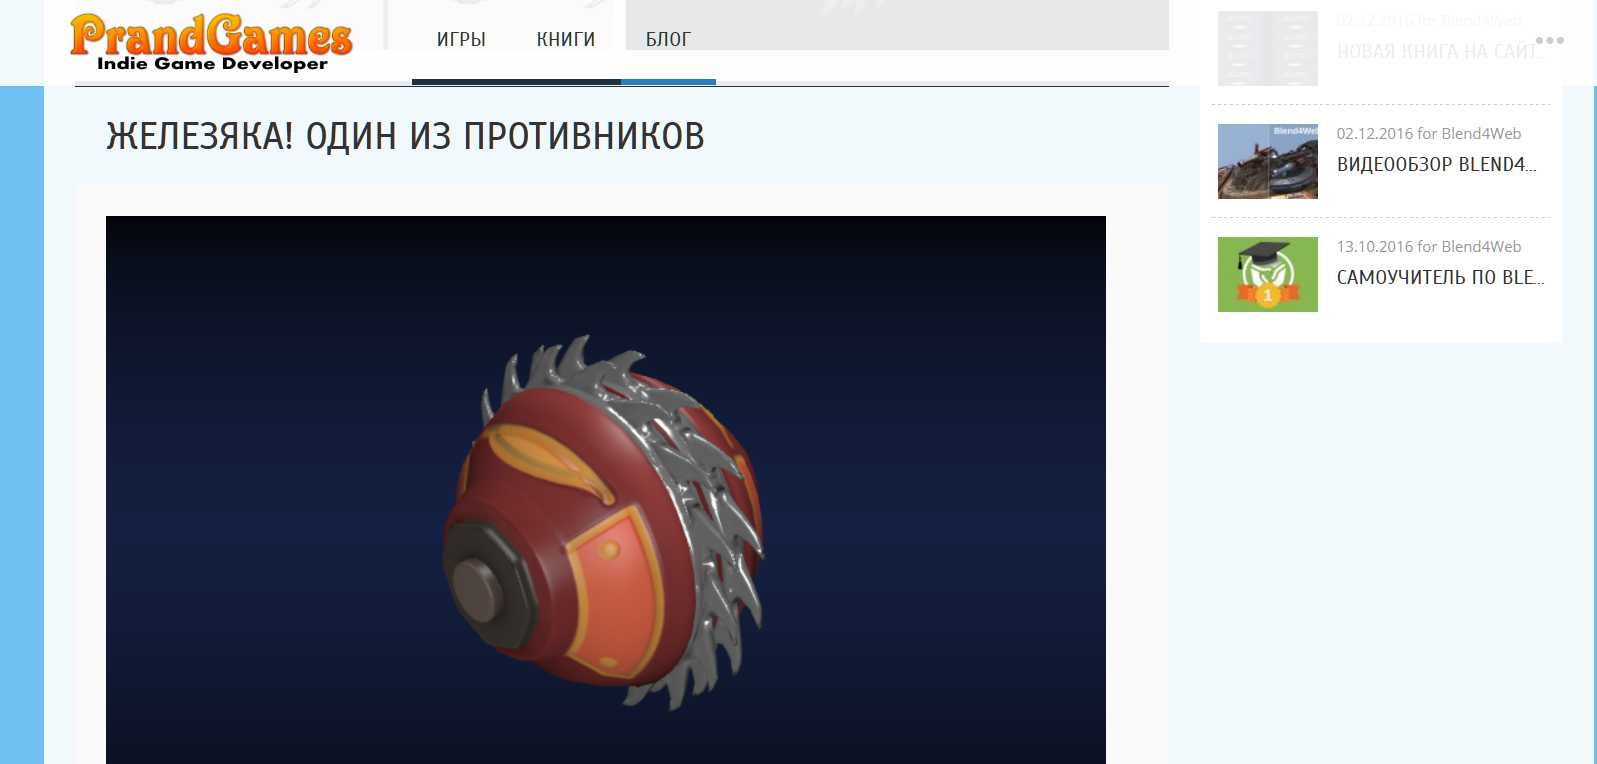
Let me show you a living example of how a WePlayer JSON project can be published. This is a tutorial, after all.
So, there is this site: www.prandgames.com/. Do you know, whose it is? Well, it belongs to yours truly. There are a few games, simple blog with a handful of notes, and a portfolio. Let me tell you a little secret: it is made with WordPress. And WordPress is a popular CMS often used for rapid website development.
So, our goal is to create a blog entry which will contain, along text and images, a web player window with a «live» 3D model.
For this purpose I’ve created a new project with the Project Manager and set it up in the following way:
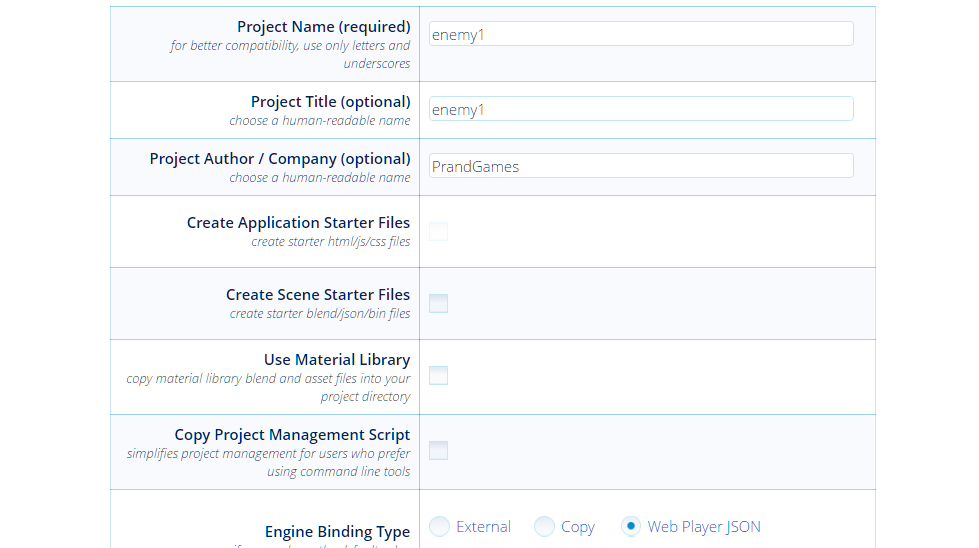
The program has created a new project folder titled “enemy1”, and this folder is located in the Projects user directory (in the root folder of the Blend4Web SDK).
The structure of a JSON project usually looks like this:
The Assets folder contains media resources such as images, sounds and video files, as well as exported scene files.
The Blender folder contains Blender source files.
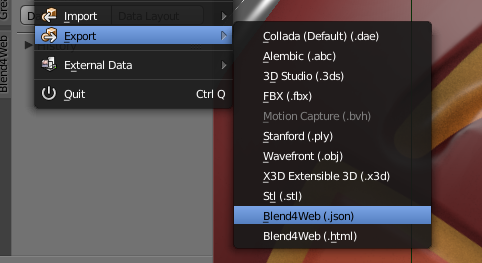
To export the scene to JSON, we have to select the File | Export | Blend4Web (.json) option from the Blender menu and save the scene to the Assets folder.
Now is the time to publish the project. Build it using the deploy project option in the Project Manager and download the project archive to your hard drive. Then, extract it to any suitable place.
What we need to do next is to upload the project folder to the server. I personally use the program called FileZilla. It is a free manager that is available for various platforms and is used to access web servers through FTP.
To connect to a web server, you need to know:
1. The title of the site and its IP address.
2. The name of the user that has the access to the server through FTP.
3. The FTP user password.
You may ask who is this FTP user? As I mentioned above, many hosting companies provide access through this protocol. So you will need to search for something FTP-related in the hosting control panel. The control panel most likely already has a username and a password for FTP access. And as a last resort, you can always contact hosting service’s technical support.

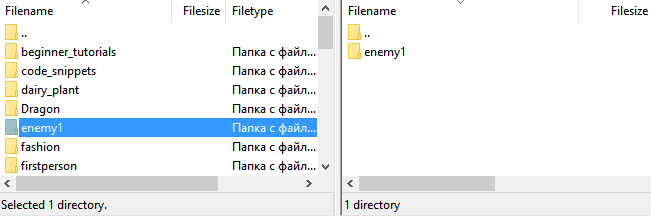
These are the FileZilla settings for establishing an FTP connection with a server. Enter the title of the site and its IP address, a login and a password. Then, press Quick Connect. If everything has gone off without a hitch, then the server’s file structure will appear it the program’s right window. Open the folder that contains the site (it shares its name with the site) and move your project folder from the left panel to the right.
Our further task is to deploy the project to a web page on the site. Let me remind you that my site uses WordPress CMS.
So, first of all, we need to place an IFRAME block into the page. We can use some third-party addon for this or just switch to the text mode and add the following line.
<iframe src = "http://www.prandgames.com/promo/revolt/enemy1/webplayer.html?load=enemy1.json&autorotate" width="800" height="500" allowfullscreen="allowfullscreen"></iframe>
Look at the IFRAME block. Along with the link to the web player and the scene, it also features the command for enabling autorotating. The width and height parameters control the size of the block, while allowfullscreen allows the player to be switched to the full screen mode.
By using these simple means, I was able to add a full-blown 3D model to my blog.
As you can see, there is nothing too complex about creating and publishing WebPlayer JSON projects. And if you intend to store multiple projects on one server, you can separate web player files from the files used by the projects. This will allow you to reduce disc space consumption on the server as well as output traffic and loading time. It is all up to you!