SOLVED: Cycles IES lamp data not rendered?
07 June 2017 19:08
Reply to post of user Mikhail Luzyanin
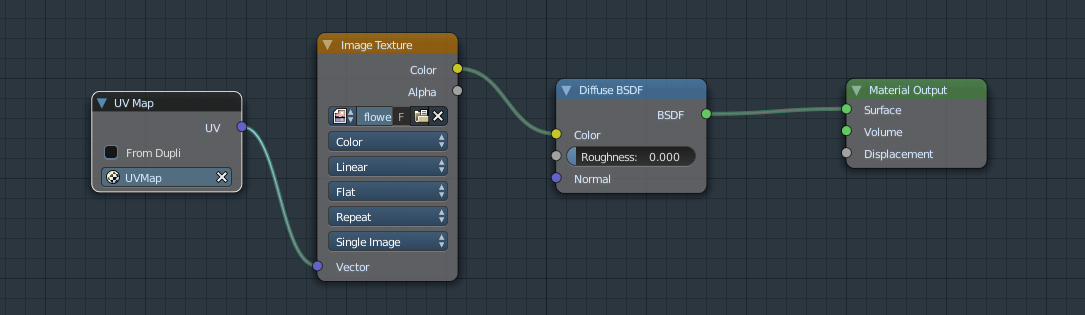
You need to connect to your image UVMap node with selected right UVMap in it. Blender automatically connected selected UVMap from mesh tab, but for Blend4Web you need to connect it to an Image node by yourself.
I really appreciate everyone's help. I'm sorry for my ignorance…isn't that node already connected as shown?

07 June 2017 19:17

I really appreciate everyone's help. I'm sorry for my ignorance…isn't that node already connected as shown?You should add UV Map node in the beginning of the node setup. Just like that:
The imported .ies file is a point type by default, not an area type in both cycles and blend4webI see. Blend4Web utilizes Blender Internal lamp settings so there may be some differences from Cycles in the resulting image. We are working on the improvement of this situation

07 June 2017 19:24
Reply to post of user Konstantin Khomyakov
You should add UV Map node in the beginning of the node setup. Just like that:
I now see my Texture Atlas is completely garbage but its there now in blend4web preview. You guys are awesome!!!


08 June 2017 18:43
Reply to post of user clessley
I now see my Texture Atlas is completely garbage
Had some trouble getting the floor to bake in the render. What I wasn't understanding is that one must individually bake each object texture with an individual UV Map (not combined). This tutorial helped me further simplify the process: link.
Before when trying to use a single UV Map the floor was black (nothing there). With a UV Map for each object/texture the floor renders.

Thanks again to everyone who babied me through this. Much appreciated!
Test file as is: link and Workflow (take with a grain of salt):
- create objects and size them
- reset scale using cntrl-A > Scale
- Add textures through Material tab and set correct scale for textures
- reset scale again
- add any object special items like holes
- select specific object texture to bake
- create unique UV Map
- rename unique UV Map to match object name
- enter edit mode > U > Smart UV Project > make sure all all planes of object are selected > save
- select new object and repeat 4 preceeding steps > save
- select all objects to bake
- select Bake
- UV Image Editor: save image as xxx.png (put somewhere, not in textures folder)
- Node Editor : select the specific object > Image Texture select baked image texture(s), repeat
- create new UV Map node in Node Editor for each object > connect each UV Map node from UV to Vector of Image Texture node
- switch to blend4web engine > preview, if ok
- File > Export > blend4web .html > upload to web server > joy