How to fix these custom normals?
16 March 2016 10:23
Blend4Web's Normal Editor is a great feature, but sometimes I get stuck with shading I can't seem to fix.
Case 1: Normals that won't go back …to "normal"
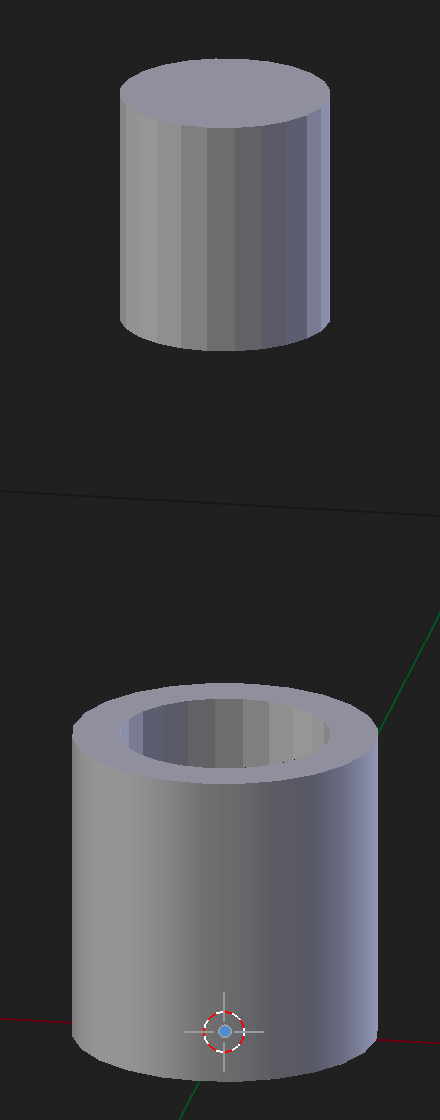
For example, here is an object made up of two cylinders. A smaller solid one and a larger hollow one.
On the hollow one, the normals are exactly as they should be (on the outside, never mind the inside).
So the top and bottom look like flat faces, and the edge ring that goes around is looking smooth.
But for some reason, on the solid cylinder I cannot get the same effect.
![]()
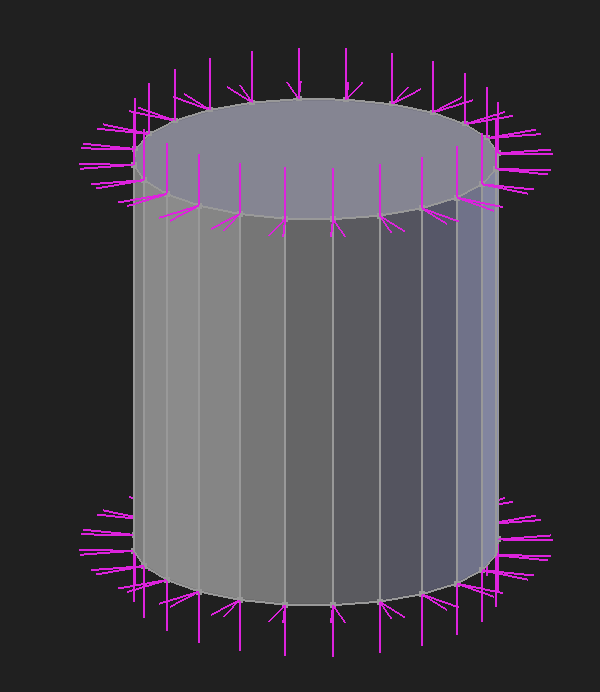
Upon viewing the normals, it is apparent that the splitting is the cause of the problem.
I want there to be splitting on the edge loops that define each cap of the cylinder. But I don't want splitting on the edge ring that goes around the cylinder.
![]()
I can press "Restore" while Split Mode is OFF, but then I lose the flat shading on the top.
I can press "Restore" while Split Mode is ON, but then I lose the smooth shading on the edge ring.
I can't win.
I can "Clear Custom Split Normals Data" but then I lose my work on the hollow cylinder, which is looking OK.
(I know I can Separate the mesh, but this shouldn't be necessary each time I encounter this problem.)
What's really strange is, I tried to Copy and Paste the normal data from the vertices of the hollow cylinder to those of the solid one, but even that method didn't work as expected.
Case 2: Inconsistency when mirrored
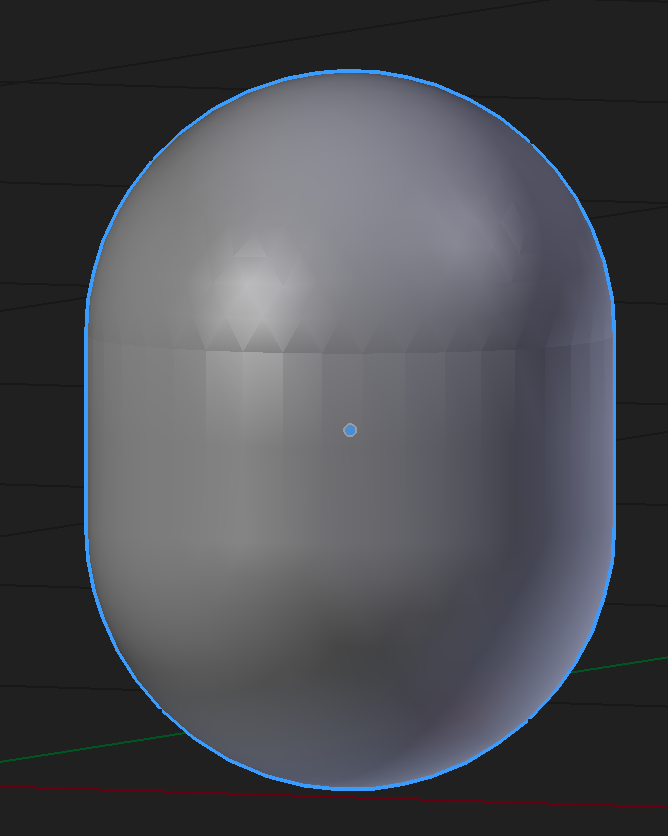
I have this icosphere that I've elongated into a sort of pill shape. The original geometry is on the bottom, and the Mirror Modifier result is on the top (mirrored on Z).
If the Mirror Modifier makes an exact flipped copy of the geometry, this shouldn't happen, right?
![]()
Could it be a bug with Blender's custom normals (Auto Smooth) feature? A bug with B4W's Normal Editor? Or am I just using it wrong?
Thanks in advance for any help!
Example .blend file
Case 1: Normals that won't go back …to "normal"

For example, here is an object made up of two cylinders. A smaller solid one and a larger hollow one.
On the hollow one, the normals are exactly as they should be (on the outside, never mind the inside).
So the top and bottom look like flat faces, and the edge ring that goes around is looking smooth.
But for some reason, on the solid cylinder I cannot get the same effect.
Upon viewing the normals, it is apparent that the splitting is the cause of the problem.
I want there to be splitting on the edge loops that define each cap of the cylinder. But I don't want splitting on the edge ring that goes around the cylinder.
I can press "Restore" while Split Mode is OFF, but then I lose the flat shading on the top.
I can press "Restore" while Split Mode is ON, but then I lose the smooth shading on the edge ring.
I can't win.
I can "Clear Custom Split Normals Data" but then I lose my work on the hollow cylinder, which is looking OK.
(I know I can Separate the mesh, but this shouldn't be necessary each time I encounter this problem.)
What's really strange is, I tried to Copy and Paste the normal data from the vertices of the hollow cylinder to those of the solid one, but even that method didn't work as expected.
Case 2: Inconsistency when mirrored

I have this icosphere that I've elongated into a sort of pill shape. The original geometry is on the bottom, and the Mirror Modifier result is on the top (mirrored on Z).
If the Mirror Modifier makes an exact flipped copy of the geometry, this shouldn't happen, right?
Could it be a bug with Blender's custom normals (Auto Smooth) feature? A bug with B4W's Normal Editor? Or am I just using it wrong?
Thanks in advance for any help!
Example .blend file
16 March 2016 19:02

Upon viewing the normals, it is apparent that the splitting is the cause of the problem.Unfortunaly you can modify only normals of one separated selected vertex, you can't change normals in multiply selected vertex. So you need to do odification with many vertexes one by one to acheve effect.
I want there to be splitting on the edge loops that define each cap of the cylinder. But I don't want splitting on the edge ring that goes around the cylinder.
I have this icosphere that I've elongated into a sort of pill shape. The original geometry is on the bottom, and the Mirror Modifier result is on the top (mirrored on Z).It's blender type of combining vertec normals, so you need just to change them manualy to achive needed effect.
Blend4web and that kind of thing.
17 March 2016 13:26
Thank you, Mikhail.
After reading your reply, I realized I can get the desired result on the solid cylinder by separating the faces on the top and bottom from the rest of the mesh. (Although it's still a mystery to me why my hollow cylinder does not require that.)
![]()
As for the icosphere-pill object, by applying the Mirror Modifier and then clicking "Restore" I was able to get the top to match the bottom.
The information you provided enabled me to find workarounds to these limitations. Thank you!
After reading your reply, I realized I can get the desired result on the solid cylinder by separating the faces on the top and bottom from the rest of the mesh. (Although it's still a mystery to me why my hollow cylinder does not require that.)
As for the icosphere-pill object, by applying the Mirror Modifier and then clicking "Restore" I was able to get the top to match the bottom.
The information you provided enabled me to find workarounds to these limitations. Thank you!

18 March 2016 09:15
Update
Regarding cases like with the cylinder, I have found that an easy way to get sharp edges without complicating the normals is to simply mark the edges as "Sharp".
Actually, it turns out that my solid cylinder's edges had all been marked as sharp. I don't remember doing it, but I must have. I was happy to discover that by just clearing the "Sharp" marking on the edge ring I got exactly the shading I wanted, without needing to separate the geometry.
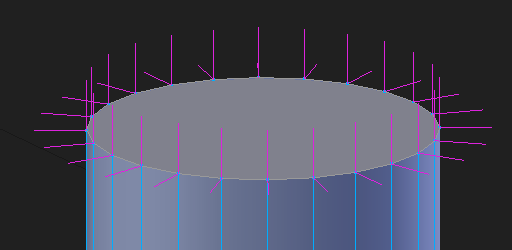
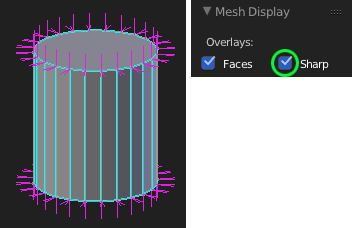
In summary - I found I had Sharp edges I didn't intend for:
![]()
I cleared the ones I didn't want:
![]()
My cylinder's shading was fixed!
![]()
Regarding cases like with the cylinder, I have found that an easy way to get sharp edges without complicating the normals is to simply mark the edges as "Sharp".
Actually, it turns out that my solid cylinder's edges had all been marked as sharp. I don't remember doing it, but I must have. I was happy to discover that by just clearing the "Sharp" marking on the edge ring I got exactly the shading I wanted, without needing to separate the geometry.
In summary - I found I had Sharp edges I didn't intend for:
I cleared the ones I didn't want:
My cylinder's shading was fixed!
