"Chasing Lights" effect
10 October 2014 00:45

Hi all! Glad to see this place up and running, and I expect to be here regularly, given the direction I've taken work-wise.  Thank you to
the programmers for an awesome and promising tool.
I would like to create a "chasing lights" effect using Blend4Web - essentially a row of visible lights that go on and off in a directional
sequence, if that makes sense. I see that node materials are possibly involved, but tinkering has gotten me nowhere, and - I guess because Blend4Web is so new - I could find no relevant tutorial, so I'm hoping for more direction. What settings do I need to change to get this
effect, how do I attach those to keyframes, can I see a preview animation in the workspace
(I did find a Blender file posted online that had an effect similar to what I wanted, but could find no way of doing such a preview - it has me concerned about "working blind")?
Thanks in advance for any help!
 Thank you to
 the programmers for an awesome and promising tool.
I would like to create a "chasing lights" effect using Blend4Web - essentially a row of visible lights that go on and off in a directional
sequence, if that makes sense. I see that node materials are possibly involved, but tinkering has gotten me nowhere, and - I guess because Blend4Web is so new - I could find no relevant tutorial, so I'm hoping for more direction. What settings do I need to change to get this
effect, how do I attach those to keyframes, can I see a preview animation in the workspace
(I did find a Blender file posted online that had an effect similar to what I wanted, but could find no way of doing such a preview - it has me concerned about "working blind")?
Thanks in advance for any help!
10 October 2014 10:19

Ответ на сообщение пользователя Rollo-s_Son
I would like to create a "chasing lights" effect using Blend4Web
Hi! Do you have some reference video/screenshot?
Blend4Web Team
https://twitter.com/AlexKowel
https://twitter.com/AlexKowel
10 October 2014 10:58
Here's a video of an effect similar to what I want to achieve.
http://ak1.picdn.net/shutterstock/videos/3010831/preview/stock-footage-colorful-blinking-bulbs-in-amusement-park.webm
http://ak1.picdn.net/shutterstock/videos/3010831/preview/stock-footage-colorful-blinking-bulbs-in-amusement-park.webm
10 October 2014 12:48

Hello, welcome to our brand new forum!
I'm so glad to answer to this first question so I've even prepared a simple example.
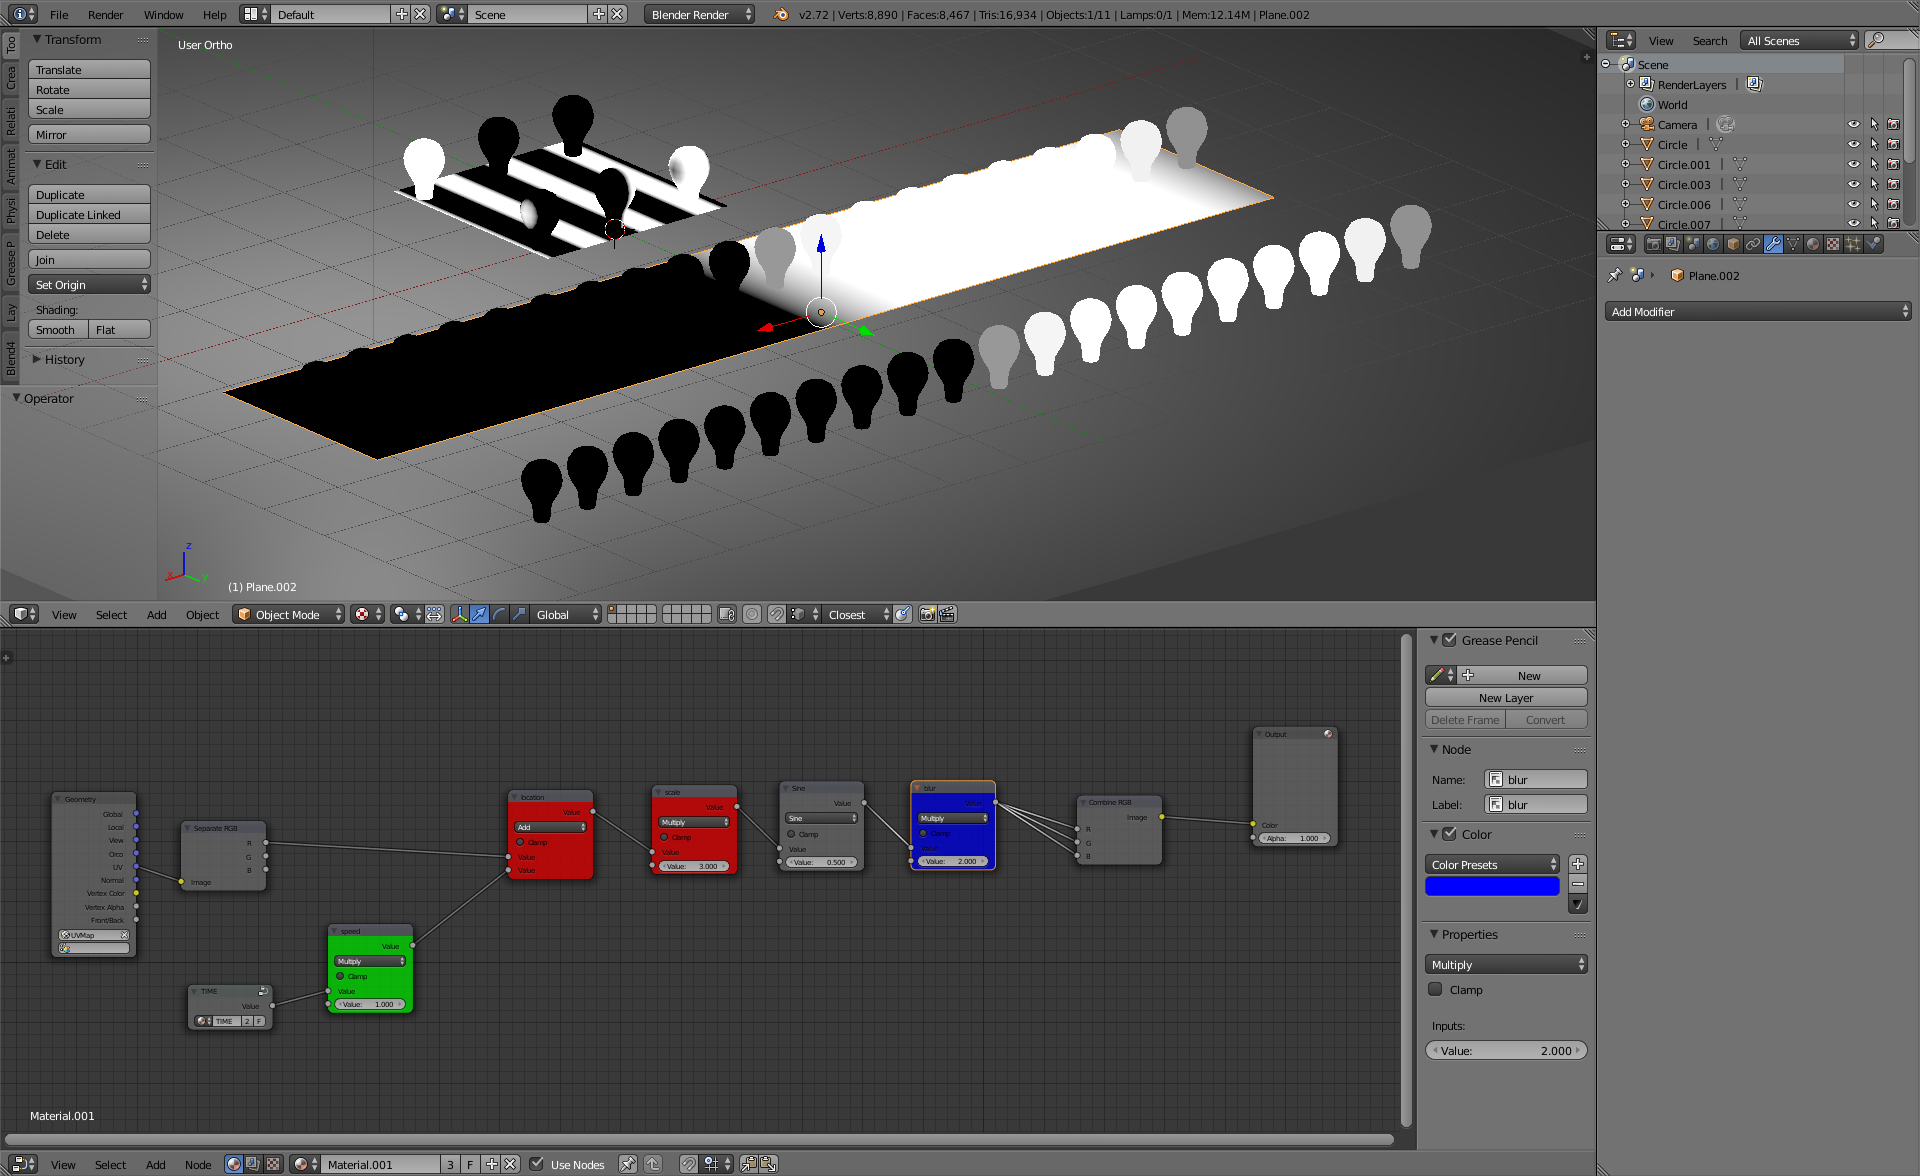
You can try to do an animation by using the Node "TIME". As an output it generates a number of seconds since the scene load.
In the example:
Green Node (of type MULTIPLY) used to assign a speed.
First Red Node (ADD) creates a sliding emission effect (it's just a decoy, no light is being emit actually)
Second Red Node (MULTPLY) scales the effect
Then sine used to create a periodic effect
The blue one (MULTIPLY) is tune the final gradient
Than it's all joined together.
That's all. It you want to do more sophisticated glow effect you may use some plane or sphere with transparency.
![]()
chasing_lamps.html
chasing_lamps.blend
I'm so glad to answer to this first question so I've even prepared a simple example.
You can try to do an animation by using the Node "TIME". As an output it generates a number of seconds since the scene load.
In the example:
Green Node (of type MULTIPLY) used to assign a speed.
First Red Node (ADD) creates a sliding emission effect (it's just a decoy, no light is being emit actually)
Second Red Node (MULTPLY) scales the effect
Then sine used to create a periodic effect
The blue one (MULTIPLY) is tune the final gradient
Than it's all joined together.
That's all. It you want to do more sophisticated glow effect you may use some plane or sphere with transparency.
chasing_lamps.html
chasing_lamps.blend
Manager and 3D Generalist at Blend4Web
No pain, no gain.
mikhail@blend4web.com
No pain, no gain.
mikhail@blend4web.com
10 October 2014 16:24
Thank you, for both the sample files and the welcome!
I am pretty new to animation and completely new to nodes - I can see I have a lot of studying to do!
Is there a way to interactively view the effects of changing nodes / node settings in animation, or do I have to keep checking the
results in the html output?
I am pretty new to animation and completely new to nodes - I can see I have a lot of studying to do!

Is there a way to interactively view the effects of changing nodes / node settings in animation, or do I have to keep checking the
results in the html output?
10 October 2014 17:00
Is there a way to interactively view the effects of changing nodes / node settings in animation, or do I have to keep checking the
results in the html output?
Hi!
The TIME node is Blend4Web-specific and so the results cannot be viewed in Blender. You can replace it with a generic Value node and animate it. Unfortunately Blender does not update its viewport for animated nodes (yeah this needs to be fixed by Blender devs). As a workaround you can switch to the Rendered mode and see the changes in a frame-by-frame way.
Also I'd recommend to all Blend4Web users to use SDK's viewer with open browser instead of exporting to HTMLs. This will provide you with a lot of additional information about what is going on. Also JSON+binary format is much more effective that HTML. See this tutorial for using the web player with external JSON files.
11 October 2014 21:15
I've rolled around some ideas to make this work for what's been requested of me, and I'm feeling pretty good about
it. Again, I greatly appreciate all the tips and info, and will let you know if I need any more pointers.
I do have one more question - is there, or will there be, a way to render objects in browser such that they look to have soft edges? I'm thinking that would look nice inside a glass sphere as part of a lighting effect.
12 October 2014 01:02
Using the same sample file, is there a way to set the nodes to use an image, tied in with TIME, to do an animated texture? I think these would be easier to sync up on multiple objects than procedurals.
13 October 2014 15:59

is there, or will there be, a way to render objects in browser such that they look to have soft edges?
Hello! If I understood correctly, you can achieve this effect by using Halo - this is the easiest way. Sadly, right now you can't animate Halo somehow :( But you can do it using billboards and particle system instead of Halo, the effect will be the same, and you can animate it by using node TIME, for example

There's one more option: you can make two strips of polygons and cross them in X-shape, then paint them using Vertex Colour and this VC will be used as alpha: black zones will be transparent. And you can animate them, too. Here's an example: left one is Halo, in the middle are billboards and right one is X-shaped mesh.

pseudoglow.blend
fakeglow.html
If it's not exactly what you want, there will be a better way, we are working on it now.

It will be possible to add some "glow" to an object in needed places, so there will be soft edges :)
Ответ на сообщение пользователя Rollo-s_Son
Using the same sample file, is there a way to set the nodes to use an image, tied in with TIME, to do an animated texture? I think these would be easier to sync up on multiple objects than procedurals.
Yes,and you can see our example here: shining areas under floating things are made using TIME+texture :) Basically, you add TIME values to image coordinates and TIME shifts your UV. That is the easiest example:

Here we are shifting red channel, so it means we are shifting UV in positive X direction. If you want negative direction, change MULTIPLY value to negative. So, red channel means X and green channel means Y
14 October 2014 03:45
Ответ на сообщение пользователя Pavel Kotov
If it's not exactly what you want, there will be a better way, we are working on it now.
My heroes!
Again, the help is greatly appreciated!I'm really enjoying all this 'poking around under the hood' to learn how things work. This is one of the ways I learn best.
Thanks for the explanation of UV to Separate RGB as a means of splitting out axes/vectors.
