Striped Shader Part 2
2014-04-18
Lets continue our striped adventures. This time we'll make a stripe with soft edges.
Lets have a look at the shader.
It is very similar to the previous one from part 1, so I'll describe only the differences.
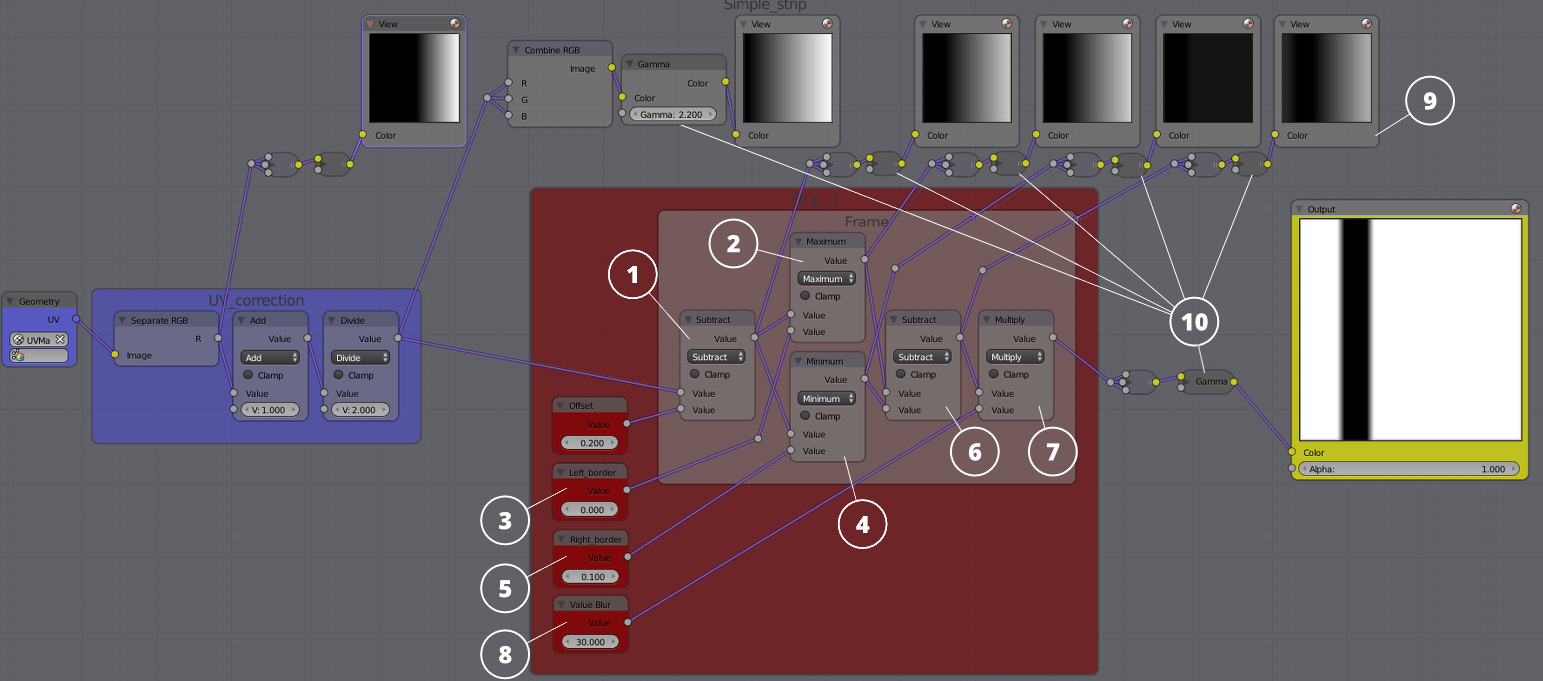
After the offset is calculated (1) the data goes into the Maximum node (2). This node compares the two input values and returns the largest. In this case a continuous range of the interpolated values goes into the first socket (we see it as a gradient) and the constant zero value goes into the second socket. We can adjust this value from 0 to -1 to change the left edge of the stripe (3).
Similar to it the Minimum node returns the smallest value after comparing (4). We can change the right edge of the strip by adjusting this value in the 0,1 - 1 range (5).
After that the minimum value is subtracted from the maximum one (6).
Below is the illustration of what's going on. For simplicity only 5 distinct values are shown instead of a full gradient.
 Lets have a look at these values:
1) Original values;
2) After the 0.2 offset;
3) Maximum after comparing with 0;
4) Minimum after comparing with 0.1;
5) Result after subtraction.
Lets have a look at these values:
1) Original values;
2) After the 0.2 offset;
3) Maximum after comparing with 0;
4) Minimum after comparing with 0.1;
5) Result after subtraction.
And as a result we get a stripe. For the real interpolated values we get a smooth gradient as shown in the (9) node.
The Multiply node controls the width of the stripe smoothing (7).
At the end we insert a gamma correction node (10).
You can find the source blend file in the following directory: blend4web/blender/tutorials/basic/striped_shader_2/.
Changelog
[2014-04-18] Initial release.
[2015-09-07] A screenshot showing the material has been changed, because the special node RGB_TO_LINEAR is no longer needed: Blender now supports Gamma node.
[2017-01-12] Fixed incorrect/broken links.