User posts Pavel Kotov
21 November 2014 12:12

As said in documentation, dynamic reflection works only on planes: mirrors, water, etc. So on 3d objects it looks very strangely :)
I recommend to use matcap or enviroment map with objects like this
Btw I really recommend to re-model (or change topology) so you can apply smooth shading without problem - flat shading works not very good with those maps (looks like disco ball ) Well, you can increase subsurfs, too
![]()
.blend
(this matcap is just for the example, it won't affect HTML)
I recommend to use matcap or enviroment map with objects like this

Btw I really recommend to re-model (or change topology) so you can apply smooth shading without problem - flat shading works not very good with those maps (looks like disco ball
 ) Well, you can increase subsurfs, too
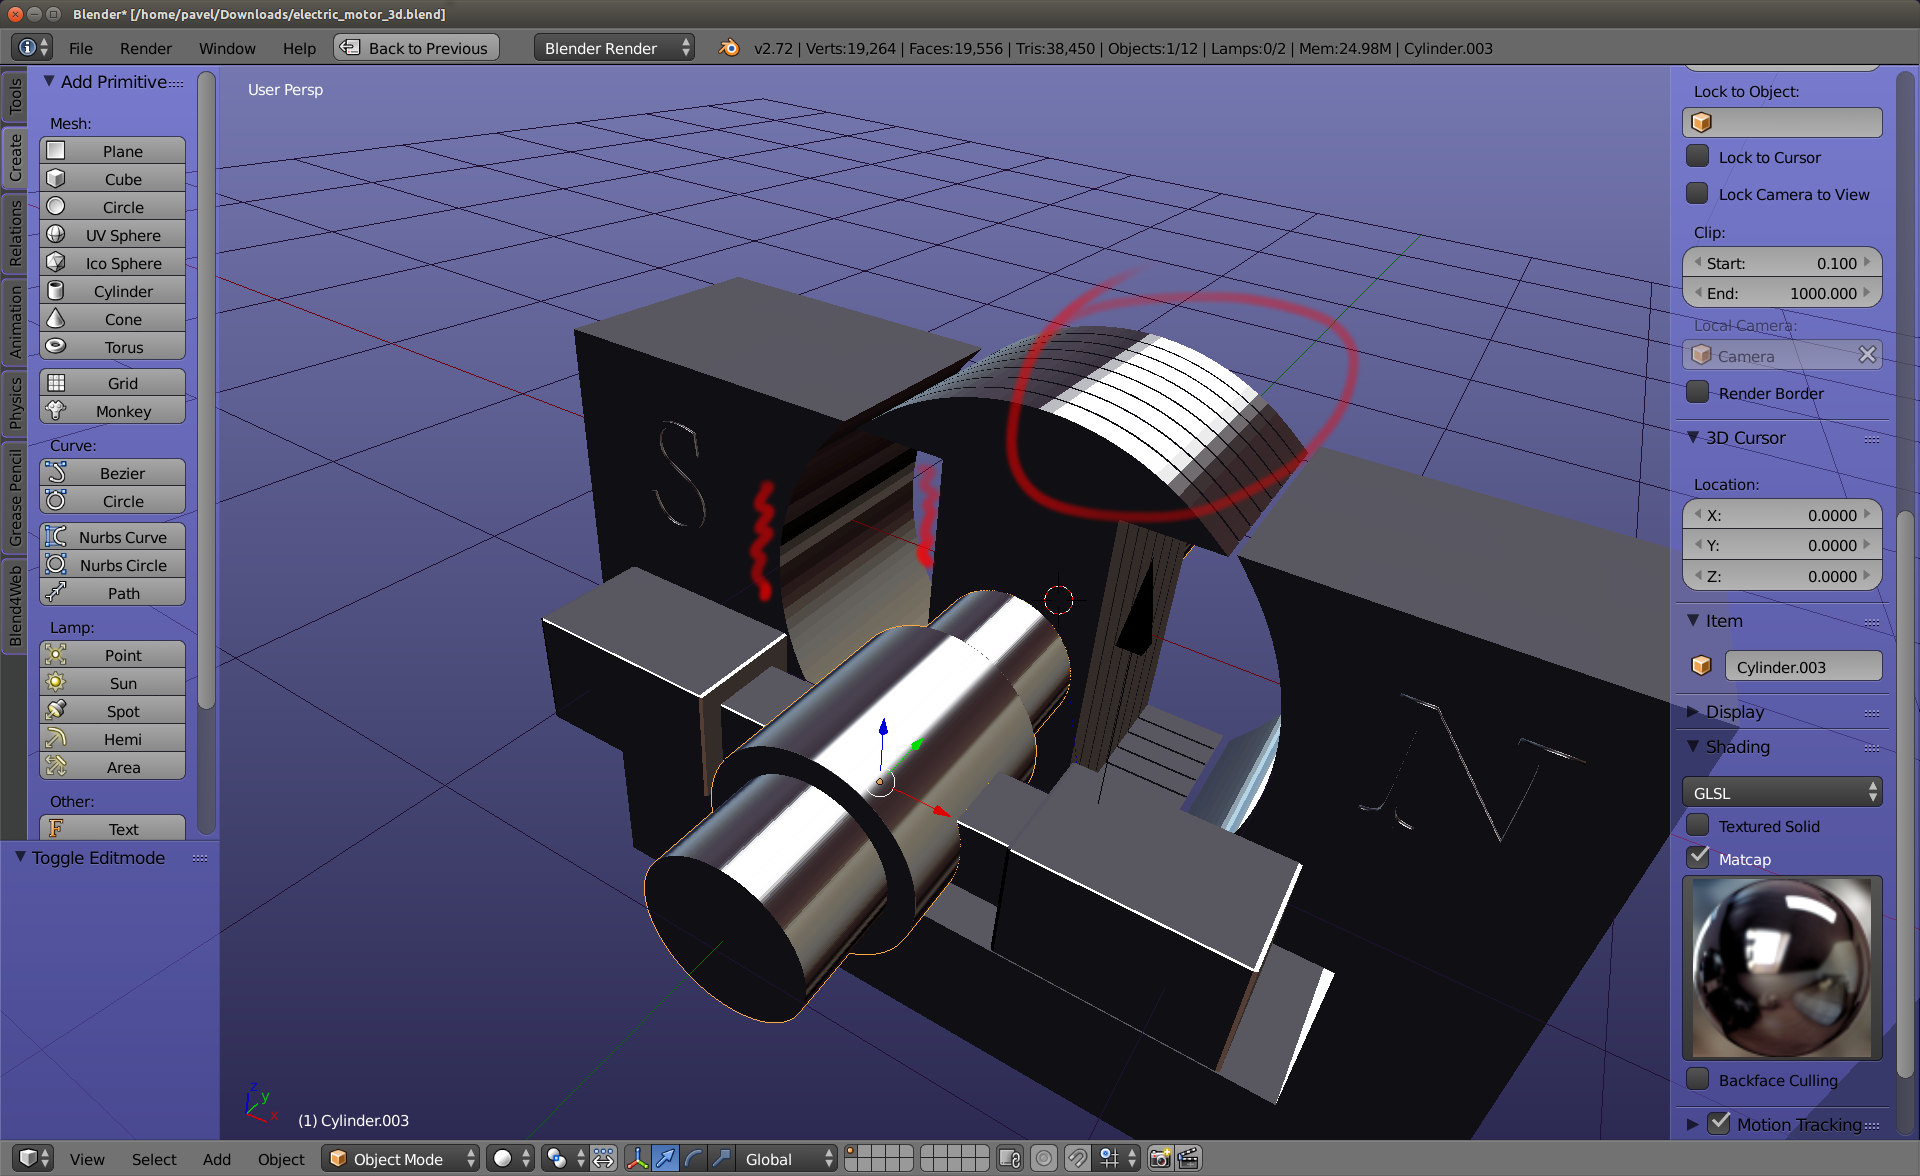
.blend
(this matcap is just for the example, it won't affect HTML)
20 November 2014 10:22
Oh I think I see the problem. The resolution of your image is NPOT - not power of two. Press f12 in your browser and choose console - there must be warning like "Using NPOT textures!" I mean, WebGL likely understands pictures like 512x512, 128x256 etc. So try to scale your pic to 512x512, for exapmle, and let's see what'll happen 
19 November 2014 10:14
Yep  If I understood correctly - see .blend file with tortoise - sand texture is tiled. Just add node mapping after UV, it will be automatically tiled. If it's stack material, find "size" in mapping in texture tab - it does the same thing
If I understood correctly - see .blend file with tortoise - sand texture is tiled. Just add node mapping after UV, it will be automatically tiled. If it's stack material, find "size" in mapping in texture tab - it does the same thing
12 November 2014 18:41
Oh, you're welcome  And good luck
Hmmm.. We started to support Euler animation in v14.10. Maybe your version of our SDK is 14.09 or earlier?
 And good luck
Hmmm.. We started to support Euler animation in v14.10. Maybe your version of our SDK is 14.09 or earlier?
12 November 2014 14:43
Well, this example can be fixed in easiest way But I'll explain the hard way too (which is actually more powerful when you're used to it), so there won't be problems with complicated projects.
Here are three things.
1. You didn't turn on "Animation -> use default" on animated objects
In object tab in our section Blend4Web find "animation" and turn on "Use default". Here you can set animation to cyclic if you want, too.
2. We don't support non-uniform scaling. Yeah, only proportional scaling (all axes equally, say, 2,2,2) works. Still, it can be done using bones or vertex animation :)
Now, let's say "U" will be scaled equally and problems 1 and 2 are fixed. If you'll export everything now, it will.. Well, it will work, but not as we needed and strangely. Here is it.
Soo. Why is it happening?
Everything is very easy
3. If animated objects aren't at center, insert at least one location keyframe in all axes. If location keyframes aren't set, engine doesn't know where exactly is an animated object, so it puts this object in 0,0,0. So by inserting location keyframe you, like, "pin" your object to the place where it must be :) Letter H has only X location keyframes, so it works in one axis, and Y and Z are not pinned so they are zero. Well, I inserted location keyframes and everything works fine now:
click
Here is final .blend file
As for hard part. Well, it's not that hard If your project has several animated objects and armature animation, I highly recommend using grouping, linking and making proxies.
Let's say, you want to make a scene where are two characters. One is singing, other is playing piano. So what we got here: pianist, singer (and their armatures), mic, piano, floor and some lights. Now let's make this kind of project architecture:
![]()
Scene.blend contains floor, lightning, camera, mic and piano. This is main file which will be exported. Main characters and their armatures are linked to the main scene. Note: singer and pianist (their rigs, too) must stay in the center in their .blends. Well, their origins, to be more specific And they must be grouped: let's say, singer and his armature are "group_singer" and pianist with his armature are "group_pianist". So: you're linking "group_singer" from singer.blend to scene.blend and then you make a proxy. Select linked group, press ctrl+alt+p and select your armature name. Now you have a proxy which is like your armature and you can work with it, animate it and etc. , but the main armature will be in your singer.blend file untouched. That's a great way to operate animated things in big projects :) You can find example of it in our game examples, which are in our SDK, too
Hope it'll help!
 But I'll explain the hard way too (which is actually more powerful when you're used to it), so there won't be problems with complicated projects.
Here are three things.
1. You didn't turn on "Animation -> use default" on animated objects
In object tab in our section Blend4Web find "animation" and turn on "Use default". Here you can set animation to cyclic if you want, too.
2. We don't support non-uniform scaling. Yeah, only proportional scaling (all axes equally, say, 2,2,2) works. Still, it can be done using bones or vertex animation :)
Now, let's say "U" will be scaled equally and problems 1 and 2 are fixed. If you'll export everything now, it will.. Well, it will work, but not as we needed and strangely. Here is it.
Soo. Why is it happening?
Everything is very easy
3. If animated objects aren't at center, insert at least one location keyframe in all axes. If location keyframes aren't set, engine doesn't know where exactly is an animated object, so it puts this object in 0,0,0. So by inserting location keyframe you, like, "pin" your object to the place where it must be :) Letter H has only X location keyframes, so it works in one axis, and Y and Z are not pinned so they are zero. Well, I inserted location keyframes and everything works fine now:
click
Here is final .blend file
As for hard part. Well, it's not that hard
If your project has several animated objects and armature animation, I highly recommend using grouping, linking and making proxies. Let's say, you want to make a scene where are two characters. One is singing, other is playing piano. So what we got here: pianist, singer (and their armatures), mic, piano, floor and some lights. Now let's make this kind of project architecture:

Scene.blend contains floor, lightning, camera, mic and piano. This is main file which will be exported. Main characters and their armatures are linked to the main scene. Note: singer and pianist (their rigs, too) must stay in the center in their .blends. Well, their origins, to be more specific
And they must be grouped: let's say, singer and his armature are "group_singer" and pianist with his armature are "group_pianist". So: you're linking "group_singer" from singer.blend to scene.blend and then you make a proxy. Select linked group, press ctrl+alt+p and select your armature name. Now you have a proxy which is like your armature and you can work with it, animate it and etc. , but the main armature will be in your singer.blend file untouched. That's a great way to operate animated things in big projects :) You can find example of it in our game examples, which are in our SDK, too Hope it'll help!
11 November 2014 17:55
Hello and welcome!
First of all, parenting trouble. This happens when child object has an inverse transform, in other words, the object you want to be a parent must be in the center (0,0,0 XYZ), and only after that parenting can be done - without inverse transform. BTW, here in our documentation are lots of helpful tips about errors
So, to fix that when you have parent relationship already set:
-clear translation and rotation of parent (alt+r and alt+g).
-select a child, put 3D cursor to its origin (alt+s -> Cursor to selected)
-Click alt+p and select "Clear parent inverse" (after that a child might fly faaar away somewhere)
-Move child back by alt+s ->selected to cursor.
That might be easiest way to clear inverse and to keep child where it must be.
About animation: it's a little tricky. Send me please your file (or the example if you can't send original) by the mail - pkotov@blend4web.com. It's difficult to help without some investigation
31 October 2014 21:54
And if you want modifier to be applied you must turn on "Apply modifiers" in object settings, tab Blend4Web 
Which modifier you want to apply?
Which modifier you want to apply?
31 October 2014 21:51
Hmm, I dunno. Try to look through our examples to see how everything is set up. Also keep in mind that only image textures are working! Clouds, Voronoi etc. are not supported.
And you can see errors in console: press f12 while watching your scene in the browser :)
And you can see errors in console: press f12 while watching your scene in the browser :)
29 October 2014 19:29
Hello julper!
Awesome And you?
The main question is - what exactly do you want to do? Look here, it's my veeeeery simple example of interaction by using NLA scripts. Also read the whole topic, maybe you'll even find an answer :)
BTW, this scene was made without programming, too.
In our new release (14.10) functional of NLA scripts will be greatly improved, so we gonna make a tutorial about this (and about other new features, too ) So I recommend to download 14.10 to try this feature, if you want to try it by yourself
  And sadly NLA-based scenes made by older version won't work in new version of SDK
And one more thing. You can use this NLA scripts without installing SDK, but I recommend to install it because it contains lots of helpful things, such as Viewer and examples of our scenes.
Awesome
And you?The main question is - what exactly do you want to do? Look here, it's my veeeeery simple example of interaction by using NLA scripts. Also read the whole topic, maybe you'll even find an answer :)
BTW, this scene was made without programming, too.
In our new release (14.10) functional of NLA scripts will be greatly improved, so we gonna make a tutorial about this (and about other new features, too
) So I recommend to download 14.10 to try this feature, if you want to try it by yourself And sadly NLA-based scenes made by older version won't work in new version of SDK 
And one more thing. You can use this NLA scripts without installing SDK, but I recommend to install it because it contains lots of helpful things, such as Viewer and examples of our scenes.
24 October 2014 11:00
No, right now exported Vertex anim on freshly added plane, everything works fine. There can be some things:
-If you used shape keys, it won't export, right now shape keys are working only by using workarounds, for example, using addon New Tek MDD format and modifier Mesh Cache Here is the workflow of this process.
If you're not using this, then see if you:
-Baked VA in our VA baker
-In Object Export options (tab Blend4Web) turned "Export vertex animation" and "Animation: Use default" and "Cyclic" on.
That must work!
No, I recommend it as Blender user What is better to B4W can say our programmers (they say it's whatever, actually
 options of stack materials are just not fully supported)
Nodes just give you WAY more options to work with I started to use nodes here, at work, about 5-6 month ago, and became so addicted already
  A tortoise was my first project where I used nodes.
In free time I'm working on tutorial focused on node materials :) Dunno, when I will finish, but it won't take long.
-If you used shape keys, it won't export, right now shape keys are working only by using workarounds, for example, using addon New Tek MDD format and modifier Mesh Cache
Here is the workflow of this process.If you're not using this, then see if you:
-Baked VA in our VA baker
-In Object Export options (tab Blend4Web) turned "Export vertex animation" and "Animation: Use default" and "Cyclic" on.
That must work!
I guess you recommend node mats as being 'friendlier' to Blend4Web?
No, I recommend it as Blender user
What is better to B4W can say our programmers (they say it's whatever, actually options of stack materials are just not fully supported)
Nodes just give you WAY more options to work with
I started to use nodes here, at work, about 5-6 month ago, and became so addicted already A tortoise was my first project where I used nodes. In free time I'm working on tutorial focused on node materials :) Dunno, when I will finish, but it won't take long.